mon-goose to MON-STER

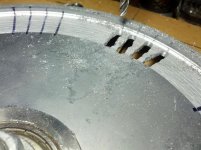
drill bit had allot of drift and was blunt so i tried my 4.5mm new bit and munched through the side plate still some drift but i straightened up the edges with a file.

really didnt go acording to plan but its not too bad. as long as the side cover is balanced at the end its all good, just might look a bit shit if my vents arnt too straight.
 
got all my batteries now so this weekend i plan on cutting fram and inserting the battery box. also my new front wheel should be here soon, the other new components from CRC should be here for next weekend.. also for some reason forgot to order balance lead paralleling harnes things, so put that through yesterday. other HK componenets should be on the plane as we speak/type/read :)

I'm totally eyeballing some nanotecs wanting 36s lipo woohoo! ill have to do my best at thrashing the 20c turnigys then i'm thinking 12 x 6s 4000mah should fit in my battery box, configed to 36s 8ah charged to 4.15v / cell gives just under 150v :) ebikes ca sim says 85kph and the acceleration , well we can only imagine it would be something like stock 250cc 2stroke bike. (stuck in 1st and a half gear? sort of with no power band hmm can't really compare but that would be my guess at a compareable referance) anyway should put out about 5kw+ actual power at the wheel with weight inc rider about 111kg.. ahh pipe dreaming there.. back to reality i have to build the MOFO first.. the full moon screwed me this week (middle finger to the sky aghh).. loonatic massive.. anyway.. hopefully ill have heaps of posts about doing good work this weekend :)
 
I'd hold fire on 36s.. Maybe 34 better.

I was going to go up to the full 150 volt of the 4115 too, but lots of advice and reading convinced me otherwise. It is running just too close to the FETs limit.

I have a 24 FET 4115 for my 5405, laced into 17 inch moped rims. Equates to about 22 inch bike size.

I am now looking at going to 32s maybe 34. Depends what I can do with the nano tech packs I already have.

My original plan was to use my 20s4p pack and add a booster pack of 16s4p . So I bought packs for that booster pack, but the build has dragged on soooo long, that my 20s pack now has 408 cycles on it. Not really good to series the new pack with the old pack.
So my 16s4p booster will be rebuilt as 32s2p

Are you using regen? If so, 34s better too.

34 x 4.15= 141.
34 x 4.2 = 142.8.

So this leaves you with headway for regen and a HVC of 145, so you even get regen hot off the charger
 
thanks NeilP

woho my lights just blew,...

anyway yeah ill look at a combo for 32s , i was looking at 30s as a serious second placer too... 10s packs can be charged with the big 10s chargers and balanced at the same time. :) would be nice to charge at 1kw and it be balanced to.
 
Neil, yeah thanks for that idea, i was looking at options and found that i can get 21 of these http://www.hobbyking.com/hobbyking/store/__9461__Turnigy_2200mAh_5S_30C_Lipo_Pack.html
and run 35s3p for 147v 6.6ah , not bad... regen at 150v should have some good efect especialy with no disk on the rear.
 
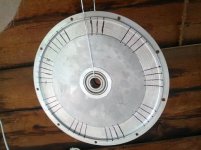
Having trouble uploading pics for some reason but I got the vents on 1 plate (disk side) done, drilled 6 10mm holes in the spaces in the disk extension/mount. The vents are a bit wobbly in places but its not too shity, I file-ed them at the outer perimeter to get Max air ventage over the windings/coils. They are about 5mmx25mmx36slots so thats 45square cm equivalent of 6.7cm x 6.7cm that's a decent vent and the slight turbine effect of 36 edges pushing and pulling the air to the circumference and venturi effect over all those edges should be significant enough not to discount. As for the gear side , well it was a time consuming head fucj to make vents so I'll do a bunch of holes on the perimeter. The gear side plate being closer to the centre of the hub takes most load and could be of benefit to have it being stronger(remove less metal). I must admit I am getting distracted by beer and stuff but hey ,life?.. anyway if I ride it on easter then deadline achieved:) and Adelaide cup long weekend is next weekend ... you beauty !
 
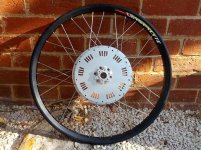
Got 3 deliveries today. 2 from crc, wheel + assortment of goodies like brakes n stickers , they sent the wrong stem though and it won't fit so I took photos and emailed. I hope they just send what I ordered and pay for and leave it at that. Hk stuff came so I can get started on the wireing harness. The 8mm wide plugs are way harder to push together than I imagined they could be, I'll need a crow bar to unplug the series conector. Got 10 gauge wire but its not as thick as I thought, might go 8g for some longer pieces, phase /power. Handle bar is nice and big and nice shape :)
 
pendragon8000 said:
View attachment 1
above, not all filed flat at outer ends.(some are)
below, all filed and air in holes drilled near centre.

it looks way cooler with the coils behind the vents.
Nice Job with the cover. It looks cool :p pun intended
 
Falco said:
pendragon8000 said:
View attachment 1
above, not all filed flat at outer ends.(some are)
below, all filed and air in holes drilled near centre.

it looks way cooler with the coils behind the vents.
Nice Job with the cover. It looks cool :p pun intended
cheers, yeah if i get motivated ill spray the windings (and stator?) with enamel and drill the other plate, it would be nice to have vents on both sides but it takes SOOOO long to drill and file all the holes. then i can put it all together with my 7 speed 11-32 that i got today.
bit bumed out because i got sent a thumb throttle instead on a CA V3 from ebikes.ca they sent the wrong item. sory to name and blame the ebike.ca crew cos they are such a great company but they buggered this order i just got. the invoice says "v3 cyclalanalyst direct plug" ill see how they respond and report for everyone.
 
Ebikes.CA aka grin technology have messaged me saying I can keep the thumb throttle and they are sending a CA v3

Also received the correct head stem from crc. I'm really keen to get it all on the bike. I'll have to start cutting and welding this long weekend.

I think the grips will end up quite close to the seat, about 6 cm closer than on my Scott spark xc 29er so if anyone knows of pros and cons of that element of geometry please let me know your thoughts. Cheers.
 
Nice work on the slots. I drew up something similar a while back but didnt get around to doing it for the same reasons you've found - it's too time consuming and hard to get neat. I found a bloke with w CNC machine who was happy to do it for me but it would have been a bit expensive for something cosmetic like that when normal old round holes are just as effective.
 
Thanks Jay, yeah its a bit cosmetic, but I wouldn't be totally satisfied if I didn't try it. I do think the turbine effect will make some difference , although small. And the more leading edge for venturi effect should also make a difference.

Just got a pm from Rix about geometry, I asked his opinion 'cos he seems to be very knowledgeable in such things.
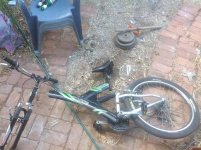
So I might file the frame back in a way that gives a less steep rack (steer tube angle) 'cos it will be a bit twitchy at speed. It feels beautifuly nimble at low speed atm . But I have to re do the steer tube housing anyway for the new fork so I might as well set it for average speed. Also the photo at the start of the thread doesn't show angle after rear suspension sag, and that's about 3.5cm so I'll have to take some side on photos with the sag I'll have. Also new fork is longer so that will increase rake to, I'll have to get my algebra on!
 
Geometry-handling3.jpg

was looking at this to help me with geometry and realised when i was saying "RAKE" meant "TRAIL" .. sory folks, not many ppl talk about it with me so i dont get the definitions locked in to my brain :oops: :p
EDIT:
maby i did mean the right term... anyway i was talking about the slope of the steer tube prety much, thats the issue at hand...
 
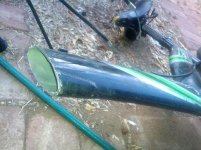
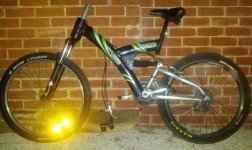
monocycle mongoose.JPG
straightish cut.JPG
also got the motor back together and used blue lock tight to hold the screws in. told the guy in bunnings what it was for and he said "an Ebike?" and told me he had a carbon frame he wants to motorise and so i showed him my scott spark out the front, told him about keplers build with the carbon frame and told him he has to get on ES.. anyway back to my build.. i put the gear side plate on, oposite side screws working around then removed 1 at a time and put a drop of lock tight on there and put the screw back in pretty tight but not damaging head. then lower rim/rotor down over the guts that i had enamel sprayed and she clunked back into place, but unfortunately needed a little help to get the axle all the way into the hub so i put the other side plate on and used the gear puller to push the axle through to the other side, didnt want to go so i tried to wind up the diy scisor jack and wiggle the wheel, then unloaded the puller/pusher and she poped into place :) joy.. so i repeated the screw in process on that side. ill add a photo of that later.. im thinking ill shorten the stock wires and put the conectors closer to the hub then add some 8g wire from the controller to the hub conectors and i have the beautifull 8mm gold plated plugs. it would be awsome to have 8g all the way to the windings from the fets but thats allot of work for upgrading about 30cm of wire. the other 70cm or so of wire will be way more than required so that will be nice. i have the thought of paying hundreds of dollars for batteries and controller that can put out more power only to have the electrons restricted by wire thats not thick enough.. hence the 8mm conectors and fat wire. still need a buzzer for the 70deg C thermostate in the controller, and make a voltage divider for it to give aproximate drop from 150v to max buzzer, so when im running the 100v for now it will still work , should be able to find a 30v-6v buzzer or something..

also got my 24v horn today. ill just rig it up through one 6s pack so for the most part it wont effect the balance of the pack and the few seconds of 100w or so it pulls shouldnt make a significant diference. (idea stolen from a ES board memeber)
it reminds me of an 80's mazda for some reason with its "low tone" bit more ballsy than the scooter horn i got from hyena but its about 50% bigger to.
 
Ok, whats going on with that frame? This isn't the result of excessive carb loading is it? (evidence on the seat) :lol:

BTW, i like the slots too. Looks much more OEM then holes. I think this is how I would vent a motor also. Having a mill will be handy. :)
 
Kepler said:
Ok, whats going on with that frame? This isn't the result of excessive carb loading is it? (evidence on the seat) :lol:

BTW, i like the slots too. Looks much more OEM then holes. I think this is how I would vent a motor also. Having a mill will be handy. :)
Cant remember what OEM stands for, but sounds good (ill work it out). the seat, well it was a bit old when i got it 10 years ago so yeah, my GF said should would buy me a nice seat for it for my Bday in a month. I dont know about carbs but maby curry and yiros farts ate through the seat? :D

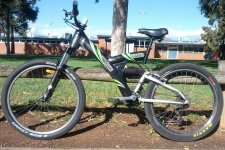
heres the mod so far. check the less steep fork angle i got!
FORKING HELL.JPG
Its less steep than my XC scott spark, and almost as long wheel base now. i think i increased the wheel base by about 5cm. i may have been a bit over kill with the angle i cut the frame at but oh well, she'll be a sweet ride at high speed now :)
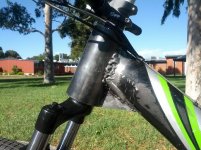
btw its only tak welded atm..
 
lol, well i love beer and to be honest there are a few bottles around, i try not to show my mess too much when i take photos for everyone, my work bench has about 5 different types of empty bottles.. rogers , coopers sparkling, becks, squire larger, squire pilsner, and a stiltskin cider, and strong bow cider. i do drink a fair bit, i should brew again but then i get a bit out of controll with beer on tap, i have had to brew mid strength, its like having a glass of water with every beer...
 
just used a calculator to work out the aproximate angle is 64 deg stem angle.. thats prety low, might have to compensate by pumping up rear suspension and lowering front (just a little) but its a workable range i have to play with so im happy, and it will be better for less experianced friends when riding with me, they will have more balance at high speed..
 
test ride new forks - bottle shop run.JPG
fat weld there big and there cheesy.JPG
It feels AMAZING!! the new shocks were so worth all the effort of modding the frame and i totaly fluked some sik geometry, well there must have been some skill right? :)
anyway im really looking foward to getting it powered up now, it should handle beautifully over a bit of rough stuff and at high speed.
also note the triangular extra bracket i added under the steer tube housing, arc welds tend to be brital so i went over kill cos i have had welds break and it sucks...
 
Ah I missed the bit earlier where you planned to mod the frame. I thought you'd stacked it and snapped it at first!
And now that it's welded like that I'd be all the more cautious of that happening :lol:
I'm no pro welder myself but I'd be a bit shy of riding it hard or at speed. I'd be inclined to put a gussett on it too, in that gap on the underside.
What are you using for the head tube ? Looks somewhat oversized! I can't see a headset, have you just use bearings with an OD to suit the tube and ID to suit the steerer ?
 
Back
Top