The Cycle Satiator, universal charger for the enthusiasts

Just to be sure, you are holding down the button as the Satiator is plugged in and the screen stays blank?

To Justin,

Can we have some indicator that the Satiator is in bootloader mode besides just a blank screen?
 
mrbill said:
I got the device driver loaded OK, and it was assigned to COM11--I seem to have no choice about this.

Can you check your device manager and see that COM11 is identified as the USB Serial Port? It should also vanish when you unplug the USB cable from the computer.

Does the tool give this error when I attempt to update with the same version of firmware? Shall I take it on faith that all will work when the next version of firmware is released, or have I got a setup problem that still needs to be addressed?

There shouldn't be any issues reloading the same firmware, so this is definitely a problem that will need to be addressed. As Cal3thousand said, do make sure that the satiator is in bootloader as identified by the completely blank screen. Assuming it's not that, then next thing I would do is eliminate a TTL->USB cable issue by using the same cable to program your Cycle Analyst. It should work just fine reading and writing CA3 settings via the CA3 setup utility, and if it doesn't then we know there's a problem with the cable.

If it does work fine on the CA3 but still not on the Satiator, then the next area we would look would be for a wiring issue in the XLR -> TRS adapter cable.

cal3thousand said:
To Justin,
Can we have some indicator that the Satiator is in bootloader mode besides just a blank screen?

Unfortunately not. The bootloader is rather writ in stone at this point, and we wanted to keep it as small as possible which doesn't give allowance for initializing and writing to a graphics display screen. However, the planned workflow in the V1.0 firmware will involve navigating to a setup menu on the Satiator that gives a "Connect to PC" option, and selecting this will then jump the program into bootloader while hopefully leaving a static message on the screen, so that should be more informative to the status. There will always still be the option of holding the button during power on, but that would be more of a last resort if the firmware was corrupted.
 
I am so excited for this charger. It really opens up a lot of potential for people, especially those who want to ride to work, but are dissuaded from doing so because the trip is too long.
 
justin_le said:
cal3thousand said:
To Justin,
Can we have some indicator that the Satiator is in bootloader mode besides just a blank screen?

Unfortunately not. The bootloader is rather writ in stone at this point, and we wanted to keep it as small as possible which doesn't give allowance for initializing and writing to a graphics display screen. However, the planned workflow in the V1.0 firmware will involve navigating to a setup menu on the Satiator that gives a "Connect to PC" option, and selecting this will then jump the program into bootloader while hopefully leaving a static message on the screen, so that should be more informative to the status. There will always still be the option of holding the button during power on, but that would be more of a last resort if the firmware was corrupted.

I suspected that much, but it couldn't hurt to ask :wink:

A navigation screen should be a good way to get to the bootloader and know it, even if the display doesn't stick.
 
cal3thousand said:
Just to be sure, you are holding down the button as the Satiator is plugged in and the screen stays blank?

Yes, the screen is blank after I plug in the Satiator while holding down the lower button.

justin_le said:
Can you check your device manager and see that COM11 is identified as the USB Serial Port? It should also vanish when you unplug the USB cable from the computer.

Yes, it is defined as USB Serial Port -- COM11. And, it appears as a device on my computer when the USB end is plugged into my computer, and it disappears as a device on my computer when the USB is unplugged from my computer.

justin_le said:
[... The] next thing I would do is eliminate a TTL->USB cable issue by using the same cable to program your Cycle Analyst. It should work just fine reading and writing CA3 settings via the CA3 setup utility, and if it doesn't then we know there's a problem with the cable.

I read data from one of my CAV3's without any problem using the TTL -> USB cable provided with the Satiator. I didn't want to write, but I assume that if it can read, it can also write.

justin_le said:
If it does work fine on the CA3 but still not on the Satiator, then the next area we would look would be for a wiring issue in the XLR -> TRS adapter cable.

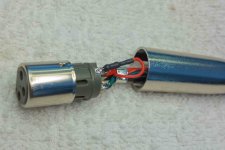
Continuity through the pins of the XLR -> TRS adapter cable is given below. The only surprise was the insertion of a passive device with approximately 975 ohms resistance in series between Pin 1 of the XLR and the middle ring on the TRS jack. The device is shrink-wrapped, so I can't confirm what it is without removing the wrap, but it looks like a 1/4 or 1/8-watt resistor.
20140711-DSC07215.jpg

Code:
XLR            AndersonPP                   TRS
----           -------------                ----
1              red                          middle ring,via passive device described above - red wire
2              (no connection)              tip - green wire
3              black                        base - black wire

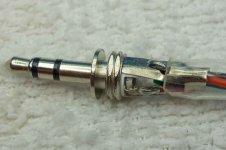
While I was checking the XLR -> TRS adapter continuity, I noticed that the solder tab for the middle ring on the TRS plug was almost shorting out with the solder tab for the tip. I pried the middle solder tab away slightly and could see that the white insulation material had been cracked where the middle solder tab had been bent inward, presumably during initial assembly, to allow the clear plastic insulation to slide over the middle and inner solder tabs on the connector.
20140711-DSC07214.jpg

What shall I do next?
 
mrbill said:
I read data from one of my CAV3's without any problem using the TTL -> USB cable provided with the Satiator. I didn't want to write, but I assume that if it can read, it can also write.

That's not strictly true. If you can read the settings from the CA3, then that involves 2-day communication and indeed it confirms both the TX and RX lines are working. But if the CA3 is plugged in and streaming data, then you will still be able to read this fine even if the TX part of the TTL->USB cable is blown. That's actually what was happening on our end which was a bit tricky to piece together. Without the small zener diode protecting the tip of the TRS plug it could damage the Tx functionality of the cable when plugged into a live satiator, but the Rx functionality is all there.

Continuity through the pins of the XLR -> TRS adapter cable is given below. The only surprise was the insertion of a passive device with approximately 975 ohms resistance in series between Pin 1 of the XLR and the middle ring on the TRS jack. The device is shrink-wrapped, so I can't confirm what it is without removing the wrap, but it looks like a 1/4 or 1/8-watt resistor.

Are you sure you mean Pin1 and not Pin3? There should be a 1K resistor between the middle ring of the TRS and the communication line (pin3). This is required for bidirectional communication on a single wire into the charger.

Code:
XLR            AndersonPP                   TRS
----           -------------                ----
1              red                          middle ring,via passive device described above - red wire
2              (no connection)              tip - green wire
3              black                        base - black wire

Should be:
Code:
XLR            AndersonPP                   TRS
----           -------------                ----
1              red                          No Connection 
2              black                        base - black wire
3              (no connection)              tip - green wire, middle ring - red wire via 1K resistor
 
justin_le said:
mrbill said:
I read data from one of my CAV3's without any problem using the TTL -> USB cable provided with the Satiator. I didn't want to write, but I assume that if it can read, it can also write.

That's not strictly true. If you can read the settings from the CA3, then that involves 2-way communication and indeed it confirms both the TX and RX lines are working. But if the CA3 is plugged in and streaming data, then you will still be able to read this fine even if the TX part of the TTL->USB cable is blown. That's actually what was happening on our end which was a bit tricky to piece together. Without the small zener diode protecting the tip of the TRS plug it could damage the Tx functionality of the cable when plugged into a live satiator, but the Rx functionality is all there.

Hi Justin:

I used the Satiator TTL cable (FT230X Basic UART, COM11) to program the CAV3. I had no trouble reading data setup data from the CAV3, but it took me several tries to write setup data. About 1 out of 4 tries succeeded. I'm not sure why the write process is so unreliable. Fortunately, I don't need to do that very often, but it is disconcerting. I should also note that when I plugged in my Satator TTL cable, my laptop (Win7 Professional) attempted to install a Microsoft mouse driver in addition to the already existing UART driver present that had been installed at an earlier session a few days ago. I manually uninstalled the mouse driver before attempting to read or write.

As a further test I used the CAV3 TTL cable (TTL-232R-AJ FTDI, COM8) and read and wrote to the CAV3. Again it took me a couple of tries to get a successful write. So, maybe the write unreliability has some other non-Grin-provided-equipment cause, or maybe I need to follow a strict turn-on and connect procedure. My CAV3 is connected directly to my controller, a Lyen 12-FET Mk II, so the controller is powered when the CAV3 is powered.

Success is more likely if I follow the procedure:

1) Connect only the USB end to my laptop.
2) Start the write process (until I get the modal dialog to select the port).
3) Power on the CAV3 (and controller) and wait for the CAV3 splash screen to finish its routine.
4) Plug the TRS plug into the CAV3.
5) Continue the write process.

I confused Pins 2 and 3 on the XLR.

Here's the correct table of what I have.

Code:
XLR            AndersonPP                   TRS
----           -------------                ----
1              red                          middle ring, in series with 1k resistor - red wire
2              black                        base - black wire
3              (no connection)              tip - green wire
Zener diode on TRS plug goes between tip (cathode) and base.

Here's a photo of the XLR connector wiring:

http://endless-sphere.com/forums/download/file.php?id=141746

It looks like the series resistor and red wire need to be moved from Pin 1 to Pin 3. Could you please confirm this before I break out the soldering iron?

Thanks.
 
mrbill said:
Here's a photo of the XLR connector wiring:
http://endless-sphere.com/forums/download/file.php?id=141746
It looks like the series resistor and red wire need to be moved from Pin 1 to Pin 3. Could you please confirm this before I break out the soldering iron?

Yes indeed! This totally looks to be the source of the problem. The communication wire should be coming off pin3 and not pin1. Looks like someone here had the soldering equivalent of a typo when assembling that cable adapter. Let me know if that works, or at the very least results in a different error message. It is still a bit strange that your success rate on reflashing the CA3 is not 100%, there is an output log file of the flashing process that might be informative here.

-Justin
 
Most of our Cycle Satiator development and testing was done either indoors or in the relatively cool outdoors of Vancouver, and typically at max power the satiator temperature would reach 65-68 oC, which is just below the point of thermal rollback (70oC) and so the power was not limited. However, a lot of people are using it in hotter climates, and now that we're having a summer heatwave here in Vancouver we are also seeing the Satiator become power limited at less than 360 watts. My last charge I had it out in the full sunshine, 30oC outside temperature, charging a 52V nominal battery and the power was being reduced about 290 watts in steady state. A few people have commented that they've taken to putting a damp rag or giving a squirt of water on the satiator casing in order to improve cooling and get the max output current.

Anyways, we'd love to capture a bunch of actual reference numbers that beta testers are seeing for when the Satiator does go into thermal rollback. You can either post that info here, or I've also created an online google forms submission which will help us organize the data

Thermal Rollback Form.jpg

Depending on the numbers there is a chance that we'd make a clamp-on finned heatsink that people could attach to the top flat surface of the Satiator and help it get full power specs even in hotter conditions. Also, people overseas running off 220V AC _should_ see better performance here as the overall efficiency of the charger is almost 1% higher with a 220V input compared to a 110V input. It will be neat to see of the real world feedback bears this out.
 
justin_le said:
mrbill said:
Here's a photo of the XLR connector wiring:
http://endless-sphere.com/forums/download/file.php?id=141746
It looks like the series resistor and red wire need to be moved from Pin 1 to Pin 3. Could you please confirm this before I break out the soldering iron?

Yes indeed! This totally looks to be the source of the problem. The communication wire should be coming off pin3 and not pin1. Looks like someone here had the soldering equivalent of a typo when assembling that cable adapter. Let me know if that works, or at the very least results in a different error message. It is still a bit strange that your success rate on reflashing the CA3 is not 100%, there is an output log file of the flashing process that might be informative here.

-Justin

OK, success at last.

I switched the the resistor lead to Pin 3. I also discovered another problem with my process and one remaining issue with the Satiator update process.

I had been until now been running these apps over a fileserver at a remote location. I suspected this might be causing latency issues in both the CAV3 Setup Utility and the Satiator Update Tool. Both of these tools appear to have short timeouts, especially the Satiator Update Tool. Perhaps the timeouts can be lengthened in the next release for each of these tools.

After copying all program files for the CAV3 Setup Utility and the Satiator Update Tool to my local drive, I was able to run these successfully without error. In the case of the CAV3 Setup Utility, I ran it successfully four out of four times in succession.

One remaining problem gave me a brief panic. I think it's related to short timeouts, and it ought to be addressed. When I power up the Satiator in Bootloader Mode, I need to count to ten or more before clicking the Update Firmware button. If I click Update Firmware button too quickly after powering up the Satiator, the update proceeds through the "Erasing Flash" and "Loading File", but fails at "Uploading", and "bricks" my Satiator. See attached log file for more information.

View attachment outputlog-Tue-July-15-2014--4-56-26-pm.txt
Fortunately, starting the update process again, this time counting to ten, then clicking "Update Firmware", resulted in a successful upload and "un-bricking".

Lastly, I was happy that my custom profiles survived the adventure.
 
If it's actually waterproof, I guess those with a real need to run it in the heat could put a misting bottle on the hot surface(s). ;) Or even submerge the parts of it that don't have electrical connections, though that might not be a good idea.
 
amberwolf said:
If it's actually waterproof, I guess those with a real need to run it in the heat could put a misting bottle on the hot surface(s). ;) Or even submerge the parts of it that don't have electrical connections, though that might not be a good idea.

Even a small sunshade would help. That black metal case got pretty warm sitting in the sun unplugged; Even warmer than it gets charging at 200W on carpet.
 
I could swear i read at one point that it was possible to setup custom charge profiles from PC and flash/upload them to the charger...

I got the firmware update tool, cable, the .hex file .. but i'm either missing an obvious step or was dreaming it up. ... what did i miss ? :oops:

Have tested it on the Fatbike a few times, the only bike in my collection with a BMS so i had to limit this to 4 amps argh.. needs a BMS bypass this bike does.. on the To Do list for tomorrow.
 
Ypedal said:
I could swear i read at one point that it was possible to setup custom charge profiles from PC and flash/upload them to the charger...

I got the firmware update tool, cable, the .hex file .. but i'm either missing an obvious step or was dreaming it up. ... what did i miss ? :oops:

Have tested it on the Fatbike a few times, the only bike in my collection with a BMS so i had to limit this to 4 amps argh.. needs a BMS bypass this bike does.. on the To Do list for tomorrow.

It's on the 'todo' list. I presume when firmware passes v1.0 or possibly before for us Beta members.
 
Ypedal said:
oh.. :| ... sorry... i have at least 6 profiles to create... good way to test the durability of the buttons ! :p

You'll certainly get acquainted with the interface that way! For us guys that already use CAs and accustomed to Grin's 2-button menu system have an advantage already :D
 
cal3thousand said:
Even a small sunshade would help. That black metal case got pretty warm sitting in the sun unplugged; Even warmer than it gets charging at 200W on carpet.

Yeah, black radiating surfaces are a 2 way street in the heat flow paradigm. Back when the prototype enclosures were being CNC machined, the chargers that were left with a raw aluminum finish ran almost 10 degrees hotter than those which were painted or anodized black. However, sitting in the sunshine with no power, I'm sure they'd stay quite cool while the black ones cooked themselves.

Thermal input energy on a Satiator (~200cm^2) in full sunlight (~1000 W/m^2) is 20 watts. Internal heat generated charging at 200 watts (assume about 93% efficiency in this case) is 14 watts. So that pretty nicely correlates to your observations, and certainly suggests there's a lot to be said for placing it in the shade when charging outdoors.
 
justin_le said:
cal3thousand said:
Even a small sunshade would help. That black metal case got pretty warm sitting in the sun unplugged; Even warmer than it gets charging at 200W on carpet.

Yeah, black radiating surfaces are a 2 way street in the heat flow paradigm. Back when the prototype enclosures were being CNC machined, the chargers that were left with a raw aluminum finish ran almost 10 degrees hotter than those which were painted or anodized black. However, sitting in the sunshine with no power, I'm sure they'd stay quite cool while the black ones cooked themselves.

Thermal input energy on a Satiator (~200cm^2) in full sunlight (~1000 W/m^2) is 20 watts. Internal heat generated charging at 200 watts (assume about 93% efficiency in this case) is 14 watts. So that pretty nicely correlates to your observations, and certainly suggests there's a lot to be said for placing it in the shade when charging outdoors.
Edited. My bad, need coffe :(
 
I am charging to 49.8V at 7A and the charger reports 342 watts and 60-63 Celsius. This seems pretty hot. The ambient temperature is approximately 75 Fahrenheit I am not certain where the temperature probe is taking its measurement from but won't this have a degradation effect on the components over time?

Also If I am charging to 4.15V/cell instead of 4.2V/cell, should there still be a trimming of current prior to cut off? In other words would it be possible or smart to set this to happen?
 
amigafan2003 said:
Damn, 2.25v short of what I need (15s lipo charged to 62.25v).
:-(

Well, a little work around but you can go up to 63V using a lead acid profile instead of a Lithium profile. In order to allow worst-case equalization voltages for SLA charging we allowed that up to 63V, (though for regulatory it is still nominally a 60V max output). Just make sure to customize the float voltage to be the same as the full charge voltage, rather than taking the default value.

That said, your LiPo will last much longer for cycle life if you only charge it to 60.0V, just won't give you quite the same range.

-Justin
 
JoyRiddin said:
I am charging to 49.8V at 7A and the charger reports 342 watts and 60-63 Celsius. This seems pretty hot. The ambient temperature is approximately 75 Fahrenheit

In this case you aren't in thermal rollback at all. 49.8V * 7A = 342 ish watts (given rounding approximations). You'll only have thermal rollback when the internal temperature hits 70oC.

I am not certain where the temperature probe is taking its measurement from but won't this have a degradation effect on the components over time?

Cooler is definitely better but all the internal electrical components are spec'd for continuous operation at at least 100oC, so it's still well below the temperature where we'd worry about the life of any internal parts. Our main concern is the OLED display module, since the life of organic LED's is certainly impacted by higher temperatures. Only time will really show how much of a degradation will happen, and the screen saver is there to minimize this. I certainly hope that 5-10 years on the display is still fully readable, if a bit less bright. This is also why we wound up with a yellow display, as opposed to the blue which we had started with; the lifetime spec to 50% brightness on yellow was over twice as long.

Also If I am charging to 4.15V/cell instead of 4.2V/cell, should there still be a trimming of current prior to cut off? In other words would it be possible or smart to set this to happen?

You'll have a trickle current regardless of where you set the cutoff. So if you set the Charge Complete Amps to say 1A, it will still continue the trickle top up at 0.9A, 0.8A, 0.7A..., but the screen will simply say "Charge Complete" during this region. The charge time counter will stop incrementing, but the charge amp-hours should keep slowly climbing up. We were considering having the accumulated amp-hours after the "charge complete" text stored in a different register so that you could see the amount of trickle/balancing amp-hours that went in independently of the bulk Ah, but it wasn't felt that valuable to implement at this stage.

-Justin
 
Well everyone on the Beta program, it is time to update to the V0.809 firmware!

This is available for download here

We've also got a website now to consolidate all the Satiator info and downloads/documents in a single place:
http://www.ebikes.ca/product-info/grin-products/cycle-satiator.html

So at the "Downloads" section you can access the latest .hex files, the software utility for updating the firmware, as well as additional documentation and profile creation tools once we have those ready and available:
Downloads Page.jpg

And in a similar manner to the V3 Cycle Analyst, we've created both a google form for submitting bug reports or feedback:
https://docs.google.com/a/ebikes.com/forms/d/1C59qSz1pfaOu14tUC4pzSYBd8Gv1XyAt01jNeu5igX0/viewform

and have also shared a publish sheet that shows the known bugs and immediately planned enhancements for the next firmware releases:
https://docs.google.com/spreadsheet/pub?key=0AhABuMmPaEBkdExMVS1kWnFSbjROUlAyeEdZdkVsWmc&single=true&gid=1&range=PublishedCells&output=html
Bugs and Features.jpg

The V0.809 addresses a number of the bugs shown here, including most importantly proper charger termination with the NiMH/NiCad profile. I'm hoping to have this updated to show clearly all the changes in the 0.809 build in the next day or two. In the meantime though, this is a chance for everyone who hasn't yet to make sure that they can successfully execute a firmware reflashing with the hardware cables and software utility. -Justin
 
justin_le said:
amigafan2003 said:
Damn, 2.25v short of what I need (15s lipo charged to 62.25v).
:-(

Well, a little work around but you can go up to 63V using a lead acid profile instead of a Lithium profile. In order to allow worst-case equalization voltages for SLA charging we allowed that up to 63V, (though for regulatory it is still nominally a 60V max output). Just make sure to customize the float voltage to be the same as the full charge voltage, rather than taking the default value.

That said, your LiPo will last much longer for cycle life if you only charge it to 60.0V, just won't give you quite the same range.

-Justin

Hmm, so just to be clear be I stump up some cash, the lead acid profile is still a cc/cv method suitable for lipo? And you can set end charge to say 62v (as long as float charge is 62v as well)?

I might take one pack out and measure the Ah difference between 4.15v and 4v as well.
 
I have a custom battery pack I made myself from old laptop cells. The batteries are 4S20P for a total battery voltage of 16.8v and 40Ahr per battery if charged to 4.2v per cell. The total battery pack is 4 x 16.8 = 67.2v with no BMS. Will your new charger be able to bulk charge this custom voltage battery pack? I balance the batteries manually when necessary using balancing leads to the batteries to each 20 cell string.
 
Back
Top