bbs02 installation question

izeman

1 GW
Joined
Jun 21, 2011
Messages
5,131
Location
Vienna, Austria
got a bbs02 kit from paul/cellman. as always WONDERFUL service, and MOON as a great support!! everything came packed very well and in perfect condition.
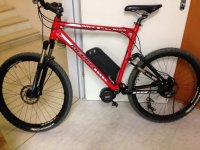
i started installing it on a friend's bike (who needs to be electrified ;)) and the bike seems to be the perfect candidate for the bottle mount battery.
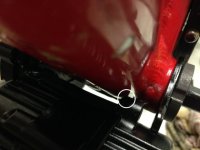
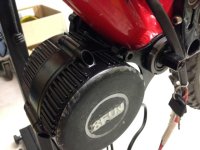
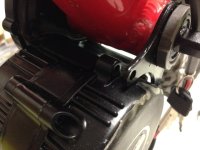
installing the motor is easy, but the lower frame is very wide, so i can't move the motor flush to the frame. the contact point is the case where it's screwed to the bottom bracket's bracket. *ggg*
i thought i could file it off a bit (the white circle in the second picture) as it should still be strong enough afterwards. what do you guys think?

nice bike:

IMG_0137.JPG
and this is where the motor touches the frame:

IMG_0136.JPG
 
The same thing happens on my fatbike. I'm just going to file off some of the motor tab. No problem other than possibly voiding the warranty.
 
izeman said:
how would that help? i want the motor to move upward more closer to the frame and the screw mount is in the way - well a part of it.
the motor is meant to butt up against the down tube. There is a thin piece of rubber on the motor at this point. Just add a shim there so the metal doesn't hit against the frame.
 
i heard that the chain line is quite bad as the chain ring is moved far to the right. so grinding away 5mm from the right side would solve three problems:
.) chain line
.) motor mount not touching the frame
.) i can install both rings on the bb
if i ever need to remove the kit i can install a 68mm bb or use a 73mm and a 5mm spacer.
 
maxwell92036 said:
izeman said:
73mm unfortunately. i may make the bb narrower with a grinder.
why do that?
I installed one on my Ti framed bike with a 73 mm BB she'll. It worked fine. Plus I don't think it will solve your main issue. And I wouldn't start grinding away on the motor either.
do you have close up pictures of the installed motor?
 
izeman said:
i heard that the chain line is quite bad as the chain ring is moved far to the right. so grinding away 5mm from the right side would solve three problems:
.) chain line
.) motor mount not touching the frame
.) i can install both rings on the bb
if i ever need to remove the kit i can install a 68mm bb or use a 73mm and a 5mm spacer.

No need to grind anything. It's not really clear from your pictures but you seem to face 2 problems arising from your use of a frame that the BBSxx is not designed for.

That is:
1. your down-tube seems to be an irregular shape and is pressing against one of the motor casing flange bolt mounts on the left side.
2. Your BB appears to be too wide (wider than 68mm anyway).

If you want to persist with this installation I'd suggest 2 simple solutions.

For problem #1, as someone has already suggested, just get a solid spacer that will go in between the curved motor casing and an appropriate contact point on the front surface of the down tube. I have found that a small section cut from a 14mm diameter hull 'bung' (extremely dense rubber) from a yachting supply shop was ideal for this purpose. Just shape a bit to fit the curved tube and glue on with contact cement.

For problem#2, use solid SS washers (or make some spacers from alu tubing) to put into the gap between left-side mounting flange and the threaded motor casing mounts. Trial tighten the BB ring first so you get a reliable measurement of the gap involved and select the number of washers or the spacer required. Do not use the original screws that some with the kit - they will be too short and you'll end up stripping threads in the motor casing (please don't ask me how I discovered this elementary point!) From memory, I think one of the 2 casing threads is 'blind' (that is, not open at it's end). With the flange secured by the BB ring, use a small rod or similar to measure the depth of the blind thread in the casing then add the 'gap' between casing and flange and then the thickness of the flange. This total - minus 1 or 2 mm for end clearance - is the maximum length of the 2 new M6 bolts you need to go out and buy (or cut from longer bolts).

This is a much easier strategy that grinding or cutting anything at the BB and is perfectly secure! Don't forget to use Loctite on the BB ring. Don't worry too much about chain line issues. IMHO it's an overly emphasised 'problem' and can be improved a bit by simply using less cogs at the rear - for everyday road use with the BBSxx you only need 3-5 gears anyway. Just set the derailleur stops to use the highest few gears on the cassette or freewheel (starting with the smallest) or - if you need your low gears for hills - just reconfigure your cassette with fewer 'smaller' or 'in between' cogs using appropriate free hub spacers to move the combination you end up with further to the right side of the wheel and set the stops on your derailleur as needed. I've used both these approaches quite satisfactorily.

Savvas.

Ps; I'd add - and I know it sounds a bit 'school-teacherish' - that the installation of the BBSxx kits will obviously be much simpler of the frame chosen is one the kit is designed for. There must be millions of such frames and bikes available - new and used - on the planet. Apart from an old Moulton APB, the kit will fit every one of the dozen or so bikes in and around my bike shed. All road or older MTBs to be sure, but all suitable candidates! Just a thought...
 
I have just intalled a BBS02 on a Giant Trance. Same problem with the lug for the bolt. I filed the metal down on an angle just enough to get the motor flush with the down tube.

I also had to take off 1mm of the top of the lower RH swingarm bolt. May only be specific to the Trance, but something else to look out for if you're thinking of grinding the BB.

Totally agree about the service from Paul and Moon at em3ev. Top stuff!

I only installed the kit yesterday, and after a 20km ride I can see why everybody is raving about these fantastic kits.
 
thank you all for your input. sure i can add some rubber spacer and can make some aluminium or stainless steel spacers on the lathe for the gap between the motor on the bracket and use longer screws.
but why not cut off 5mm from the right side of the bb housing? with the right tools it a minute job and it will be a perfect fit afterwards with no additional spacers or stuff. and the motor will be moved upwards by at least a cm which will be welcome to add ground clearance.
i guess i will sleep over it one more night and decide what to do tomorrow.
btw: it's not that you have any options if the customers want a special bike to be converted. do it or leave it. i chose to take the challenge :)
 
izeman said:
thank you all for your input. sure i can add some rubber spacer and can make some aluminium or stainless steel spacers on the lathe for the gap between the motor on the bracket and use longer screws.
but why not cut off 5mm from the right side of the bb housing? with the right tools it a minute job and it will be a perfect fit afterwards with no additional spacers or stuff. and the motor will be moved upwards by at least a cm which will be welcome to add ground clearance.
i guess i will sleep over it one more night and decide what to do tomorrow.
btw: it's not that you have any options if the customers want a special bike to be converted. do it or leave it. i chose to take the challenge :)

Sure thing - I agree - if you feel up to the challenge, then go ahead. I guess I am just aware that the notion of 'grinding' away at the BB has been raised a number of times, probably by less well equipped users when - for them - there are probably easier solutions. I missed mention of it being a customer's bike I'm afraid. Good luck,

Savvas.
 
rolls said:
Totally agree about the service from Paul and Moon at em3ev. Top stuff!

I only installed the kit yesterday, and after a 20km ride I can see why everybody is raving about these fantastic kits.

I shouldn't have written that so early. Just after I posted that I went out to the bike, turned it on and gave the back wheel a quick spin with the throttle and hopped on to ride around the yard. Dead. Nothing from the PAS or throttle. The display was still on with no error messages. Every time I touch the throttle there is a faint click in the motor. Less than 20km on the kit.

Going by what others have posted in the BBS02 faults and fixes thread it seems the controller has spat it. 2 emails to Paul at em3ev so far, but no reply.

If it had have been a few '000km I would still have been a bit peeved, but less than 20km? Confidence is really shot with this POS.
 
If it had have been a few '000km I would still have been a bit peeved, but less than 20km? Confidence is really shot with this POS.

Man that sucks. Mine is supposed to be arriving this Friday from EM3. Been waiting for months for this thing. If it craps out in the first day I am going to be VERY upset.

Anyhow....I am trying to do all of my prep and hardware store runs before the drive arrives on Friday in hopes that I can actually ride it that night.

I got extra washers and longer bolts on one of my kits specifically for a 73 mm BB. Nothing you can't get at most hardware stores. Just take in your shorter bolts to compare.
I solved my chain jumping off issues just by keeping the front derailluer on.

Mine will also be installed on a 73mm BB shell. Can anyone instruct me on the length of M6 bolts required and how many washers/spacers you needed? I assume you all have just used stainless hex cap bolts? Thanks.
 
After sending a few emails to em3ev I have just received a message from Moon. Paul can't answer my technical questions because he is on the way to the USA.

So much for going with a "trusted" supplier. I could be stuck for a while.

I should have gone with an AFT kit.
 
Raged said:
Check your ebrake isnt being engaged. (disconnect them altogether).

I have hydro brakes, so I'm not using the ebrakes, but I hooked one up for a test. When I activated the ebrake I couldn't hear the click coming from the motor.
 
joshseitz said:
Mine will also be installed on a 73mm BB shell. Can anyone instruct me on the length of M6 bolts required and how many washers/spacers you needed? I assume you all have just used stainless hex cap bolts? Thanks.
as this kit it supposed to go on a 68mm bb and you have 73mm you will need screws that are 5mm longer. stainless steel m6 hex will be fine. if you want it could measure the length of the supplied screws.
 
rolls said:
Raged said:
Check your ebrake isnt being engaged. (disconnect them altogether).

I have hydro brakes, so I'm not using the ebrakes, but I hooked one up for a test. When I activated the ebrake I couldn't hear the click coming from the motor.
if it would really be an ebrake problem than there would be NO SOUND at all. ebrakes totally kill the motor. it may be something in the controller. i hope my kit won't suffer from your problem and i hope you get it solved soon.
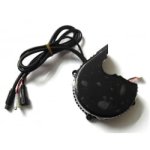
paul is very helpful, and i can understand that you're upset that you don't get your answer immediately, but even i can't answer my mail on a journey or on a transcontinental flight. ;) give him some more time and he will solve that. worst thing that could happen is, that he will send you a new controller http://em3ev.com/store/index.php?route=product/product&path=36&product_id=188 and you have to replace it.

BBS01 Controller1-250x250.jpg
problems that don't show immediately at initial testing are impossible to sort out for a supplier :(
 
Back
Top