Cree HP-LED Conversion & DC-DC Converter Assy

Greetings ES peoples –

From the land of dark winter days and pitch-black nights when the sky is spitting down large-drop rain… it is time for a modification.

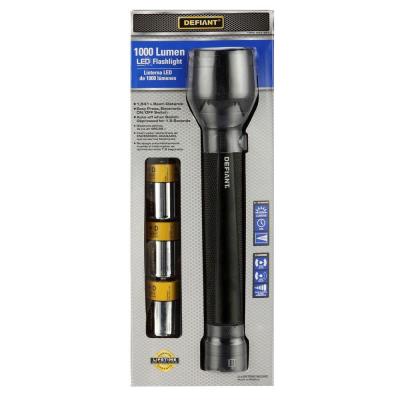
As I said in a previous post, the Cree UltraFire WF-501B units are not a good direct swap because I’d have to purchase new mounting hardware and remake the front faring to match; a little too much work.

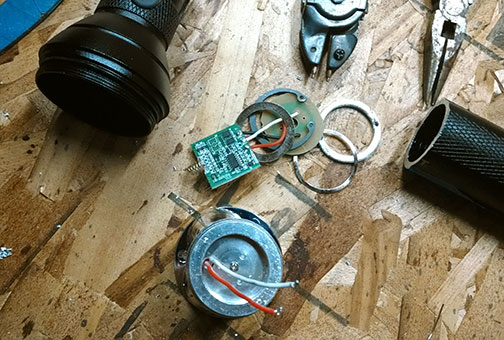
Instead, I have analyzed the problem with the UniqueFire X8 Cree XP-G R5 300L HP-LED, and it comes down to this:
  • Either I’m developing night-blindness, or the UniqueFire is slowly dimming. :?
  • The Crees are affected by the Blinkies on the same circuit, and flickering in an annoying way.
  • Reviewing the DC Input of the Crees: The range is between 2.5 to 9 VDC, and may consume up to 1000mA.
  • The DC-DC Converter driving the accessory circuits puts out 60W total; one 3.3V @ 9A max, and two 12V @ 2.5 A max.
  • The Planet Bike Super-Flash Blinkies used two AAA batteries, each rated for 1000mA+ at 1.5V, however the mfr says they’ll run for 100+ hours, therefore we must presume that the consumption is 3 VDC at 100mAh Qty-2 -> 0.6W total for the pair; a negligible amount.
My proposed upgrade would move the Crees from the 3.3 circuit, placing them on the 12V circuit, and have a set of 7808 VRs in parallel (or hang one inline to each Cree after the Wye), effectively driving the Crees at 2.4X more power.

The question that I have is that there appears to be several varieties of the 7808, with some having 1A or 1.5A output, and other lesser details. My thinking was to go for the 1.5A out because the Crees are able to regulate their own current.

So it comes down to:
  • Does the mod sound reasonable; have I missed anything?
  • Which device should I select?
My local supplier has them in stock but they are priced 5X over Digikey search. I’m in no giant hurry – other than it is beginning to feel like Sauron is approaching with the ever-darkening mood of the northern latitude. :wink:

Eyeofsauron.jpg


Here's the link to the selection again: Digikey search.
Awaiting illumination, KF
 
I'd suggest one of those cheap LM2596 based converters off ebay. Just search for LM2596.
I got some for about $1 ea. If you want it faster, look for a US seller. The ones I got can do about 2A without a heat sink. You adjust the voltage with the trim pot. I don't know how they can make these so cheap.
LM2596.jpg

They make a fancier version with an adjustable current limiter, which is perfect for driving LEDs.
Search for LM2596 CC CV
 
Hey guys -

Dennis, I know the 7805 will work from my experience with bleeding two+ LiPo cells down to zilch, and I have some spare 7805s... though I really want to drive these LEDs a bit higher.

Richard, that does look like an efficient way to go. Sadly HK has the best price but it will be on the slow boat from CN getting here. Domestic suppliers are robber barons at $8++, sheesh.

This guy here L7808CV can be had for $0.64. Whatcha think?

Prefer not to wait 3 weeks. KF
 
fechter said:
I'd suggest one of those cheap LM2596 based converters off ebay. Just search for LM2596.
I got some for about $1 ea. If you want it faster, look for a US seller. The ones I got can do about 2A without a heat sink. You adjust the voltage with the trim pot. I don't know how they can make these so cheap.


They make a fancier version with an adjustable current limiter, which is perfect for driving LEDs.
Search for LM2596 CC CV

Child labor :twisted:
 
Bought the CV CC device Richard suggested, but didn't want to wait until December or next year, so I ponied up the stones and should have it by Tuesday next week.

<sigh>

But at least I should be able to see better! :idea:
In the dark, KF
 
A constant current supply is what you really want for a LED. It will maintain constant brightness over a wide range of conditions.
 
Got this bad boy a couple days ago and I finally had the time to hook it up this afternoon.

DC-DC LM2596 Step-down Adjustable Power Supply Module _1.jpg
Made the mods to my system where I could plug and play...

The original circuit for the Crees was rock steady at 3.3VDC. The 12-volt feed into this unit was also rock steady at 12VDC. I switched over to the device above once I got the voltage in parity. Twiddled and twiddled and twiddled but the voltage would not go up, so I twiddled on the Current - then finally it started putting out power. Very slow going although the lights were getting brighter. The UniqueFire Crees are supposed to handle 9V... Nope; they begin to burn out at 5.6VDC :cry:

And then there was smoke :shock:

Actually I noticed little whips from the PCB: Felt the coil and it nearly burned my thumb. The chip was slightly cooler. I can't fathom which would have been hotter if I had gone the KA7808 route - not that it matters. Both lights were lost at 5.6VDC. So much for that experiment. :roll:

Now that those were toast (not a great loss being 4 years old and getting dimmer), I swapped in replacements that I had been using as a drain to tombstone ol' LiPos - the Cree Ultrafire WF-501B which is supposed to put out 3X lumens. They didn't, and in fact they died too on the 3.3VDC circuit. :oops:

Ahhh! But when I purchased the UniqueFire, I snagged Qty-3 but only used 2. So now I'm One-Eye'd but it's a very bright eye. Gots to source replacements pronto.

Found this and this at my local Home Despot:
1000 Lumens LED Flashlight
1500 Lumen LED Flashlight

So my thinking is that the 1k Lumen uses 4.5V, and the 1.5K Lumen uses 6. The DC-DC converter on my ebike outputs 60W which leaves lots of headroom for these little lights. Still my calculations suggests the 1.5k Lumen will pull about 1A, so with a pair it's going to be closer to 12W. I don't trust the LM2596 device; it really did become very hot. Substituting, if I use a KA7806, the peak A = 2.2; though admittedly it would probably get really hot as well.

:idea: Is there a better alternative?

I don't need to drive at night again until Monday so I've got a little time. Little boot in the right direction is all I'm asking. :)
Call me One-Eye'd & half-blind, KF :wink:
 
Kingfish said:
And then there was smoke :shock:

Actually I noticed little whips from the PCB: Felt the coil and it nearly burned my thumb. The chip was slightly cooler. :

That's usually a good indication the device ratings have been exceeded. :wink:

Maybe I was making incorrect assumptions about your lights. How many watts are these? How much current do they take?

Do your lights have a driver circuit built into them or just raw LEDs?

If your lights have a driver chip, then you can supply them with a constant voltage and the driver will take care of the rest. If you're driving bare LEDs, then you want a constant current supply.

The little 2596 boards are good for about 2 amps output without a heat sink. A linear regulator will throw off way more heat. They do make higher rated versions of the switching converters. Seems like you need one of them.
 
Yes, the Cree flashlights have drivers built in.

I have searched for candidates though fear that I am not well-adept in this field. Thus I ask for a lil’ help or boot up my backside in the general direction. My local Electronics supply carries NTE components; spendy but then it's same-day service.

Ol’ One-Eye KF :wink:
 
I wouldn't suggest a linear regulator. They are simple but most of them are limited to about 1A, which is less than the one you smoked and it will get really, really hot. They make larger versions of the adjustable switching regulators.

Here's a 12A version. That should be enough: http://www.ebay.com/itm/DC-12A-300W...110?pt=LH_DefaultDomain_0&hash=item2598384786

A less expensive, smaller 5A unit: http://www.ebay.com/itm/DC-DC-Buck-...067?pt=LH_DefaultDomain_0&hash=item4add4b3f63

Can you use an ammeter to measure what the light takes?
 
Hi Richard - thank you for the tips! :D
We've had a new development from the PNW Ghetto Grunge Garage

Snagged the Home Despot 1000 Lumen flashlights, QTY-2; the 1500 Lumen units would not fit in my backpack. No worries – the 1k are P L E N T Y bright by a factor of 3X each. 8)

I disassembled one unit to figure out how it was put together and saw that there were two wires going to the LED array (there’s 3 LEDs per unit). It has 3 modes and so I measured the voltage for each:
  • High = 3.2 to 3.3 V
  • Low = 1.6 V
  • Pulsating on High
This is an exciting turn of events because it means I can go with a straight hookup to the 3.3 VDC circuit and drive both of these bad boys directly. The only issue left is how to deal with the Blinky ripple which I posted on 12/19/2012

DCDCConverterStatic0.png


Using LTSpice, I modeled up a nasty ripple and came up with a solution that is pretty amateur (a string of 4.7k uH inductors in series, and with a large filter cap across the load). Although not expensive – I thought of one other idea that might be the best of all…

  • The 3.3 Circuit powers Blinkies and Headlights. I have a stack of rechargeable AA batteries rated at 1.2 V @ 2500 mAh:
    :idea: After the fork in the circuit where one side goes to Blinkies, could I take 3 batteries in series to get 3.6 V and place them in parallel with the Blinks, then let the batteries deal with the current ripple? The 3.3 circuit will never overcharge the batteries, although they will always have a charge. It just seemed simpler than trying to figure out the precise Inductor-Cap filtration.
With the help of Teslanv, we modified the physical assembly for mounting; he took pics and I’ll post them after tomorrow.

Excited and optimistic, KF
 
2000 Lumen Headlight Assembly Notes

Preamble: My old LED headlights failed in an attempt to brighten them. Needed replacement ASAP. Need was worth more than the cost of waiting for best price to arrive. Solution was total MacGyver.

Note: Repeating some previous information in order to create a concise post.

Searching the known sources and the web did not provide fruitful answers or timely solutions. It was in fact the source supplier that had posted my old LED flashlights could handle up to 9 VDC, so I purchased a switched-mode supply to test. Nope, the specs are inaccurate and both LEDs failed at 5.6 V. Bummed but not lost. Tried again with my backup set of LED flashlights that claimed they were 1000 Lumen each, but those too failed to do the job (probably my fault for using them prior in extreme conditions). Now I’m stuck. Searching for local solutions, the lion’s share of choices are outrageously priced and underwhelming in lighting power, until I found this:


@ Home Depot: Defiant Model # HD14Q407 1000 Lumens LED Flashlight

25fcaf92-cd3e-4d62-8884-fcb5d0f08ec9_400.jpg


There was also a 1500 Lumen version; the difference was that the 1k used Qty-3 D-cell batteries, whilst the 1.5k used 4. Two reasons why I bought the 1k: The runtime was nearly 3X that of the 1.5k, and… well – it could fit in my knapsack ;)

Bought 2 of these units and went forward to dissected how they were put together and quickly determined that they were assembled completely different that the previous Cree units, and as luck would have it – the LED heads were connected by 2 wires (~ 20-AWG, white and red). Checking the voltage across the high mode came within 3.2 to 3.3 VDC! No voltage adjustment required :)

Based upon the nominal battery size of 1.2 Ah with 3 in series at 4.5 V and having a lifetime of 22 hours, the current draw was estimated to be (1.5*3*1.2)/22 = ~ ¼ W. If true, even with Qty-2 there would not be any issues with pulling too much power.

Fabrication

DIYDefiantMods20141123.0.jpg

Comparing Defiant 1k with the old system of twin Cree UniqueFire 300 Lumen units. Note the Handlebar mount (found on eBay some years ago).

DIYDefiantMods20141123.1.jpg

The Defiant head has 3 LEDs built in. First thing we did was cut most of the battery holder away.

DIYDefiantMods20141123.2.jpg

The triple LED Head assembly is made of an Aluminum base with polished plastic reflectors, and is connected to the specialized driver circuit board by two wires. The voltage across these wires in “High” mode was 3.3 VDC.

DIYDefiantMods20141123.3.jpg

Except for the thumbswitch, here it is fully disassembled.

DIYDefiantMods20141123.4.jpg

Using a jig to secure the part, we employed a chop-saw to create the mounting interface.

DIYDefiantMods20141123.5.jpg

For the mechanical interface to work, the ID of the Battery housing measured 1.35 inches, whilst the ID of the Handlebar holder measured 1.1 inches. In a quick search, it turns out that ¾ inch PVC tubing would be the least expensive material: The OD of ¾ inch PVC is 1.05 inches and the standard F/F coupling has an OD of 1.3 inches. Here is the intended final assembly.

DIYDefiantMods20141123.6.jpg

Once again a comparison of size of the Defiant 1000 Lumen with the 300 Lumen Cree UniqueFire. The new head unit is significantly larger and thus affects the faring, so the final length of PVC will be determined by trial. Unseen, though worth noting is that we drilled a ¼ inch wire feed-through hole at the juncture where the coupling fit the pipe.

Painting
Again – I was in a hurry and did not have sufficient time to source the proper paint. Going with what was available locally, I chose this:
@ Home Depot: Rust-Oleum Stops Rust Model # 265494 12 oz. LeakSeal Black Spray

536a2ffa-9727-498d-bbfe-fe30d8398937_400.jpg


Understand that it’s raining outside and cold; this was the only paint that I could find that under these conditions – cured in 2 hours. I sprayed both the modified heads and PVC assemblies. It was still tacky after 3 so I brought them inside and placed them on top of an oil-based room heater and it still took the better part of the day to cure out.

Word about the Sealant: It is definitely not paint, however it does create a vinyl-like rubbery coating that can provide an adequate weather barrier if the surfaces are properly treated. I used 400-grit wet/dry on the PVC until the printed markings were removed, and again on the modified sections of the Defiant body. This was followed with a denatured alcohol wipe-down to remove dust.

Mounting
In brief, the re-mounting was a bit difficult due in to the weight of the heads, and I was in a hurry so there was no time for pics. However I did create a tensioning system using zip-ties that prevented the lights from tipping forward; it’s not optimum and adjustments will be required – but there is time for that. The Field Test followed immediately upon completion.

The first thing I noted was that the flickering induced by the troublesome Blinkies was almost non-apparent; it’s still there – although very subtle and hardly noticeable. That’s a good sign, and I am grateful for that issue to go away. The brightness of the headlights is profound, though easily adoptable: Imagine that the previous system was dimming, perhaps less than 50% of rated value, and the new system boasted more than 3X illumination power. That was very apparent in the pitch black rainy night. I could actually see the road clearly well over 100 feet away.

I will post a comparison of lighting at first opportunity – meaning when it quits raining. (Sorry California: I wish you could take ours)

Final Thoughts
This is not the optimum solution; the units are spendy and the heads are weighty. My costs out of pocket were about $65 USD for the flashlights after tax + about $15 USD for sealant and sandpaper. If you use PVC, Rust-Oleum makes a paint especially formulated for that material however it’s over $35, and for me I didn’t want to part another Jackson.

By going with direct wiring, I have bypassed the LED driver. This may or not be a good thang, and time will tell. However there is opportunity to leverage the unconnected Low-Beam switch and create a lower-voltage opportunity, maybe for daytime driving. Always something to twiddle…

That’s me for now. As I said, I’ll post the nighttime distance at first dark.
Enjoy, KF
 
Won't sawing it in half void the warranty? :wink:

If you're driving the LEDs directly, that's where using a constant current regulator is recommended.
You want to keep the LED current below the rating. The voltage across the LED does not tell you as much.
 
Thanks Richard :)

Understood; I will try to get a better picture of that over the next few days.

Warrantee? We don't need no stinking warrantee :wink:
Although I am super curious if the 1500 Lumen would have had the same voltage or maybe another LED; I'll take a look next time I'm at HD.

A future so bright... KF 8)
 
Back
Top