PROJECT MAYHEM -> Urban Assault Build Thread

thanks, disregard edits above.
The wife just got home. . .

Tomorrow I will scope out those 11 toothers and start thinking about the front Chain Ring. I really want to have the biggest possible but not if it means that it is going to get munched every time I bust a corner. . . I will have to take some measurements. I am fine with using a road version.

thanks!
-methods
 
methods said:
thanks, disregard edits above.
The wife just got home. . .

Tomorrow I will scope out those 11 toothers and start thinking about the front Chain Ring. I really want to have the biggest possible but not if it means that it is going to get munched every time I bust a corner. . . I will have to take some measurements. I am fine with using a road version.

thanks!
-methods

cool,

Gear chart using MPH @ 80 RPM

For 26 X 2.35 / 60-559 / MTB tire with 175 mm cranks

36t front chainring
11t rear 20.6 mph
14t rear 16.2 mph

http://www.sheldonbrown.com/gears/

You can play around with it, quite useful for visualising :D Good luck!
 
methods said:
* Do I grease all those little hinge points?
* Does it matter what I torque them too?
* Do I clean and then grease the head set?
* Do I need to know anything special?

I am also trying to figure out how to put my 50 tooth (or maybe it is 52 tooth) front sprocket on. Being as this is a downhill bike it just has two tiny sprockets. Do I have to replace the entire assembly or do I just need to buy another "ring" of step out adapters?

I also have no experience with the rear gears. I would like to put the absolute smallest possible in the back. I want to peddle at 45mph. What do I do to put the absolute tiniest on the back?

Thanks!
-methods
!

* Do I grease all those little hinge points? YES
* Does it matter what I torque them too? YES
* Do I clean and then grease the head set? YES
* Do I need to know anything special? YES

trying to figure out how to put my 50 tooth (or maybe it is 52 tooth) front sprocket on. - I have a 53T/34T front double setup with a Suntour XC thumb shifter, one rear bmx freewheel, 14t. I am out of gear at 22-23 mph. The gearing required for effective pedal input at 45mph would have to be in the neigborhood of a 70-80T big chainring. Rearding your crankset - if you have 5 bolts holding your chainrings on, then you either have a standard (130mm) or compact (110mm) spacing on your BCD or bolt circle diameter. 4 bolt is a unversal newer size, and harder to source larger ring sizes cheap

should get ya started anyways...
Len
 
Battery and Controller placement

Ok, so it has been a few days. It is the weekend again and I plan to be running by Monday.

So far I have painted everything but the frame. The frame is sanded down and taped off so I will hit that today.

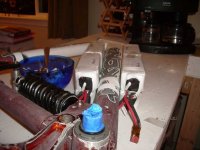
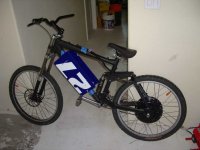
Right now I am looking at battery placement. I decided that I don't want the controller hanging off the back anymore so I am going to stuff it into the triangle with the batteries. Eventually I will be running more cells and the controller will have to move again, but for now, this will be clean.

I tried many configurations, but this seems to be the best:

* Weight is down low
* Batteries and controller fit
* Minimized width, only a little thicker than the frame
* Efficient wire routing from controller to motor
* Efficient wiring from battery to battery, and to controller

*** OPEN TO SUGGESTIONS ***

BatteryAndController_029.jpg

BatteryAndController_015.jpg

BatteryAndController_016.jpg

BatteryAndController_009.jpg


I think that for this go around I am going to add a few luxuries

* Power Switch
* Charging port for my 14V Controller battery


Hmmm.... Wait a second. . . It just occurred to me that the BMS has to fit in there too. Maybe I will mount it to the bottom of the controller.


I think I will remove a few items this time around:

* Remove both E-Brakes
- Poor quality
- No choice of long vs short pull
- Cant use with hydrophilic
- Causes motor heat during regen

I think I am just going to rig some sort of button at an Emergency Brake and Regen brake. That way I can do whatever I like with my brake handles.

* Remove variable regen
- I have never really used it. With a 100V pack, 100% barely gets me 10A regen


* Remove all Ghetto
- This time around I am going for clean. Everything will be neat and tidy. Not professional mind you. . . Just need and tidy. I am still considering whether to hide the internals with 2 sheets of black plastic or to display the guts. I kind of like displaying the guts but I suspect the wiring will start to look like shit in there. Most likely I will cover the sides.

- Now by clean, I DO NOT mean no tape :| I like tape. Especially black duct tape. I am going to have lots of that :wink:


Still in the works:

50T front chain ring
11T rear
Wide wheels (work with U Brakes?)
Phat knobby tires
Higher quality throttle
Finish front 8” disk conversion (got all the parts)
Re-Tune rear Ubrake conversion
Find shifters for front and rear
Change out neck to fix my posture
Possibly a 24” rear wheel, but I would have to re-engineer my rear brakes and I would lose ground clearance
Etc.

Pictures later today of the painted frame and Assembly. I let paint dry for about 1 hours :twisted:

-deviantmethods
 
Here are the painted parts.
The only prep I did was sanding with 200 grit.
I hit them with a few coats of black primer then a few more coats of flat black
I did not sand between the primer and the final coat to retain that "Mayhem" look
:mrgreen: Gritty :mrgreen:

PaintedAndAssembled_001.jpg


I am really conscientious about allowing paint to dry properly so after I sprayed the frame on the front porch at 6AM (50 degrees with high humidity) I waited an entire 30 minutes before assembling :wink:

PaintedAndAssembled_005.jpg


I think these forks look Gangsta. Never have been a Chrome guy. Not even a "shiny" guy. I like muted tones

PaintedAndAssembled_008.jpg

PaintedAndAssembled_018.jpg


Not one to waste any time I set up the new 8" rotor

PaintedAndAssembled_021.jpg


And then took it for a test ride :lol: :lol: :lol:

PaintedAndAssembled_019.jpg

PaintedAndAssembled_022.jpg
 
Now there is still something I dont like about the bike. I dont know what it is, but it is missing. I am not a "Bike Guy" so I am not really contentious of all the things one can do to a bike to make it look angry. . . I want the bike to look angry and intimidating.

One major thing I think it needs are those 3" big fat tires. That really makes a bike look bad ass

Another thing is that neck. I got it from a bike store (pull off) just to give me a couple more inches of reach. Does that not "go" with this sort of frame? I want my bike to have the stance that the DC1 has. I have another neck called a "Shorty" but it makes me feel cramped.

Perhaps I can run that 24" Double Wide rim on the back with a 3"+ tire. If I can get the U-Brakes to work that would be cool. I just have to convince the bike shop to lace the 5305. Is it easy to do myself? I will lace it, I just thought that it was some sort of black magic. I dont have an alignment wheel but all the stuff is bent anyway so I dont think it matters all that much. . .

-methods
 
methods said:
Now there is still something I dont like about the bike. I dont know what it is, but it is missing. I am not a "Bike Guy" so I am not really contentious of all the things one can do to a bike to make it look angry. . . I want the bike to look angry and intimidating.
The fork's a bit pretty... I might black it somehow and drop the bars. IIRC, Lowell shortened his bars to good effect.
 

Attachments

  • methodsBlackout1.jpg
    methodsBlackout1.jpg
    53.7 KB · Views: 1,694
Hmmm.... Maybe I will try flipping that neck over to see how it feels.
Picture gear gangster. . .
I just watched the holy movie again. I think this was the 400th time.

So I have the batteries mounted.
I started by using the water bottle bolts and a few zip ties to make a top platform
I attached a lower platform to that

BatteryBox_002.jpg

For that I built two walls that I attached via zip ties
Lucky for me they remodeled Lowes. I dumpster dove for all the plastic signs.

BatteryBox_005.jpg

View attachment 7

BatteryBox_007.jpg

BatteryBox_008.jpg

BatteryBox_010.jpg

After proof of concept I painted the sides.

Inside I attached the batteries to strips of plastic with strapping tape.
The strips of plastic are 2" wide
Now I have 2 modules, each with 4 batteries attached to it
Each module has industrial strength Velcro on the bottom. This chit is so strong that I trust my life to it!
One module mounts on the top, one on the bottom.
Nothing holds the bottom module on except the velcro
It is so strong that I can barely pull it off :wink:

BatteryBox_013.jpg

BatteryBox_015.jpg

BatteryBox_016.jpg


In this picture you can see the notches I cut out between the batteries. This will allow access to the cavity where I will make all the connections.
You can also see the strip of plastic that acts to tie the modules together.
After I figure out the wiring I will put the sides back on and start on mounting the controller

BatteryBox_014.jpg

-methods

Tip: You can fertilize your lawn with used motor oil :idea:
 
I don't like the flipped handlebar look that TD showed personally. It won't give the bike a badass freeride look IMHO. To each their own though...

Looks great matt black w/ a bit of chrome shine on the fork lowers and crank arms :)
I might have left the swingarm plates polished alu but no worries.

I think your component placement is quite good. The battery mounts look great. If you need to make some space, you could strap the controller to the front of the forks like this: http://e-mtb.com.au/images/DSC01070M.jpg (though maybe flat against the forks would look a bit cleaner). Also, if you want to go stealth the covers used in that pic might be the go.

As for making the bike look more badass:
Stem: The 'neck' is usually called a "stem" basically DH guys often have the shortest fattest stem, sometimes cut from a solid block of aluminium. Another type is the direct mount stem, which actually mounts straight on your fork. Thompson makes very pimpin' stems and seatposts that are widely considered the highest quality gear. Of course mtb parts on mtb bikes, road parts on road bikes usually has the most uniform look.

Seats: they go two ways, DH racers go for long & thin uncomfortable seats since they won't be sitting at all really during a race. Freeriders sometimes go for a big fat seats. Dirt jumpers (DJ) go for tiny fat seats.

Peddles: Big platform peddles with long replaceable pins are the go.

Grips: ODI lock-on grips or similar. Various pimping endcaps available.

Bars: Width, rise, sweep and oversized (31.8mm) or non-oversized (26.0mm) are the variables. It comes down to feel and comfort. Just remember if you cut your bars down and then want extra leverage your SOL.

I'll report back later with some examples of pimped out 'mean' looking DH and freeride bikes you can take some cues from if your curious. At the end of the day though, do what is comfortable and performs well. And everyone else and their opinions can get stuffed :wink: aka do what you want.
 
Actually those swing arms were painted orange :(

Hey, thanks for all the info.
I have one of those stems that is cut from a solid block of aluminum. Maybe I will put it back on.

Comfortable is important, but for this first build I want the bike to look really aggressive. I am actively trying to recruit young people from my work. It is the perfect pool of early adopters, 20 - 30 years old engineers with lots of money and no kids :wink: I want to build an army of space monkeys on electric bikes so that we can accelerate the movement to electric cars by 2010

I showed my wife the movie "Who Killed the Electric Car" and then let her ride my bike and she now insists that I build an electric car (WINK)
To make things better. . . She wants it to be a Porsche !!! She said that she thinks it is reasonable to spend up to $40k

Now for me . . . I want to wait till about 2011 when all the aftermarket parts hit the market. So many cars are being released in 2010 that it is almost pointless to spend the money now when I will be able to salvage/dumpsterdive/source from china/piece together a car out of quality cheap parts.

Anyway, thanks for the tips!

-methods
 
Nice build. Is that plastic made of abs? You can use abs cement to permanently bond them and make it as 2 parts clamp together. I'll be a more stronger casing and you can do away with some or all of the zip ties.

methods said:
Tip: You can fertilize your lawn with used motor oil :idea:
Are you going to Pluto and leave your toxic trash behind here? Bad and irresponsible even if you do it on your own property. Go to Autozone, Kragen and have them recycle your used oil, this service is free - just a Tip to avoid harming the environment.

* Used motor oil is insoluble, persistent and can contain toxic chemicals and heavy metals.
* It’s slow to degrade.
* It sticks to everything from beach sand to bird feathers.
* It's a major source of oil contamination of waterways and can result in pollution of drinking water sources.


http://epa.gov/epawaste/conserve/materials/usedoil/index.htm
 
ARE YOU KIDDING ME ?!?!?

Dude. . . It is a quote from the movie "FIGHT CLUB"
Just like everything else in this thread.
- Project Mayhem
- Army of Space Monkeys
- Tyler Durden

(big sigh)

You dont see the humor in that quote?
It is so ridiculous that no one could possibly think it is a good idea. . .

Come on man. . . Fertilize your lawn with used motor oil?????

-methods
 
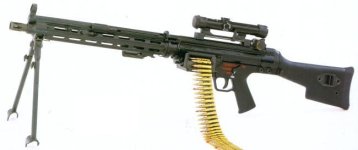
Dunno man, I think I'd go for a 23E, it would give smoother thrust.

hk23e_02.jpg
 
Ypedal said:
And nothing says badass like a sawed off shot gun mounted to the rear frame section ! :wink:

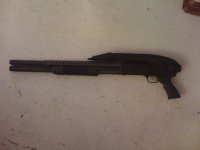
You mean like this?

IMG_0019.JPG

I actually shoot trap with this bad boy. Everybody starts lip-smacking when I pull it out. Then they settle down when I hit at least 21 - 23 out of 25 every time :roll: Who says you can't shoot trap with a scatter gun? The secret is to shoot the instant you see the bird. I aim high and catch it with the spread.

IMG_0020.JPG

I had to put the folding stock on there to meet regulations at the local gun club. Rules state that "a long rifle must have a full stock".
:wink: It does. . . It just happens to be folded up.

-methods
 
I just picked up an old Intense M1 that I will be modifying soon.
It has a 24" rear wheel, any suggestions as to what tire to use for urban riding? The hookworm looks attractive but I believe its like 100G.
I'm not sure as to how it will be modified but I do like the RC motors, maybe even two.

I'm 52 and haven't done a lot of stunt riding in my time but I was just curious as to what this bike can do. This bike is friggin crazy. I never rode down stairs in my life. Within 5 minutes I was jumping 4 steps at a time at pretty good speed and it always felt perfectly stable, going down loong flights! I think I'll stiffen it up a tad for more road use.
Cheers,
 
Nice!

That suspension really is confidence inspiring. . .

I am looking into tires right now too.
My concern is whether or not I will be able to fit a 26" double wide with >3" tires between the front and rear forks.

I suspect that I will have to step down to 24" wheels to fit.

If you get the hookworms let us know how they do.
I run the double thick tubes and Kevlar to try to reduce the chances of a flat.

-Patrick
 
I just placed my XC 26" wheel in the rear triangle to see if it would fit and it did.
But that 26" wheel is about 1/2 the weight of the 24" DH setup ! My scale is crap but it seems about 3lbs lighter.
Although, I don't think this wheel would've held so well on the stairs. Also I don't know what configuration of power I'll be using so a 24" rim could be advantageous.
Cheers,
Rob
 
I have been snoozing. . . Not really doing anything. I am in a bit of a funk about the bike for some reason. Maybe I will work on it this weekend.

Today I received a few more parts:

* Got my two BMS boards =) Very professionally packaged. I still need to order parts for those

* Got my Uber bikelight. 900 lumen's of goodness =) Runs for one hour on a pair of protected 2400mah Lithium cells

* Got my Kelly firmware update (209). This gives me the new throttle braking as well as many other new features ;)

* Went round and round about a rear disk. . . Still stewing on that one. Until I get a rear disk I cant get my doublewides :? m mmm

* Convinced the wife again that she needs a 9 continents kit. . . I will have to give her 12 of my 5Ah cells. . . . So that means I need to buy more batteries for me!

-methods
 
methods said:
View attachment 6
(Now I think this looks cool but I am a total geek

It looks Badass! Awesome how you used a seatpost to hold the batteries in the triangle. How'd you get the clamp to be at the proper angle? I've only seen the ones that will be parallel to the ground when you clip to the back of the seatpost. How'd you mangle the mount around the other way? Is it a specific brand that has that option? I was searching for ways to mount bats in the triangle, and your way is awesome, simple, and clean.
 
I used this rack:

http://www.walmart.com/catalog/product.do?product_id=9207799

$15 seat post rack.

If you look at a standard seat post it is leaning back. That angle is captured by the seat post rack to ensure your cargo is parallel to the ground.

If you take that seat post rack, flip it over, then rotate it around to the front you now get the same corrective angle put forward.

Go to the bottom of page 2 of this tread for more pictures:
http://www.endless-sphere.com/forums/viewtopic.php?f=2&t=4409&p=92875&hilit=+upside+down#p92875

I used a crow bar to open up the bracket enough to allow it to fit around the frame.

-methods
 
Back
Top