Trouble Opening a QSmotor (clone?) 8000W motor

igashosparks

10 mW
Joined
Jan 6, 2023
Messages
25
Hi All,

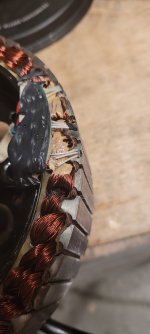
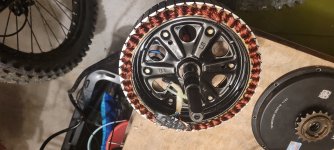
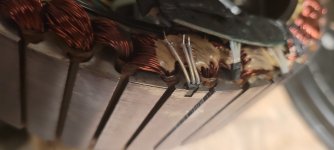
I'm trying to open my 8000W (likely clone) QSmotor to replace a failed hall sensor. I got it halfway opened, but can't get the remaining outside panel off to expose the Hall Sensors.
Motor side view.jpg motor freewheel view.jpg

There is a BMX style freewheel sprocket attached to the threaded axle (going through the motor). I can't tell if I need to remove the freewheel first, or if the axle will simply pull through the freewheel if I was able to overcome the magnetic pull. I've done some research, and see that some need to use a gear puller link this:

Gear Puller.jpg
Or do I need to remove the freewheel first and then use a gear puller to overcome the magnetic force.. I was able to use the the cement floor to press through to get the other side off.. (It was pretty challenging)

Any thoughts are appreciated!
 
Normally, the easiest way to get access to everything inside the motor, more or less, is to undo the screws on the brake rotor side cover then use a gear puller to push the whole stator and that cover out (and use it to gently lower it back in place exactly the same way, to prevent magnet damage or fingertip loss).

You can pry the cover off instead, but it risks bending or breaking the cover, or slipping with the prytool and hitting the windings inside (which usually causes irreparable damage); if that doesn't happen adn then you remove the stator by say, standing on the wheel with the axle on the ground, that can get the stator out but it risks fingertip removal if you get them in the wrong place at the wrong time (same for putting it back in).


Freeewheels don't normally have to come off to take a cover off; theyre attached to the cover so should just come with it.

Sometimes the bearings are rusted onto the axle, though, and that can feel like it's really stuck.

There's no magnetic force without the rotor (which is part of the wheel where the spokes are laced to), and the covers are usually aluminum so not really magnetically attracted like that anyway. :) But when taking the stator out of the rotor it's quite a challenge without a gear puller, as you found. ;)


Some of the QS motors like yours ahve two hall sets, one on each side of the stator. If so, you could just use the second set if they're working, If not, you can just replace those and use the second set of wires intead of the primary ones, and not have to remove the other cover.
 
Try applying heat to the cover. I have been working on some motors (not bike) recently that used to need to be pressed appart but heating the ends makes them practically fall apart. I suggest putting blocks under the cover then heating. When it is too hot to touch, tap lightly on the end of the shaft with a rubber mallet or wood block. Watch where the flame goes if using a torch and keep it back from the cosmetic surfaces. It will also help during reassembly if needed.
 
The heat only needs to be applied to the cover and it doesn't take all that much. Plus the magnets are not part of the stator unless I am missing something. It is early here and the coffee has not done it's job completely. :)
 
A light heating of the cover can be enough, if you’re worried about the magnets then wrap the outside of the rotor ring with wet towels or similar, max temp will be 100 deg C which the magnets can take while installed in the magnetic circuit.
 
UPDATE:. My gear puller arrived today.. (way bigger spread then needed...). The cover separated from the stator like butter using this device. No heating or removing the flywheel required.

Now onto replacing the halls.. they are indeed a hot mess.
 

Attachments

  • 20230309_122226.jpg
    20230309_122226.jpg
    862.5 KB · Views: 22
  • 20230309_122232.jpg
    20230309_122232.jpg
    1.2 MB · Views: 20
  • 20230309_122238.jpg
    20230309_122238.jpg
    777.9 KB · Views: 21
I believe it was a combination of the motor overheating (after a 45 minutes of uphill abuse, very steep grades) to the point of melting the solder? (not sure what the melt point of the solder that they used). in combination of the circuit board being pulled to the right (bad craftsmanship)..

The seller of the bike is questionable, some things they did pretty well, other things were very sketch, useless their intent was to kill gringos, then job well done.. they are no longer responding to me: coolflybikes.com.
 
Got the halls swapped out.. what a PIA that was. Between peeling off whatever was covering the hall circuit board and to trying to get the hall wires through little holes already filled with solder.. I believe it took a good 4 hours. I also didn't realize one needed monster truck force to get the covers closed around the motor and overcome the magnetic repulsion, if that was what was going on.. I had to run to Ace Hardware and purchase screws that were twice as long as the originals, so they could reach the other side and get a reasonable bite, then slowly tightened them going around in circles.. then once the xtra long screws bottomed out, I had to one by one replace with the original screws and finally get the two lids to seal. I'm kind of proud of myself that it actually worked.. the one video I watched, these dudes used a hydrophilic press to seal the motor back up.. I was at a complete loss, until the extra long screw idea came along.

I'm happy to say that I am now back on the road, although my soldering job with the halls was very shoddy, and I didn't actually take any measures to increase the heat dissipation in the motor. So I should most likely just buy another motor before I breakdown again.

 
The magnets don't affect the covers directly. But since the stator doesn't sit centered without the covers to hold it there (is pulled toward the magnets on one side or another), it makes it harder to get the cover lip into the rotor on that side (but it will go in easier on the opposite edge). A deadblow hammer (basically a rubber mallet) will usually help with this, by tapping gently but firmly around the edges over and over until it is seated well enough to start the screws in. Once the lips are in enough of the rotor, the force you're overcoming is just the tight fit (sometimes even an interference fit) of the cover lips into the rotor.

A hydraulic press can be used, but even the QS205 I have doesn't require that level of force--the small 2"-wide mallet is sufficient.

The long-screw trick works, too, of course. :)
 
Mine? I got it after someone else on ES broke the axle ends off. :lol: Somewhere around here
shows his chewed up dropouts where the motor was moving around and then the torque (much higher power levels than it was rated for) eventually broke it. I don't recall which version it is.

Some pics of it's original disassembly/etc here, down the page,
Just before that post is where I rebuilt the too-small 3-jaw puller to have longer arms shaped to fit hubmotors.

From someone else, I have another stator with no rotor/covers, with it's axle removed and a couple replacement axles, but I don't have any info on what it's been thru. One of the axles will probably be used to fix the above motor, and the other to fix this stator, and either use them to swap out to test different windings (don't know what either of them is off the top of my head), or if I damage one I have a spare, or maybe even eventually find someone that breaks their stator but has a usable rotor/covers, etc. that doesn't want to keep it. I have several versions of a plan to use one of them on the SB Cruiser Mk II, which would not be an in-wheel hubmotor drive, but would drive large-diameter regular spoked wheels via chain; how it gets to the chain and whether it's one or two separate motors per wheel varies in the plans.
 
You'd have to ask QSMotor (some of their people post in their sale thread in the Items For Sale - New section) to be sure.

Markings can always be faked, even the hologram stickers I've seen on various genuine QSmotors (like the QS205 I have here) are easy enough to do. So you can't be sure just by looking at anything if it's real, just because it looks real (though it is easy enough to tell *some* fakes).
 
So is this actually a clone motor, or a legit QSmotor? I have a similar looking motor.
Its a real one. Not a clone.

100%. Legit.
 
Back
Top