The base Yuba Mundo is equipped with Promax v-brakes with Tektro Io discs as an option – 160mm/180mm front/rear. A special 140/160mm adapter is required to mount the rear 180mm caliper due to a non-standard placement of the rear disc caliper mounting tabs. The adapter is part of the disc brake kit and is also available separately as a solution for mounting ‘any’ 180mm rear brake. However, mounting Avid BB7s is somewhat problematic since Avid uses a 185mm rotor which is not technically supported by Yuba and turns out to be incompatible with their standard adapter solution.
This post describes a means to install BB7s using standard Avid adapters and a small shim. The method employed to determine the shimming is described below and is admittedly only eyeball accurate, but the rotors and pads show the proper wear patterns and the installed brakes work very well – tested with 40+ mph stops. This installation was done on a Mundo V4 - you will need to verify with Yuba that mounting tab placement is unchanged for other frame models.
Components
Although Yuba uses a reverse 160mm/180mm front/rear arrangement with the larger brake in the rear, this installation is for a 185mm/185mm setup. The stopping power is excellent and the front/rear braking balance with equal sized rotors works well, in part because of the long cable run to the rear which softens that cable pull a bit. However, for a heavy cargo bike a 203mm/185mm setup would also work nicely – it’s about the same price.
Front Installation
The front installation is a simple by-the-book BB7 installation. The cable sheath was cut with a Dremel with fiber cutting disc and the cable was cut with a standard cable cutter that was on hand. Lacking the proper crimper for the cable end ferrules, they were just glued on with Loctite Super Glue Ultra Gel Control (1109181). The cable end strands were super glued for ¾” in lieu of using an end cap so the cable could be easily disassembled. The outer rotor ring was wiped clean with isopropyl alcohol to remove machine and finger grease before assembly and again just prior to pad/cable adjustment.
View attachment 13
While the wheel was dismounted to bolt up the rotor, the black baked-on v-brake crud was polished off the rim with Mother's Mag & Aluminum Polish and the black polish residue removed with Simple Green. The rear wheel got the same treatment later.
Rear Installation
A comparison of the standard Avid 185mm adapter and the somewhat lower profile special adapter provided by Yuba is shown below. The Avid adapter positions the caliper further from the axle center and with a slight clockwise angular displacement.
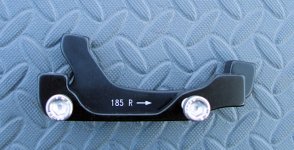
The Yuba Adapter can be used, but requires a couple of 5-6mm spacers and new, longer screws - not an attractive solution.
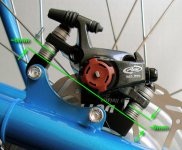
Surprisingly, in spite of the non-standard mounting tabs, the standard Avid 185mm adapter works almost perfectly, requiring only a small 1.5 mm shim on the rear post. Simply install the brake normally and insert the extra shim as shown below - a common 6mm stainless washer (Ace Hardware) is the proper thickness. This shim provides necessary clearance between the bottom of the caliper slot and the rotor edge and aligns the outer edge of the pads to coincide with the outer edge of the rotor. You can check this alignment by looking into the rear of the caliper slot and checking that the pad and rotor edges are at the same height.
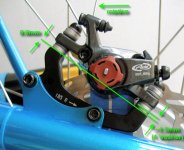
The cable is routed through the braze-on cable guide on the seat stay and to the braze-on ferrule on the bottom of the top tube. The little soft plastic cable spacer was salvaged from the discarded v-brake cable and threaded onto the cable wire in between the fore and aft sheaths. As with the front installation, cable length was guided by Sheldon Brown's advice on cables.
View attachment 11
Other Shims
Since I use washers inside the rear dropouts as part of a hub motor 14mm dropout mounting solution, the hub and rotor are positioned further inward than normal. To compensate, a 6mm SS washer is added between each end of the caliper adapter and the mounting tabs to move the adapter and caliper inward by a roughly similar amount. The Avid CPS system (below) will accommodate some difference between the axle and caliper washer thicknesses. These shims are not for accurate alignment, but rather just to get the CPS into adjustment range.
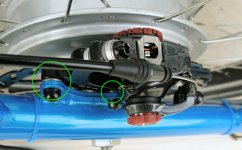
The need for this became apparent during installation when it was impossible to properly align the caliper with the rotor in the desired 1/3, 2/3 ratio (Step 5).
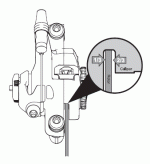
With caliper installation complete, the rear brake lever was given a good two-handed squeeze to stretch the long cable. The cable anchor on the caliper arm was readjusted and the squeeze/adjust procedure repeated several times until the lever firmed up and no more stretch could be introduced.
Here is a link to Breaking in Disc Brakes. Do it! :wink:
Eyeball Evaluation
The wipe area of the rear hacked installation is essentially identical to that of the standard factory bracket installation in the front.
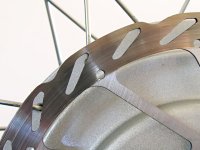
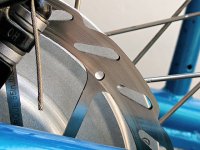
Determining Adapter Shimming
The remainder of this post describes the means to verify the shimming - you can skip this if you just want to get on the road .
.
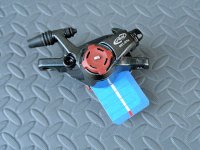
A simple technique was used to determine shimming and verify adapter alignment with slightly better than eyeball accuracy. A rectangle of plastic (luggage tag/shopping card) was cut with the same width as a brake pad. The pads were pulled from the caliper and the outer pad replaced with the plastic pad which protruded from the caliper serving to indicate the exact orientation of the pad seat in the caliper. The caliper was then mounted up and a photo taken that included both the caliper and axle. The protruding plastic pad was then identified in the images and used to draft some guidelines to determine the caliper/pad alignment.
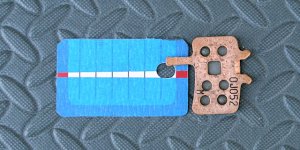
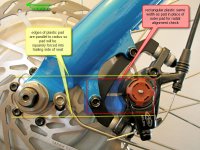
The front brake was tested first to verify that the edges of the caliper pad seat are indeed parallel to the radius connecting the axle center to the midpoint of the pad. This causes the force of the rotor against the pad to push it squarely into the side of caliper seat.
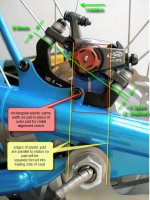
Different rear brake shim configurations were tested to identify one where
• the radial distance of the pads from the axle center and
• the angular orientation of the pads relative to a radius of the rotor
were identical to those of the front brake.
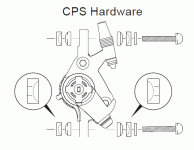
To simplify brake adjustment, Avid uses a proprietary Caliper Positioning System (CPS) that is designed to allow the caliper posts to be tightened down regardless of the particular orientation of the caliper. Fortunately, this feature will also compensate for asymmetrical shimming, allowing a simple solution using shims in lieu of machining a new adapter with squarely aligned post faces.
This post describes a means to install BB7s using standard Avid adapters and a small shim. The method employed to determine the shimming is described below and is admittedly only eyeball accurate, but the rotors and pads show the proper wear patterns and the installed brakes work very well – tested with 40+ mph stops. This installation was done on a Mundo V4 - you will need to verify with Yuba that mounting tab placement is unchanged for other frame models.
Components
Although Yuba uses a reverse 160mm/180mm front/rear arrangement with the larger brake in the rear, this installation is for a 185mm/185mm setup. The stopping power is excellent and the front/rear braking balance with equal sized rotors works well, in part because of the long cable run to the rear which softens that cable pull a bit. However, for a heavy cargo bike a 203mm/185mm setup would also work nicely – it’s about the same price.
EDIT - Here's a later ES thread that calls out difficulties using 203s - better stick with the 185s...
- (2) 2011 BB7 Front/Rear 185mm MTN brake kits (cheaper than the identical 2012 model)
- (1) SRAM Pitstop Straight Jacket brake cable set
- (1) 2011 pair Avid Speed Dial 7 levers
Front Installation
The front installation is a simple by-the-book BB7 installation. The cable sheath was cut with a Dremel with fiber cutting disc and the cable was cut with a standard cable cutter that was on hand. Lacking the proper crimper for the cable end ferrules, they were just glued on with Loctite Super Glue Ultra Gel Control (1109181). The cable end strands were super glued for ¾” in lieu of using an end cap so the cable could be easily disassembled. The outer rotor ring was wiped clean with isopropyl alcohol to remove machine and finger grease before assembly and again just prior to pad/cable adjustment.
View attachment 13
While the wheel was dismounted to bolt up the rotor, the black baked-on v-brake crud was polished off the rim with Mother's Mag & Aluminum Polish and the black polish residue removed with Simple Green. The rear wheel got the same treatment later.
Rear Installation
A comparison of the standard Avid 185mm adapter and the somewhat lower profile special adapter provided by Yuba is shown below. The Avid adapter positions the caliper further from the axle center and with a slight clockwise angular displacement.

The Yuba Adapter can be used, but requires a couple of 5-6mm spacers and new, longer screws - not an attractive solution.

Surprisingly, in spite of the non-standard mounting tabs, the standard Avid 185mm adapter works almost perfectly, requiring only a small 1.5 mm shim on the rear post. Simply install the brake normally and insert the extra shim as shown below - a common 6mm stainless washer (Ace Hardware) is the proper thickness. This shim provides necessary clearance between the bottom of the caliper slot and the rotor edge and aligns the outer edge of the pads to coincide with the outer edge of the rotor. You can check this alignment by looking into the rear of the caliper slot and checking that the pad and rotor edges are at the same height.

The cable is routed through the braze-on cable guide on the seat stay and to the braze-on ferrule on the bottom of the top tube. The little soft plastic cable spacer was salvaged from the discarded v-brake cable and threaded onto the cable wire in between the fore and aft sheaths. As with the front installation, cable length was guided by Sheldon Brown's advice on cables.
View attachment 11
Other Shims
Since I use washers inside the rear dropouts as part of a hub motor 14mm dropout mounting solution, the hub and rotor are positioned further inward than normal. To compensate, a 6mm SS washer is added between each end of the caliper adapter and the mounting tabs to move the adapter and caliper inward by a roughly similar amount. The Avid CPS system (below) will accommodate some difference between the axle and caliper washer thicknesses. These shims are not for accurate alignment, but rather just to get the CPS into adjustment range.

The need for this became apparent during installation when it was impossible to properly align the caliper with the rotor in the desired 1/3, 2/3 ratio (Step 5).

With caliper installation complete, the rear brake lever was given a good two-handed squeeze to stretch the long cable. The cable anchor on the caliper arm was readjusted and the squeeze/adjust procedure repeated several times until the lever firmed up and no more stretch could be introduced.
Here is a link to Breaking in Disc Brakes. Do it! :wink:
Eyeball Evaluation
The wipe area of the rear hacked installation is essentially identical to that of the standard factory bracket installation in the front.


Determining Adapter Shimming
The remainder of this post describes the means to verify the shimming - you can skip this if you just want to get on the road
A simple technique was used to determine shimming and verify adapter alignment with slightly better than eyeball accuracy. A rectangle of plastic (luggage tag/shopping card) was cut with the same width as a brake pad. The pads were pulled from the caliper and the outer pad replaced with the plastic pad which protruded from the caliper serving to indicate the exact orientation of the pad seat in the caliper. The caliper was then mounted up and a photo taken that included both the caliper and axle. The protruding plastic pad was then identified in the images and used to draft some guidelines to determine the caliper/pad alignment.


The front brake was tested first to verify that the edges of the caliper pad seat are indeed parallel to the radius connecting the axle center to the midpoint of the pad. This causes the force of the rotor against the pad to push it squarely into the side of caliper seat.

Different rear brake shim configurations were tested to identify one where
• the radial distance of the pads from the axle center and
• the angular orientation of the pads relative to a radius of the rotor
were identical to those of the front brake.

To simplify brake adjustment, Avid uses a proprietary Caliper Positioning System (CPS) that is designed to allow the caliper posts to be tightened down regardless of the particular orientation of the caliper. Fortunately, this feature will also compensate for asymmetrical shimming, allowing a simple solution using shims in lieu of machining a new adapter with squarely aligned post faces.


