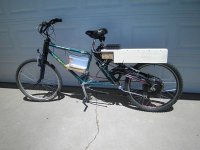
Dogmans Full Suspension Longtail Frankenbike.

dogman dan

1 PW
Joined
May 17, 2008
Messages
36,380
Location
Las Cruces New Mexico USA
Just a concept for the moment, but more to come when I get time to build it.

Starts with two steel framed bikes. One an old USPD currie frame. Cool for it's Electric logos, and geometry that is built for a 1-1/8 headset suspension fork.

So that gets you front suspension, and I have semi decent forks to put on it. The second frame is a fairly hard to find item. A steel frame with a not too horrible rear alloy swingarm. Vintage mongoose stuff, in the poor mans DH category.

Put together something like this....longtail concept small pic.jpg

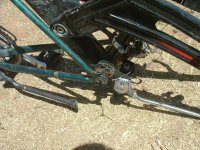
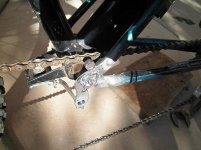
Adjustments and additional cuts will be made to get the rear dropout height correct. Then weld the two together. Much of the weight will be borne on this connection, where the bottom bracket studs will be welded into the other bikes dropouts. Then weld the other end, near the seatpost.Longtail concept,  bb to rear dropout detail..jpg

Then weld or bolt on more steel, to make the traditional longtail rear rack and huge panniers, using what used to be the top tube of the mongoose bike for it's main support. Possibly relocate the seat back a few more inches and use long backswept cruiser bars.

Lots of room in the green frame for batteries up front, or even a chain drive motor where the rear wheel was on the front frame. For now, I have a 5304 in 24" rim laying around.
 
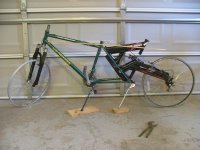
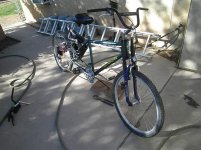
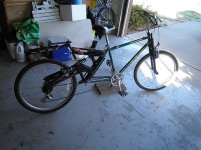
Here is how it looks as of spring 2013View attachment 1

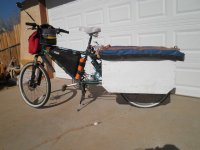
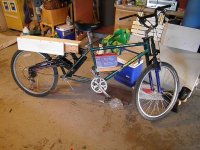
Her is how she looks as of spring 2014. I added some homemade pannier boxes, for even more heavy load capability. This gives me the same cubic inches as before, but still leaves the top deck open. The top deck is perfect for the large awkward items. Yesterday, perfect for carrying home a take and bake pizza.

Bouncing Betty 2-2014  New Panniers.jpg
 
That is damned clever Dogman. You reversed the front part of the rear bike so the headtube is facing backwards? Very cool indeed!
otherDoc

Edit: Or is that the seat tube acting like a rear rack? Still very clever!
 
This should be an interesting bike; I wanna see how you build it up. :)

I almost did something similar here:
http://www.endless-sphere.com/forums/viewtopic.php?p=378025#p378025
file.php

but decided the Y-frame was too crappy and heavy, and I could do better building my own suspension using just the swingframe off of it....not sure it's actually better but I did come up with something, and the resultant frame has lots more space in it. :)
file.php

I suppose one could just put a saddle on the Trek frame and ride it like a normal longtail, but naturally I won't do the normal thing and it'll have a 'bent seat on it instead. :)

Anyway, I'll be following your build!
 
Wow, yours is really looking good AW. I didn't like much the extra length of your first try, where you connected the head tube of one frame to the seat tube of the front frame. But to put credit where it is due, your crazybike, and your other stuff is totally where I get my inspiration, and steal ideas from. Love the big shock! I may have to get an air shock on mine if I really load it up. For street though, 1 inch of travel will be enough to prevent broke spokes.

So I am going for longer, but less long than simply finding a tandem frame. In my pic, it does look funny once you cut the Y frame. I dorked around with it some more last night, and found I will need to rotate the whole rear frame down some, possibly a lot. Likely, it will end up with the rear y frames seat tube at a pretty normal angle. Right now looking at the pic, it's hard to realize which frame part is the one that meets the front frame at the seat. That frame tube is the down tube, which on a Y frame is also the top tube.

What I really dug about this one, was the way the bottom bracket fits right into the rear dropouts nearly perfect. With some grinding, I could even bolt on. I am planning though, to weld it. I'll have nice fat thick steel even I should be able to weld. Should be very strong. What will be interesting, is if it can handle at all, or turns out to be a death wobble bike. I do expect to have some tail wag. I might end up with a lot of extra metal added on later. I'm thinking of how I can turn the rear rack panniers into extra bracing the entire length of the bike.
 
dogman said:
I didn't like much the extra length of your first try, where you connected the head tube of one frame to the seat tube of the front frame.
I ended up not liking it either, if you mean the schwinn sierra front /trek 900 back plus orange swingframe rear. :) Would still work for a bolt-together, that I may someday still do just to see if it is possible. Someday. :roll:


Love the big shock! I may have to get an air shock on mine if I really load it up. For street though, 1 inch of travel will be enough to prevent broke spokes.
If I had a smaller *working* damper, I would use it, but these big orange ones are the smallest ones that will do any good. :roll: But the spring that is on there in that pic is not the one to be used--instead it'll just be an 850lb MTB shock (whcih is harder than the one that came on these). At least, that's the theory. Should be a pic of the new method in that thread's last page or two. Twin MTB shocks would work if the dampers I have were working (might be fixable, have to figure out how to open them up). I think I'll get up to two inches of spring action this way, maybe, but I forget how much vertical travel taht will actually give. 3 or 4, I think. (including whatever sag there is from bike/rider weight and load)

I dorked around with it some more last night, and found I will need to rotate the whole rear frame down some, possibly a lot.
So that the cut-off front end mates up with the back of the seattube? If possible, grind out slots so that you can butt it up right where the seatstays meet the back of the seattube, so all the force is transferred into the toptube. Much stronger than if you put it above or below that point.

What I really dug about this one, was the way the bottom bracket fits right into the rear dropouts nearly perfect. With some grinding, I could even bolt on.
As long as you use hard washers between the square BB spindle and the dropouts, it would work. Someone pointed that out to me on my own attempt at this.


I am planning though, to weld it. I'll have nice fat thick steel even I should be able to weld. Should be very strong.
Since you won't need the BB to turn at all, you might want to first tighten up the BB cups really hard, so that there can be no wiggling of the spindle. Also check if they are plastic retainer rings and replace them with metal ones or remove and weld them in, before you do the welding on the spindle-to-dropout connection. Otherwise it might start coming apart later.

Because I like saving things for other uses, I'd probably cut off and save the entire BB shell unit for a jackshaft for something, or spare parts for regular BBs, and just weld a set of tubing or plate from the dropout area to where the BB used to be. AFAICT, the only things that mount to the part you'd be removing are the derailer for the cranks and the kickstand, neither of which you'd be using on this bike. (better to use a different kickstand and mounting place)


What will be interesting, is if it can handle at all, or turns out to be a death wobble bike. I do expect to have some tail wag. I might end up with a lot of extra metal added on later. I'm thinking of how I can turn the rear rack panniers into extra bracing the entire length of the bike.[/quote]
This is one way you can minimize wag, and make the rear rack a lot stronger:
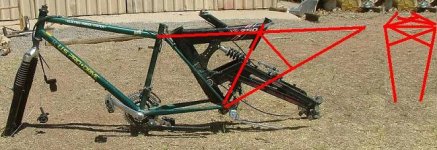
cargo rack braces.JPG
On teh right is a "rear view" of the rack, which would have an X brace across it's top, and a short one at it's rear, so it would be just above and behind where the rear tire would be at full bump.

The extra bracing wouldn't add much weight if you use small-diameter tubing, like seatstay/chainstay stuff, and still be very strong. Could be uber strong if you use old ten-speed top and downtubes, but many of those are thin-wall and hard to weld without burnthru (at least for me with my crappy HF welder, which I am damned sick of at this point). But the stays on them seem to be thicker metal for the smaller diameter. Especially on the cheap ten-speeds. If you get the really tall bikes, like for 6-foot-plus riders, the stays are super-long. That's where I got my thin tubing for the currently-in-progress bike. :)

If you prefer, you could mount the tubes like this instead, for bracing across the entire top of the bike (also usable to mount batteries from in the triangle, but they will be in the way of your legs while pedalling):
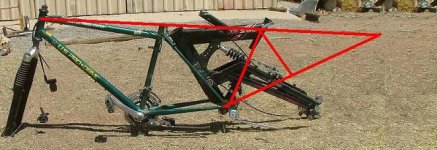
cargo rack braces v2.JPG
The thing I don't like about this is you don't get that nice V of a rear rack, unless you start spreading it out before the seattube, making it wider at that point than your legs may like. This is one of the problems I had trying to figure out how to do the cargo rack on mine.

Since I don't necessarily need a rack across the top of the wheel on mine, just the boxes or bags on the sides, I planned mine like this:
file.php

where it will come to a point in the rear (view from the sides) and have space for an X brace behind the wheel for anti-wagging (I hope).


Oh, here's the pic of the shock as it currently is:
file.php

with the post about it and more pics here:
http://www.endless-sphere.com/forums/viewtopic.php?p=389876#p389876
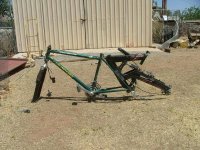
 
Yeah, great ideas AW. Your to pic of my frame is about what I had in mind. Something similar to the extra rods on a beach cruiser frame for stiffness. In the end, the idea is to create a bike that could cross a continent, but cheaper than a Yuba Mundo or Surly frame, and with suspension for my aching back. Still mostly thinking a regular saddle, guess all the miles have given me pretty leathery balls.

Got a long weekend coming up, so I may make some progress. Or I may just ride a few hundred miles. :mrgreen:
 
The only issue I see with the seat moved back and swept back bars is you'll end up with a lot of "tiller" in the steering. You may want to do something like Justin did for his cross-Canada trip. A couple tie rods back to another pivot for the bars. Just a thought.
 
The more I think about it, I'm so old school rider I'm going to like riding the front frame "normal" I have a pedal forward bike, the schwinn trike, and have come to realize I'm not a fan of pedal forward. More room for cargo in back that way anyway. I'm thinking top deck of the cargo rack with nothing on it, and two carry on bags for panniers. Or two backpacks, on some kind of coat hanger type thing that they sling on. Either way, they'd remove easy, and roll or carry.

I'm starting to consider making it front hub too, to get the front wheel and the rear cargo more balanced, in terms of weight on each wheel.

Here it is, cut and ready to weld. The stick taped on is somewhere around where I'll add a brace the length of the bike, connecting the cargo rack with the headset. Should help with the tail wag when pedaling. Checking with a vertical spirit level, I have the headset angle about right, or at least similar to other FS bikes I have. Kickstands will have to be lenthened. Double kickstands will be perfect for such a heavy bike.

One issue I can see right away is acess to the swingarm pivot bolt. Nothing an angle grinder can't fix. Might be cutting that anyway to connect the two frames. Ready to weld..jpg

Starting to think it might come out cool enough to need a name. Zoots longtail was named Le Bette or something like that. How about Bouncing Betty. Then of course, you need nose art....

Edit. Got it welded this am, just tacked in place so I can do some in the saddle tests. Should have a seat and handlebars on it tomorrow. Looks like I may have a chain alignment issue to deal with. could be It will have to be a single gear on the crank to overcome it, or some kind of pully put on to clear the extra bb in the middle of the frame. Looks like it's going to rub in the lower gears.
 
Made some progress today. Constant changes, mostly to the forks end. Ended up with this. Which seems to ride beautifully. Excellent at low speed anyway.B B front view.jpgBouncing Betty..jpg

Heres the bb weld, which needs grinding and more welding to finish. Man, I just weld horrible, but it's holding for now. At the other end near the seat, it's just tacked with three small welds. Once satisfied with the geometry, I'll add angle iorn and make it super solid.Chain just clears the rear BB..jpg

Top, temporary welds. In use, this pushes down anyway, and could almost be left loose.

I was sure I was going to have a big problem with the chain line, but as you put pedal pressure on, the chain lifts, and just clears the rear bottom bracket even when using the small front chainring. Seems to need no additional sprocket. 8)

I put the soft, cheap front shock from the FS bike back on the front. Soft is actually good in the street, and it will allow a front hub. The suspension action is quite suprisingly nice. Even though it's just a pogo stick shock, it does not pogo when you pedal hard. I was sure it would, and half sure it would pogo worse than normal. In fact, it pogos less! A strong spring may be the reason. Those cheap shocks tend to have 450-650 pound springs. This one has a 1250 pound spring. Mongoose got something right on this bike I guess.

I will start out by mounting a rear 2807, but I could put dual 2810's on it. Hmmmmm. That would climb a hill. Eventually, there is a nice place in the rear triangle to put a non hub motor. Not sure if I can cram my 5304 or a 9c in there or not.

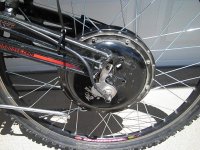
Close pic of just the rear.View attachment 1
 
Dogman;
I really like the bike and I looked closely at your welds. Unless you are a total spaz or drink a couple of quarts of Jim Beam for breakfast, I wonder where you buy your welding wire? I say this because the last time I lent my welder to a friend, in a generous token of his appreciation, he brought me two spare spools of wire. A week later when I went to weld a neighbours lawn tractor, I was blowing holes and gobbing lumps all over the place. I tried to weld on a new, clean piece of 1/8" and adjust the welder. No go, crap!. Then the neurons finally connected and I put a roll of expensive wire in the machine. Perfect weld. I used the cheap wire for electric fence around the garden. I can not make a decent weld with HF wire.
Immediately after welding, check the plugs on your supply side for warmth. If they are not stone cold, they are affecting your welding. Check for heat on your ground clamp and make sure it is clean on both ends of this cable. Scabby alligator clamps don't help. A poor ground circuit makes it very difficult to make a good weld.
When I was a kid, I helped an old guy build stick welders out of aircraft generators and others by rewinding big transformers. The voltage/current was set by changing taps on the transformer style and by regulating the field of the generators. The welds were very uniform with good penetration.
After discussion with AJ, I just had to go an try an inverter welder. Very easy, almost idiot proof way to make beautiful welds.
 
dogman said:
Made some progress today. Constant changes, mostly to the forks end. Ended up with this. Which seems to ride beautifully. Excellent at low speed anyway.
That's good--my big fear starting up a new bike has always been that it'll be unrideable when I get done, and only fixable by some major choppage. :lol:

Heres the bb weld, which needs grinding and more welding to finish. Man, I just weld horrible, but it's holding for now. At the other end near the seat, it's just tacked with three small welds. Once satisfied with the geometry, I'll add angle iorn and make it super solid.
The one thing I really think you should do is pass a tube (that starts *inside* the toptube of the rear frame) into the back of the seatpost where it meets the toptube of the front frame. This will pass the load on the rear frame to the headtube, and not downward into the seatstays (which experience has shown me will not take that forever without bending ;) ).

Even if the tube is not welded to the inside of the rear frame, but only butts up against the rear end of the stuff the toptube is part of, and is just welded at the front edge of that toptube, it's ok. It's just to pass the stress along.

Even better, if you still have the oval section that was cut out of the end of the top tube, I'd grind it so that it will fit under/around the chainstays and against the back of the seattube. Then it will "fill" the space there, and can be welded to the rear part of the toptube, as well as the seattube and chainstays, and the whole thing will be a much more rigid front-to-back beam.


I was sure I was going to have a big problem with the chain line, but as you put pedal pressure on, the chain lifts, and just clears the rear bottom bracket even when using the small front chainring. Seems to need no additional sprocket. 8)
That's nice--it never works out for me like that.


This one has a 1250 pound spring.
1250? That's unexpected....850 is even pretty big for most of the ones I've run across. I keep finding 500 and 600.

BTW: would putting two smaller springs in series give a better load rating, or just give more distance before full compression? If the latter, then does putting them in parallel give a better rating?

Asking because I intend at some point to have two separate small springs, one on each side, for the rear of the new bike, instead of the big orange shock and single spring. (After I figure out how to open the dampers up and revive them....)
 
AW;
Parallel springs gives double the weight carrying capacity. Series adds stroke length, softness and rebound.
 
I'll have to spend money to improve my welding. Using the worst possible 90 buck stick welder. Guys who do weld have tried to use it and have a very hard time. Blind doesn't help much, I need at least a better hat.

I agree AW, I need to connect directly to the base of the seatpost. I plan on some angle iorn welded there, running down the length of the stays. It got awkward trying to cut the second frame to butt nice against the seatpost tube. A crosspiece on the stays in the way, and a shifter cable in an awkward spot. Some generous chunks of Iron should allow about 6 inches of weld there to beef it up, and make an unbreakable connection.

I think I can make it stong, especially if I just take it to a real welder to finish up. :idea: One cool thing is the forces on it are pressing the two frames together on that spot. Not trying to tear it apart. That helps.

I'm really quite amazed how strong it is already. The insanely heavy rear frame and swingarm is quite stiff. There is no creaking, no swaying, no indicators that anything is flexing one bit on the whole length. I thought for sure it would creak at least a little bit. That means building a lot of stiffening into it can wait for acess to a better welder. So I'm thinking about a temporary wooden bolt on cargo rack. That would leave me lacking only some tandem length cables for rear shifters and brakes.

That would put the total cost of the thing into the 20 bucks price range, plus the cost of a motor and battery. Those are laying around the garage, so nearly free in terms of cash from this weeks budget. :mrgreen: Gotta love that!
 
Todays progress.P5280028.JPG

Should have both brakes on it in the morning, and ready for a motor.
 
Perhaps consider that you have changed the force on rear stays, just under the seat post tube, to be in shear, when they were in compression before. Maybe a little gusset from the top of the old head tube to the post tube?
 
DOGMAN you beat me to it. thats a nice setup. if you turned the handel bar and stem around and moved the seat back and down on top of the plywood,it might ride even better. :) :) :) :)
 
if you turned the handle bar and stem around and moved the seat back and down on top of the plywood, it might ride even better

In a recent post, Dogman wasn't happy with the feet-forward posture. I did that for a while, and I will be going back to it. I also used BMX bars to raise my grips to a more comfortable position. The one thing I didn't like before, was that with the reversed stem, my knees would brush against the handlebars a little on those rare occasions when I would stand to pedal.

I still like having the seat farther back and lower (like John-in-CR) but, I plan to get beach-cruiser bars to have enough sweepback to reach, while leaving lots of knee-room...
 
With the beach bars, you can also set it up with a QR bolt on the stem, so you can flip the bars downward like I have htem on CrazyBike2 (and will ahve on the new one) when sitting, and upward/rearward when standing.
 
Not sure what you mean Gordo. This bike has all the joints that hold it together in compression. I could sit on it before I welded it. It could be ridable with all the welds broken. Nevertheless, I plan to do what you are saying today, Adding some steel to solidly connect the Y frame to the seatpost tube, right where the stays come together. It should transfer some load directly to the seatpost tube, avoiding all the pressure being on the stays.

In the BB to dropout connection, it's the same forces as having a wheel there. Up below the seat, it wants to rotate down. That joint would get a pull on it if I get airborne.

If I did like pedal forward, a seat right on the front of the cargo beam would be easy. I did consider a bannana seat, that woud allow moving back a bit. I'm very comfy now as is though, with a straight up riding position from the bmx bars. Not sure yet what to bolt on for panniers. I'm considering carry on bags, backpacks, Ammo cans, 5 gallon buckets with screw lids, milk crates, etc. Idealy, some real hardshell motorcycle panniers but those would be pricy.

Cost of the bike just doubled. I had to buy a tandem length brake cable and some pads. Amazingly, Bell gear shift cable was just long enough to make it work, since my shifter is mounted a few inches further in on the bars.

Up to $35 on it now. 8) I suppose at some point I'll want to put better tires on it, and then the cost will skyrocket to $100.
 
Up and running. Rear 2807 motor. Turns out the front forks were unsuitable for a motor. Still feels decently balanced, at least with no cargo.
Finally found a use for these goofy torque arms from Fusin, after some cutting.Funky torque arms..jpg

Seems to ride quite nice. Took an 8 mile run to the grocery, and couldn't seem to make it wobble. Only going 23 mph, but it feels just rock solid. Some modifications already needed to the cargo beam. I want to make it wider, and maybe a few inches longer. Basicly, down to the fiddly stuff now. Adjusting the seat, handlebars angles, fixing the upside down installed motor, etc.

The suspension function is quite nice, breezing very smoothly over washboard dirt, or potholes. For a weird dumpster frame, it works nicer than you'd expect it to.2807 in back.jpg
 
dogman said:
Not sure what you mean Gordo. This bike has all the joints that hold it together in compression. I could sit on it before I welded it. It could be ridable with all the welds broken. Nevertheless, I plan to do what you are saying today, Adding some steel to solidly connect the Y frame to the seatpost tube, right where the stays come together. It should transfer some load directly to the seatpost tube, avoiding all the pressure being on the stays.

In the BB to dropout connection, it's the same forces as having a wheel there. Up below the seat, it wants to rotate down. That joint would get a pull on it if I get airborne.

If I did like pedal forward, a seat right on the front of the cargo beam would be easy. I did consider a bannana seat, that woud allow moving back a bit. I'm very comfy now as is though, with a straight up riding position from the bmx bars. Not sure yet what to bolt on for panniers. I'm considering carry on bags, backpacks, Ammo cans, 5 gallon buckets with screw lids, milk crates, etc. Idealy, some real hardshell motorcycle panniers but those would be pricy.

Cost of the bike just doubled. I had to buy a tandem length brake cable and some pads. Amazingly, Bell gear shift cable was just long enough to make it work, since my shifter is mounted a few inches further in on the bars.

Up to $35 on it now. 8) I suppose at some point I'll want to put better tires on it, and then the cost will skyrocket to $100.

Looks GOOD! Seeing the 2 x 6 frame you built on the back, it looked like you were going to haul 500lb loads. I have to keep remembering a decent pass of weld will hold 60,000 lbs per inch, so even a shitty tack is probably all a bicycle needs. I consider this a real work of art. Nothing gives me more pleasure than seeing a useful end product from dumpster diving. This has gone far and beyond just being useful, it looks & works great.
 
Back
Top