Adventures in frame building/Build log

aixelsyd

1 mW
Joined
May 7, 2012
Messages
17
Location
Upper Peninsula Michigan
After spending a while reading everything I can on this forum and others I am starting my own build. I'm trying to create a freeride bike with a mid mounted hub design. Not really concerned about top speed, looking for something to help out with the uphill parts of the trails. With my amateur skills and a garage full of power tools what could go wrong :wink:

I'm using a white industries DOS freewheel sprocket on the crank. Motor, controller, and CA came from ebikes.ca. Using 1" square steel tubing as frame material. Any constructive comments are very welcome.

Essential bits:
Crystalyte HS3540 rear hub motor
40amp controller
48V 12ah headway cell kit w/bms


Problem #1: Frame
From my reading the frame seems like the weakest link of the ebike. I guess normal bicycle frames just aren't up to the task for off-roading ebike stresses. So I'll be building my own. I've copied the geomerty of another freeride bike and gave it an tad bit more rake. I ordered enough supplies to make 3 frames, I figure the first two will be terrible.
Here are some of the first cuts...
7212123168_fa8320476f_n.jpg
7212119338_32b2078fd9_n.jpg
7212121294_9d40c6763f_n.jpg

All cuts done (except motor mounts), ready to tack and weld
7212129274_85109e946e_z.jpg


After welding
7212127984_3cfd5bc4c5_z.jpg


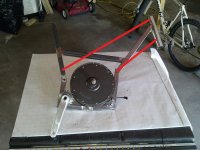
Attached the bottom bracket shell and placed the motor inside the frame as a reference. I plan on welding a bar across the frame horizontally and mounting the motor directly to that. I plan on making some fiberglass cowelings to cover up the motor and make the bike look sharp.
7212130642_6e79c789e4_c.jpg


Tomorrow I will be mounting the motor, welding the braces onto the frame, and hopefully starting on the swingarm.
Cheers.
 
It's hard for me to tell, but I hope that your square tubing is fairly thick walled. I've fabricated pedicabs from 1" round tubing and I use .095 wall.

Also, I'm a bike mechanic and I can tell you that you'll rip that head tube off unless you have multiple frame tubes connecting to it like a traditional frame.

Gussets are your friend, too.
 
goodgnus said:
. . . . you'll rip that head tube off unless you have multiple frame tubes connecting to it like a traditional frame.
Gussets are your friend, too.

Create a triangle with a short piece at or near a 90 degree angle off the main to form a second connection of that headtube. Or fill the entire length below the joint with a gusset, that might look kewl. The main thing is it needs to be held in two places to prevent all sorts of movement/flexing.

I'd feel sure 1/16" wall on a 1" square tube would be plenty strong enough, but I'm not an expert. Pedicabs bear more weight without being so much bigger and you have to plan on them bumping into things a lot.
 
You have concerns about the strength of regular bike frames, but you build something with no triangulation and no bracing to speak of? I think you need to study the problem some more. A forty year old road bike frame has more structural integrity than what you have posted here, and weighs a fraction as much.

If you are a patient technical reader, I suggest "Bicycles and Tricycles" by Archibald Sharp. It's well over 100 years old, but it does a better job of covering the basics of designing bike frames for strength than anything else I have come across.

http://books.google.com/books?id=CNwWAAAAYAAJ

If you are not a patient reader, at least read a little about trusses and try to understand them. A bike frame is a kind of truss.

http://en.wikipedia.org/wiki/Truss

Start with a boring traditional bike frame of an old-fashioned nature, with straight tubing, and change it only as much as absolutely necessary. Make all necessary changes with the understanding that straight tubes are straight for a reason, and they start and end where they do for a reason. Don't join two tubes at an angle without bracing at least one other tube to the same joint. Don't connect tubes of radically different size and thickness without a brace or a gusset. Try to make triangles and not quadrilaterals or pentagons (or heptagons, as you have done here). Try to avoid unnecessary cantilevers, like the front end and seat tube of your frame.

You can't really improve on over 150 years of continuous development in cycle technology. You can only hope to improve it a little bit for your particular special purposes, by making small intentional changes from what has been proven to work. What you have here doesn't even look safe, let alone like an improvement.

Chalo
 
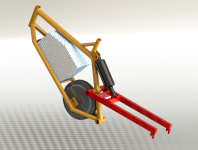
hello aixels, I am in the process of building my own bike frame too, with a mid drive. After much research and thinking I came to this design for the front frame :
file.php


I actually built two velomobiles from square tubing, as it is really easy to build stuff from, I just think you should consider making your frame simpler and more "traditional"

sw capture 3.png
 
Chalo said:
If you are a patient technical reader, I suggest "Bicycles and Tricycles" by Archibald Sharp. It's well over 100 years old, but it does a better job of covering the basics of designing bike frames for strength than anything else I have come across.

http://books.google.com/books?id=CNwWAAAAYAAJ

The Sharp treatise and other interesting old bicycle books are available to download from the Internet Archive:
http://archive.org/index.php
http://openlibrary.org/books/OL23384469M/Bicycles_tricycles
See: http://www.endless-sphere.com/forums/viewtopic.php?f=1&t=22438
 
Another classic which is relevant to this topic:
http://books.google.co.uk/books?id=8ltSZp6oQ8sC&printsec=frontcover&dq=je+gordon&hl=en&sa=X&ei=3u20T4WcPI7G-QaO7LXuDQ&ved=0CDYQ6AEwAA#v=onepage&q=je%20gordon&f=false
 
Isn't it a bit presumptuios to assume he wasn't going to triangulate the extended sections in the photo's?

I would like to know where the "From my reading the frame seems like the weakest link of the ebike." comes from....

Other than some tortional issues when running them at moped speeds & really throwing it left & right into corners on a kart track..frames have been perfected for a long time.

its the little details like "room to mount batteries in the triangle" or having to add proper drop-outs to keep a hub form spinning an axel are the only areas for improvment.
 
Thanks for all the input! Yes, the frame looks like a toothpick ready to snap right now. I mentioned at the bottom of my previous post that I still have to weld the bracing to the frame, I probably should have elaborated on that :roll: The motor mounts are also part of the structure. I'm on the laptop now and don't have any of my cad files to post a render of the full frame, I'll do that later. Thank you for the reading suggestion Chalo, got it loading on the reader as we speak. Bzhwindtalker, your frame design looks very nice! I've been following your build with great interest. I wanted to include some protection for the motor in my design, in case I high center the bike on a rock or something. Has that every happened on your bike?
Well, off to the garage, Cheers.
 
aixelsyd said:
Thanks for all the input! Yes, the frame looks like a toothpick ready to snap right now. I mentioned at the bottom of my previous post that I still have to weld the bracing to the frame, I probably should have elaborated on that

Oh, good. I should have known that fabrication skills like that come along with some horse sense too.

Chalo
 
Here is a quick update to the build log.
I wasn't able to work on the bike for a while due to illness, Finally got back in the garage last week and got the frame 80% done :D still need to attach the bottom bracket shell, weld a brace and clean up the frame.
7274672954_21742e9fdf_z.jpg


Now with the rock guard hinged
7274672788_50ded0596f_z.jpg


the rock guard comes off so I can remove the motor easily
7274672650_bb07639eb0_z.jpg


Started working on the battery pack, those lego bricks make it too easy :D
7274673120_de450ea889_z.jpg


I'm using polycarb sheets to make the battery box. Then joining the walls together by riveting them to aluminium angle. I found some nice looking rubber corners at the hardware store that i might add later. the black on aluminum looks pretty nice.
Here is the bottom part of the battery box on the frame. The box will also be anchored in the front. When its done the box will be a single unit that can be taken on and off easily
7274672316_a8eb32a57e_z.jpg


another angle
7274758650_f7e4264c75_z.jpg


Bottom side
7274762154_3f7de5536c_z.jpg


Lots of work yet to be done but i look forward to having something that will move soon :)
 
aixelsyd said:
. I guess normal bicycle frames just aren't up to the task for off-roading ebike stresses. So I'll be building my own. .

looking at the above statement , and looking at your new frame, i still cant help feeling you have missed your objective.
Your gussets have reinforced the head tube nicely, but that has now created a major stress concentration half way down that spine tube ! :shock:
 
Hi all, It has been a minute since my last post so I thought an update on my progress would be nice. Shortly after my last post I came across a great deal on used Giant AC Air. The frame was cracked but had great components and they were worth the price. I tried to modify my homebuilt frame to include the rear suspension but ended up making a mess of it :oops: . So I was back at square one desiging a new frame when i came across one of these http://www.mountaincycle.com/pre-2011/battery. the dimensions looked nice and it also had some good mounting points so I pulled the trigger and started designing a motor bracket. My father happened to be in town for visit that week so we fabricated the motor mount together :) . He has been super excited about his electric car conversion(which turned out amazing http://evalbum.com/3439) Next I got the batterypack together using some waterproof tackle boxes from the local Walmart. Still need to make a few adjustment to the chain line, strengthen the battery boxes, clean up the wiring, ect. I also plan on adding some plastic fairings to the side to make it look like a nice finished product. But she rides great. I've just taken her on a few short test rides, 30mph on the flats in the tallest gear / 10mph on steep hills in the lowest gear. Boy does she like to wheelie
7421188700_3c0f32417a_c.jpg

[youtube]16Gz4ca7kSg[/youtube]
[youtube]ZYiI8Sln1fg[/youtube]
 
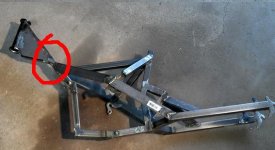
Looking good. Can't wait to see some real action with it. It looks like the frame is quite different from the previous version. What happened to your head tube support?

Also, I take it that you did something to reinforce the weak spot circled in red.
aixelsyd frame.JPG
 
Yes, I had another piece of square tube welded to the bottom of the head tube and lower on the motor mount. The frame was plenty strong, definitely overbuilt. It was a fun learning experience, but the project is much better now that i'm using a real bicycle frame. As hard as I tried, I am not a frame builder :roll: . the frame I ended up with is a super beefy DH/4x.
 
New video, Unfortunately I stripped out the rear hub on this ride. I also had to slow down over the wet parts because my water proofing isn't done yet.
[youtube]hMGRM4tbz0M[/youtube]
 
Back
Top