Bafang bbs02 / bent frame

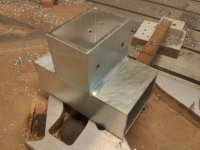
PS- DO NOT drill into your frame to create a threaded hole. The tubing is dangerously thin everywhere except the very ends... A threaded boss like the one on my bike has to be MADE by adding enough metal to the tube to support the threads. ( if you have the frame welded by a competent welder... He could add a threaded boss if you need it.)

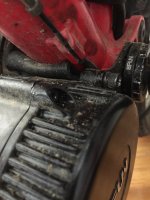
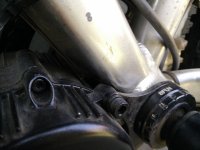
However... You can get a spacer to stay in position with rubber cement... Or by gluing it to the spot on the Bafang that is missing the rubber pad.
 
PPS
There are lots of different types of epoxy putties available... Some of the simplest have the A & B components as side by side bars of clay-like material... ( just cut across the two bars evenly and mix ). Or even with the A component wrapped cylindrically around a core of the B component.

Avoid the putties intended to repair Wood... Their fillers make them relatively unworkable.

But there are putties that are metal or ceramic filled... And some that have extremely high 'tack'... Meaning, they stick to just about any clean grease free surface like crazy.

When mixed, the ideal putty should be like soft modeling clay. It will get stiffer as it cures...and many of them cure within 5-15 minutes.
Almost all epoxy putties can be smoothed with a damp brush...the moisture should not affect the cure... And I often use a wet steel tool to smooth, shape, And contour the putty surface because the putty won't stick to the wet tool.
 
friendly1uk said:
mfj197 said:
Sculptingman, that's good information - thanks. I'm putting a BBS01 on an aluminium bike at the moment and like the idea of the epoxy clay so will go looking for something like that.

Michael

I don't think you will do any better than this http://www.ebay.co.uk/itm/Milliput-Standard-Grade-Yellow-Grey-Cheapest-On-Ebay-Freshly-Made-/111539641849?pt=UK_Crafts_Cardmaking_Scrapbooking_Glue_Tape_EH&hash=item19f847ddf9

I like that A & B are mixed equally, allowing me to mix up very small quantities.
You could make a marble sized ball and squish it in place. Oil or clingfilm the motor and frame so the stuff don't stick. Remove your part once set, and cut away the edges to square it up.

You could forget the barriers and just glue the motor in place with the stuff. You may loose some paint, but it's not great at gluing things together. It's not wet enough. To really join things you want to massage a bit of freshly mixed stuff on to the surface. Make it smear. Then your golden. If it fails after that, it's perfectly fitting shape will aid another adhesive holding it in place.

Factory direct so it's nice a cheap. It's one of our better products. Something similar is £10 so it is well worth having. Comes in a range of colours. The white is hardest to mix as both parts are white.

It's one of my better discovery's. From a jeweler.
I was having a look at this exact stuff yesterday! I'm not sure I'm ready to glue the motor in position as it's a brand new bike and motor and I want to leave the option of going for a change of motor down the line if I feel so inclined. So clingfilm it will be - many thanks. I'm also routing all cables under the BG and have seen Sculptingman's good advice on using the putty with cables too.
 
How you fare with the epoxy/putty/milliputty spacer thing?

I am having the same issue with my BBS02 on my aluminium frame. The tube is too wide, so the bolt and housing of the motor makes contact with the tube in one specific point, causing one pressure area.

file.php

file.php
 

Attachments

  • 2015-06-10 11.31.48small.jpg
    2015-06-10 11.31.48small.jpg
    93.3 KB · Views: 1,299
friendly1uk said:
I don't think you will do any better than this http://www.ebay.co.uk/itm/Milliput-Standard-Grade-Yellow-Grey-Cheapest-On-Ebay-Freshly-Made-/111539641849?pt=UK_Crafts_Cardmaking_Scrapbooking_Glue_Tape_EH&hash=item19f847ddf9
The link no longer works, but provides still enough information to know what it was: Milliput.
Thanks for the tip, and to make sure we have a working link: http://www.milliput.com/howto.html :)
 
At 80 Nm there is tremendous force that close to the axle. When focused on a small point like that I'm not surprised it causes damage. I filed down the tip when I fit it to my fatbike to keep this from happening, but I will check on it anyway now.


It's possible to repair it with HTS2000, but it takes some training to accomplish with butane or propane. Oxy-acetylene is easiest. Google HTS2000. :)
 
tahustvedt said:
It's possible to repair it with HTS2000, but it takes some training to accomplish with butane or propane. Oxy-acetylene is easiest. Google HTS2000. :)
Thanks, but wouldn't it require heat treatment afterwards? It's a specialized hardrock bike from 2004/2005, I guess it's 70xx aluminium.
 
I don't think so. The temperature is low enough to not require heat treatment afterwards if done correctly. I would try it if the alternative is to throw the frame away.
 
Here's a picture of a test I did. I punded it apart again with a hammer and the aluminium broke instead of the HTS2000. Large areas like this are difficult to solderm but filling a crack would be easy.
 

Attachments

  • Velo39.jpg
    Velo39.jpg
    82.8 KB · Views: 2,609
opperpanter said:
How you fare with the epoxy/putty/milliputty spacer thing?
Sorry to hear of your problems. The Milliput was easy to use, and as for how it works - well, I've not had any frame issues so I guess that's a positive!

Michael

P4220291.jpg
 
The damage doesn't look too bad. No visible cracks, but that doesn't have to mean anything...


I've also seen people who remove a bit of the bolt housing so it doesn't touch the tube anymore.
In my case that won't work as the tube is tooooooo wide.
 
opperpanter said:
tahustvedt said:
I punded it apart again with a hammer and the aluminium broke instead of the HTS2000.
Could mean two things:
1) The HTS2000 is very strong.
2) The soldering made the aluminium (very) weak

:)

True. :) But it's supposed to be stronger. My Butane torch had a hard time achieving the HTS2000 melting temperature (500°F lower than aluminum) on the aluminum profiles as they dissipate the heat so well, which is why it was so difficult to solder the large interface. The low melting temperature is the reason why I bought it. I wanted to "braze" my own aluminum frame. I would need an oxy-acetylene torch to do it because of the size of the profiles, so I save it for repairs now. It's interesting stuff. http://www.aluminumrepair.com/hts-2000-second-generation-fluxless-brazing-rod/
 
I just put an old bike tube between the motor and the frame. This solution works.
 
I also use a thick rubber shim to separate my aluminum frame from the BBS02 unit. I think this shim came with a seat-post-mounted rack. I put it there originally because otherwise the unit would eventually push up against the frame and the shifter cable and make my gears stuck, even if I originally tightened the unit in a position that leaves room for the cable. Now I know there's a second, more important, purpose: to preserve my frame. Good to know. I'll keep an eye on it. I think the shim will work for now. Or is anyone of the opinion that this is an insufficient solution and my frame may be at risk? Otherwise I'll definitely create an epoxy spacer as sculptingman instructs.
 
egosphere said:
I also use a thick rubber shim to separate my aluminum frame from the BBS02 unit. I think this shim came with a seat-post-mounted rack. I put it there originally because otherwise the unit would eventually push up against the frame and the shifter cable and make my gears stuck, even if I originally tightened the unit in a position that leaves room for the cable. Now I know there's a second, more important, purpose: to preserve my frame. Good to know. I'll keep an eye on it. I think the shim will work for now. Or is anyone of the opinion that this is an insufficient solution and my frame may be at risk? Otherwise I'll definitely create an epoxy spacer as sculptingman instructs.
Do you have picture of the shim?
 
Pictures of the shim attached. Excuse the dirt; haven't gotten around to cleaning after yesterday's ride. The shim is the thicker one of two that arrive with this http://amzn.com/B002T5GHNI and folder over. At first I didn't fold it and while the gears wouldn't get completely stuck they would become unresponsive to upshifting (i.e. giving slack in cable). Folded over it's perfect. And it doesn't look like any part of the motor is putting the frame in danger, right?
 

Attachments

  • IMG_1173.JPG
    IMG_1173.JPG
    96.6 KB · Views: 2,548
tahustvedt said:
I don't think so. The temperature is low enough to not require heat treatment afterwards if done correctly. I would try it if the alternative is to throw the frame away.

I know so :)

First of all we are most likely dealing with Aluminium 6061-T6.

Go above 225 degree Celsius and the hardening begins to weaken, raise the temperature and it goes faster (it's also time dependent). Go above 530 degree Celsius and let it air cool and it's gone. After normal welding of hardened aluminium the strength is around 75MPa around the weld, hardened aluminium 6061-T6 is around 300 MPa, in other words the strength in the material next to the heated area is greatly reduced.

Even if you try to harden locally you will always get a border area to the originally hardened 6061-T6 that is unhardened.

My best advise if you weld or solder or use heat is to always Quench afterwards (cold water and fast), you then reduce the heat/time period and could if you are lucky get something that looks like a Solution Heat Treatment called -T4 hardening.
 
I had a smaller dent then opperpanter and after the first day of riding put on a rubber spacer similar to egosphere. I tightened everything up with the motor bolt housing nestled in the dent it had created. That was 500 miles ago. Is a dent like the one shown by opperpanter a structural problem?
 
Back
Top