electrifying a cannondale bad boy 700

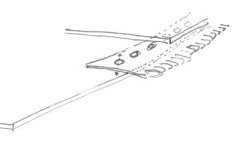
that's a good idea. you have to work very precisely and cover the spokes with tape or something so the epoxy will not get into them I think. and maybe if you want to open a triangle form you probably have to split the zippers in two parts other than going around a curve while at the third side you could laminate in a fabric functioning as a hinge. I am not sure if you can use zippers other than straight (seen from "top view" of course). but I'm not sure about that.
also I would make sure that the epoxy can leak trough the fabric of the zipper eihter through the fabric net itself (if i's rough enough) or otherwise manually make some wholes in it. that way the epoxy will make a connection to the other side and the border area will be stronger.
 
Soo, you could just make a buck of the shape you want, glass it over, then cut it in half and then laminate the zipper in place right? Sounds a LOT easier than I am sure it is, but I like it!! I think I might have to try it!
 
Yeah. I thought of this when I was thinking about my Spain trip this summer and getting all the suitcases out. Using a zipper would eliminate the need for a keyed entry. The zipper end could just be hidden, and a piece of tape can go over the zipper joint along the whole perimeter for a seemless enclosure. Then, if you wanted, you could paint over that (if you use A123 batteries or ones with high cycle life) and break it open every few years for a battery refresh and then repaint.

I would leave little trenches in the mold for extra space for the fabric. Maybe an 1/8 of inch. I would drill little holes.

Can someone get me started on laminating and tool/supply gathering? Did I miss a tutorial on here?
 
Anyone?

And if you used a zipper, you would have to make sure you put enough battery pack padding in so that it is snug in there and not bouncing around.

zippers.
http://cgi.ebay.com/US-HEAVY-DUTY-S...aultDomain_0&hash=item562ad063fb#ht_500wt_922

http://www.rochfordsupply.com/shop/Zippers/Fixed_Length_Zippers-Separating/index.html

There are some #20s (18mm) out there, but I'm not sure if you'd get that much benefit from using them. THey will probably protrude a little more from the enclosure as well.
 
All I can say is... WOW!
Great JOB E-cannon! This build has had me seriously thinking about using fiber glass on the inside of my bike. Just a couple questions that I did not catch in the thread.
How did you finish up the fiber glass to look Nice and clean? Fine sand paper and primer?
Another question. Did you use one large sheet of fiber glass? And work it into the foam?
Great work once again! I'm sorry I did not find this build thread earlier.
 
Seriously considering doing this for my next build. I hope the op is able to give some feedback about how it the enclosure copes with frame flex? I run a steel frame trek mtb and a see loads of flex going on between my knees as a motor along. With the rigid mounting method this is all transferred to the enclosure- how has it faired over time? Have any cracks appeared?
 
pguk said:
Seriously considering doing this for my next build. I hope the op is able to give some feedback about how it the enclosure copes with frame flex? I run a steel frame trek mtb and a see loads of flex going on between my knees as a motor along. With the rigid mounting method this is all transferred to the enclosure- how has it faired over time? Have any cracks appeared?
Sorry my late answer.
No cracks have appeared. The bicycle endured a couple of falls/crashes but on low velocity which I believe were stronger stress tests of the construction than a potential bending of the frame.
I believe also that you can't call the mounting completely rigid, as the holes I drilled through the enclosure are granting some clearance around the screws. I also installed some rubbery spacers on the inside of the enclosure, the spacer tubes between frame and enclosure are some sort of hard plastic.
Actually I can't really imagine a deformation of the frame which could harm the enclosure if you (idealized) look at it as a triangle. the bending then must happen in tube direction and can probably be neglected. But maybe I am totally wrong here.
Then I have to say also I use this bicycle nearly every day but not on a rough terrain (city).
Hope this helps a little.
Cheers
 
I have just found your postings, that is a beautiful job on the box. Inspires me to perhaps make one of my own on my upcoming project. I was planning on using glassed wood for the contrast with my bare metal frame but your box looks as if it came on the bike.

For future reference, if you haven't tried this, the easiest way to get rid of the foam plug is to use acetone. It dissolves the foam instantly and allows you to just pour/scoop it out. Here in the US acetone is cheaply and easily available from hardware stores by the gallon, from specialty paint stores in 5 gal cans. (Perhaps it is more tightly regulated in Europe?) Just wash out the glass box when you are finished. Acetone does evaporate quickly but it will soften the glass if left in contact for a long time. You talked about the fumes and toxicity when using epoxy, so you might not want to do this but it would make one part of the job much quicker and easier.

I am curious about something though, what kind of epoxy and glass did you use that requires you to bake it to achieve temperature resistance? I have been working for years with several different US manufacturer's resins and fabric/mat and have never read or heard anything about temperature curing like that except to ensure consistency and maximum strength in critical components. I would be curious to learn more. I know some fillers for finishing and fairing will soften in full sun if laid down under a dark paint but even those are okay if painted with a light color. I can soften the resins I work with with a heat gun but that is giving out some serious hot air, like 300-350C.

Very nice looking conversion.

Blazer
 
Super nice and very shiny!

Somehow I have missed two things

1. How is that fiberglass looks so nicely finished. How it got so smooth from being rough?

2. what do you have to do to that bike frame to accommodate/attached that enclosure
 
Vanart said:
Super nice and very shiny!
thanks!

Vanart said:
1. How is that fiberglass looks so nicely finished. How it got so smooth from being rough?
- sanding/polishing (ATTENTION here, protect yourself! The dust is dangerous.)

- primer

- finish (this was some expensive two component finish especially designed for sailplane finishing (low weight because of high covering power, ultra durable)
I hade no airbrush so I used a roller, that said it came out astonishingly nice. The finish color has in fact some metallized effect.
I guess a "normal" finishing system would have done it also...


Vanart said:
2. what do you have to do to that bike frame to accommodate/attached that enclosure
I drilled 2 additional holes in the top tube and inserted so called blind rivet nuts. The 4 other mounting points were already there (cup holder).
the rest is easy: screws from the inside of the case, some hardplastic (I guess they were silicon) spacers between frame and enclosure.
 
Hi e-cannon,

beautifull build! Today I bought a Bad Boy myself for electrification (it's father's day, i'm so happy :lol: ) Found this topic really inspiring. Will have to go for a mid drive since the bike has a rohloff hub.

Will have to fugure lot of stuff out but will post when ready...

Enjoy your bike!

Maarten
 
Back
Top