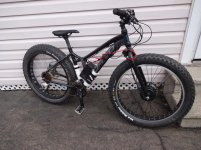
Fatbike - Norco Bigfoot !

I was thinking as I read down the thread that it might have been a better idea to lace the left rim to the right flange etc, turns out that might have been a good idea! It may also be a good idea to lace and true the wheel that way before the epoxy cures as a way of relieving stress on the joint?

Or tig weld them on the flanges that are hidden inside the tyre! Either way cross lacing them can only make it stronger.

did you think about making it 72 spoke? in an 8 cross pattern, that would look awesome!
 
I wondered about the tig welding option, i know a few talented guys here in town... i just imagined the rims would warp something awful but i don't know much about these things.... nothing to loose at this point, these rims are otherwise trash... so why not try ?

I really expected this to hold up.. argh...

there is room on the motor flange for double spokes :p
 
Rims flex and twist in normal riding, so the poxy joint would be under constant pressure and shearing forces.

It might work if you had some other form of binding as well. Like drilling holes along the glued surfaces, then tieing them together through the holes with kevlar fishing line (cheap at walmart) combined with the Epoxy.

Also maybe have the spokes cross sides, so the right side flange's spokes go over to the left side's rim. That way the force of the spokes is pulling the rims together.
 
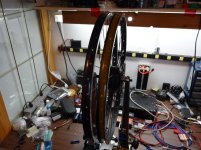
I just pulled it off the bike, removed the glue, rims are still spoked to the motor flanges with a 1" gap in the middle lol... looks cool

Norco-bigfoot13.JPG

I only applied glue to one rim, then clamped them to dry, i got pretty good adhesion as it split half on one side and half on the other rim....


Going to try the epoxy again, applying to both sides this time, then as suggested above, drill and rivet or nut/bolt thru ... and bind them with either fishing line or metal cable of some sorts ( getting it tight is going to be difficult. )

Goal here is to make it work with what i have on hand, without buying yet MORE parts..... i tried the HB Trials guy and checked chopperus, HB only has 32 hole options... and prices plus shipping on rims make my eyes bleed...

Using a set of spokes to pull each rim to the opposite flange would require buying longer spokes... so for now i will try the diy options and see how it goes.
 
Curious that it didn't stick to the rim given the fine grooved CNC'd V brake surface. As drunkskunk said there may have been something on them that prevented a good stick. I reckon enough bots/rivets alone would suffice without the epoxy.

Aaah, to be time rich :)
 
I did clean the surfaces really well with solvent and they were brand new rims with no brake pad residue .

Not only are the spokes pulling them apart, the tire is causing serious stress as well even at only 10 psi.. being glued again shortly.. and if i can figure out how to drill through the middle without making a royal mess, rivets and nuts/bolts tomorrow !
 
A trick I have used when using any epoxy with aluminum is to wet sand the epoxy into the aluminum to prevent oxidization. You want to sand the aluminum so the epoxy can key into the aluminum but the problem can be if you just simply sand the aluminum with out a coating of wet resin it will just oxidize as fast as you can sand the aluminum. The oxidization happens too fast unless you put on the resin First and then wet sand the resin into the aluminum. I have been told by the tech help at West System this will stop the oxidization from happening when working with aluminum. I have found this method to work very well for bonding aluminum to aluminum with west system epoxy and I am sure it will help with any epoxy you use when working with aluminum.
 
???... mixing 2 part epoxy and sanding it in ?...that would make one hell of a mess ? or i'm not reading this correctly.

I did however, sand the surfaces prior to reapplying the DP treatment....

View attachment 1

Washed all the grit with solvent... and applied a much larger amount of epoxy compared to last time... and applied it to both surfaces..

then i used every clamp in my collection to squeeze them back together, too lazy to remove the spokes lol.
 
Had to tweak the spokes a bit, the rim is far from perfectly true but with this large a tire and disk brakes, it's not noticeable at all.... Put the tire back on.. bolted it up .. slapped on a temp Lipo pack and had a go at it again !!..

Happy to report, after a 20 minute bash session, so far so good !!!! :p

Norco-bigfoot20.JPG

Shameless plug time: :lol:

Norco-bigfoot21.JPG
 
Ypedal things are looking good. To answer you comment on making a mess with the sanding in of the wet epoxy .....yes it will make a mess but it will work. If you dont encapsulate the sanded aluminum with a wet coat of resin the sanding you do on the aluminum will oxidize as fast as you can sand it and it will not bond as good as it will if you do your sanding with a wet coat of epoxy between the sand paper and the aluminum. Sounds crazy but I have found it to work on aluminum boats and all kind of stuff ever since the tech support at West System gave me this advise.
 
So after a few more rides, on and off-road , feeling more confident about this last ditch effort.... so onward with a proper battery setup.

Got 4 x 5S 8ah packs, setting up for 36v 16ah , with BMS and quick plug charging.

Been thinking of how this was going to come together for weeks now... but today.. after about 3 cups of black coffee... i got to it.
 

Attachments

  • Norco-bigfoot22.JPG
    Norco-bigfoot22.JPG
    96.7 KB · Views: 1,342
The vid's awesome, wish we had trails like that here.
I found these Weinmann DHL fat bike rims, and they are available on amazon for less than $40 with $6 shipping.
here's the link:
http://www.amazon.com/Weinmann-DHL101-Alloy-Rim-Powder-Coat/dp/B008ZTKF6M/ref=sr_1_4?ie=UTF8&qid=1400251819&sr=8-4&keywords=weinmann+dhl+rims
 
waynebergman said:
Ypedal things are looking good. To answer you comment on making a mess with the sanding in of the wet epoxy .....yes it will make a mess but it will work.
Yeah that make sense, I googled around a bit and it does recommend some mean surface preperation for bonding aluminium.
Anodised aluminium alloys - must be bonded as quickly as possible after degreasing and abrading and certainly within 30 minutes / must be stripped by abrasive blasting or by etching in sulphuric acid/sodium dichromate solution or branded aluminium etch compound. Unstripped metal is not suitable for bonding.
http://www.wessex-resins.com/westsystem/surface-preparation.html

Ypedal said:
googling fatbike today.. came across this :
Yeah cool vid, looks like hes having a nice time. I guess there not going to show how that guy faired at the end of the day after riding back up that hill with no motor and drinking all that beer.
BTW what motor did you put on the bike? I like how you went with 36v for the battery.
 
Sweet battery idea. I need to make an enclosure for some electronics and might borrow some of the technique.

You should post that in the battery mounting thread.
 
Update time.. :p

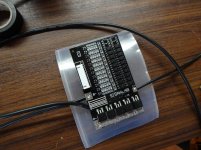
Since i'm running a 15 amp controller at the moment, figured i might as well use a BMS this time.... would be the only bike in my collection with one.

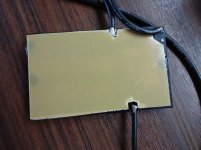
Ping includes shrink wrap and a piece of back board with his BMS's ..
Norco-bigfoot25.JPG


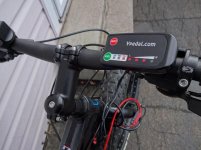
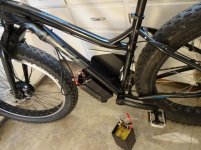
Instead of hiding the bms inside the battery box, i decided to mount it in plain sight, makes it easier to explain how an ebike system works when parts are visible.. so i soldered the power wires to the back of the BMS and cut a few notches in the backing board, then used a bit of hot glue to secure them together.
Norco-bigfoot26.JPG

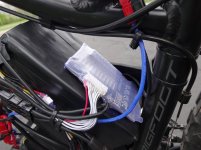
again, a bit more hot glue and stuck it to the top pack.
Norco-bigfoot27.JPG
 
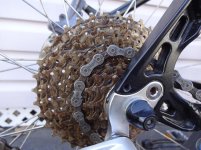
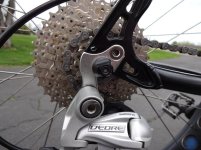
See the cassette and how dirty it was, covered in filthy rust and grease..... ( contrast with the chain i started cleaning while mounted to the bike... )
Norco-bigfoot28.JPG

And after A LOT of WD40 ... ... ended up removing the chain from the bike and bathing it in wd .. then applied a fresh coat of Clean-Ride blue ... no more greasy pant legs..

Norco-bigfoot29.JPG

Ended up taking the entire front bottom bracket apart down to the chainrings to do a proper job of removing winter salt and grit... cleaned everything.. greased.. re-assembled..

Norco-bigfoot30.JPG

Front derailleur was completely seized up ... took over 30 minutes of soaking and working it to free it up !~.
 
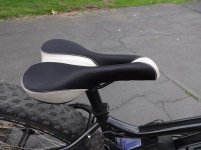
The original seat sucks... puny little hard as a rock thing it was...... got a Gel one and tried it... also no good, too thick at the horn end making pedaling difficult as it chaffed too much... then i found this one gathering dust on one of my shed bikes.... so i stole it .

Norco-bigfoot31.JPG

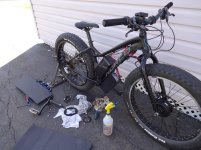
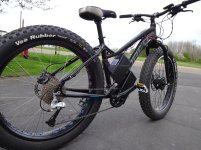
So, there it is !.. one electrified Norco Bigfoot !
Norco-bigfoot32.JPG

Took it out for the first real distance ride on Saturday, went aprox 12 km on 3.2 Ah . ..

3.2ah x 36v = 115wh / 12 = 9.6 wh/km

This is with moderate pedaling on fairly flat terrain, it's a blast to ride and even with low power on tap it's still fun.. Rolling over train tracks at 30 kph you don't even feel a thing, them big tires sure do howl like crazy tho..

Everywhere i went, people stopped and stared, it's hilarious the reaction you get riding around on this bike, people don't even realize it's electric as the tires are the first thing noticed..

youtube vid to come.
 
Ypedal said:
I just pulled it off the bike, removed the glue, rims are still spoked to the motor flanges with a 1" gap in the middle lol... looks cool

View attachment 1
Don't know if this double rim sticking connection problem has returned for you but I was just browsing the net for different type of flux's and found this flux that can join two aluminium pieces together, and I remembered this post about the issue.
Even if its not of use for you now, maybe one day in the future, or maybe some one else googling up how to stick two rims together might find it handy.

http://www.youtube.com/watch?v=D690dHDcVfA

Strength test...

[youtube]t_QoJTwvsTY[/youtube]

http://www.superiorflux.com/aluminum_solder_paste.html
http://sra-solder.com/product.php/7016/10/aluminum_solder_paste
I was going to demand you buy it and try it for my own personal convenience and entertainment but I have found anonymously and arbitrarily demanding things from people on the internet doesn't seem to work very well.
 
Back
Top