How do I get the side covers off my Crystalyte 5304

Joined
May 2, 2007
Messages
419
OK, here's the latest on my rain damaged Phoenix Cruiser. A friend with a Suburban and a bike rack, a strong friend, took me to my mother-in-laws house where we loaded the bike. Once the bike was off the ground and onto the carrier it was obvious from what I had been reading the motor was/is damaged. It does not freewheel and when you turn it it has resistance about every third revolution. It's no small wonder I couldn't pedal it and had to push.

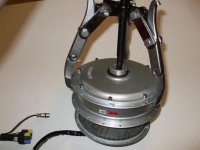
So once in my shop I put the pedals on a couple of five gallon buckets (a quick and easy work rack I learned about here on ES) and removed the front wheel, removed the allen nuts and tried to get the side covers off. That was 90 minutes ago and I am no further on getting the side covers off then if I went on a trip to the moon. Them suckers are on tight and the cover where it bends over the side is thin and I can't get a screwdriver or even a small screwdriver to bite so I can pry them up. Justin has pics on his website of one with the covers removed so I know it can be done. Does anyone know how?

Thanks, Mike
 
Wow, great thanks. Ypedal (ya gotta love that name), in the picture you have the pullers on the heavy lip with the allen screws in place and it appears the screws have been removed on the side where the wires are. You then apply pressure and the wire side seperates from the hub. Do I have that right? I'll head for the auto parts store tomorrow and try and find a three arm puller and would really like to apply it just like the picture shows. It's a lot easier than trying to fine a way under that thin metal lip where the cover folds over.

Mike
 
The covers are stuck on by the paint. See this thread: http://endless-sphere.com/forums/viewtopic.php?f=16&t=3720

If you just want to pull off the cover, you don't need the gear puller. You need the gear puller if you want to remove the magnet ring.

Did you test the motor first?

Try spinning the motor after disconnecting the controller and see if the resistance goes away.
Your description sounds like shorted FETs in the controller.
 
U actually can dispense with the gear puller altogether. Once the screws are out and the paint seal broken on both sidecovers, just put the motor in a stable situation vertically, (a hole for the axle in some plywood and lean hard, holding the lower section. Of course, I weigh 230, so my lean is HARD! Do keep hands away from the separating parts of the armature/magnet ring. Reverse to put togethet, using one cover pre attached and WATCH YOUR FINGERS!!!! Ablock of wood on each side as a spacer is a good safety device when reinstalling shaft with magnets! Just an old guys thoughts!
otherDoc
 
OK, here is the update. Thanks to fechter link I finally understood how the sidecovers are installed and removed them with no problem, then removed center section using an old two fingered puller I had. One of the wires shows some burn on the outside and as soon as I can figure out how to get my pics to a file I can find I'll download them. (new computer, VISTA and stuff is different)

I'm fixing to print the sections about testing the FET's whatever the hell they are and attempt to do that. In the meantime since everything looked pretty much OK in the motor I went ahead and started to take the controller apart. I really thought it would be a waste of time as the key worked, lights lit, the throttle lit but what the hell, there weren't that many screws. As soon as I removed the back piece (the easiest one) I knew I was screwed. The odor indicated fried electrics. A few minutes later (that reverse switch is a pain) and with the board in hand it was pretty obvious it had died a painful death.

Which in turn made me come up to my office to print the link on testing the FET. Something made the controller burn up and it hadn't gotten wet. Everything else got wet but not that. I don't think.

Oh well, five more minutes trying to get the photos to a file I can find and onward to the shop.
Mike
 
Attempting to test the FET's or whatever the hell they are proved to be a frustratiing experience. Initially, using a 9 volt battery that measured 9.25 volts on the digital meter, I stripped a little back on the red and black wires from the multi pin doobie going into the motor. Being very careful not to connect the + to the wrong wire I stripped a little back from the LITTLE blue wire and when testing it from the black to blue got 8.80 volts and applying a magnet over or near the alleged FETS produced no change. I needed a couple of more hands but a couple of alligator clips sufficed.

Since that did no good I started back inside but halfway here thought maybe you'all meant the BIG blue and yellow and green wires. So applying the meter lead to the LITTLE black wire and each of the yellow, blue and green wires I got completly different reading but not much fluctuation if any as connections tended to be tenous. Mostly the connections showed .004 - .006 and maybe a .008 once or twice. The only magnet I had was a small one on a expandable metal handle designed for picking up dropped stuff in tight places. The magnet had no back side, only a magnet side.

So in frustration I have gone onto EV Depots web site and plan on having a new motor and controller shipped ASAP. Since I still haven't figured out how to get my pictures to VISTA Pictures, even though I've done it before, that ain't a gonna happen right away. I'm tired, disgusted and fixing to be quite a bit poorer. I'm feeling a bit like Greg Norman playing today British Open, almost but not quite getting it.

Anybody wants to fix either the burnt controller and/or probably bad motor let me know and I'll ship it to you and pay a reasonable amount for repairs. Once everything is working again maybe I can sell them to help pay for the replacements. Looks like I'm gonna have boxes.

Oh well, shit happens.
Mike
 
Back
Top