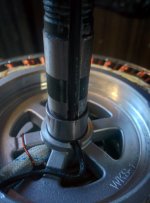
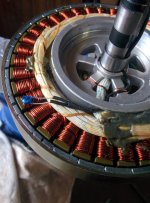
Some details of my retrofit on an ezee 350rpm rear motor (cassette freewheel version). First the pics...


I'm building a 29er with ezee motor and phaserunner controller ~60v battery capable of 50a continuous. Which adds up to a bit more than the ezee is rated to in the basic specs, but am hoping with the thermistor, phaserunnner and CAv3 I can control the amperage and internal temps to create a nice lightweight package.
(I've posted some of this in this thread too https://endless-sphere.com/forums/viewtopic.php?f=30&t=83239&p=1226856&hilit=ezee+phaserunner#p1226856 also asking for some help with the phaserunner setup...)
Back to the thermistor... Originally I'd thought to sneak the thermistor cables in with the standard cables but there isnt enough room in the original hole, (the guys at ebikes.ca told me this, but I tried anyway and so found out for myself
So I brought the cable out the right side of the motor for 2 reasons: 1) it was easier that way! and 2) I didnt want to remove metal from the axle on the side which already has the hole for the other cables.
It seemed obvious to put the groove inline with the flat part of the axle to minimise the amount of metal to remove, the downside of this is that the motor torque is transmitted through that flat part of the axle, so the surface area available to transmit torque is now a little lower. (So I'll use two torque arms on the motor, and will update this if I have problems in the future.
I started with a v small tungsten cutting bit on the die grinder to make the groove for the cable, but switched to a small v narrow grinding stone as it was faster and easier to control. The final part of the groove where the cable passes 90deg around the armature was the most difficult. Obviously you cant make a 90deg channel with a round grinding bit!
In the pictures I have already installed a shim and spacer, so you are seeing the cable pass under the spacer and make the 90deg turn.
For that part I used a 2.5mm boring bit (basically a drill) and made a series of adjacent shallow holes in the shaft and armature, then machined out the remaining space between them to finish the groove.
There was already a slot in the aluminium armature to bring the cable across, but I deepened it a little to make sure there wouldnt be any clearance issues, then tied the cable down with some copper wire from an old armature winding (copying what ezee do for the main loom).
You don't see it in the pics, but I glued the thermister to the windings using epoxy resin, rated to over 250deg. (Ive skipped over soldering the wires to the thermistor and wrapping it in shrinkwrap as i figure that's self explanatory.)
To finish the install I bonded the new wires into the groove with epoxy, (which should help to keep water out), and reassembled the motor putting loctite nut lock on the bearing nut and the motor cover screws, and flange sealant on the motor flanges.
Total time for the install was about 4 hours, which included dismantling/reassembling the wheel and tyre, so it's not a huge job by any means.
hardware needed:
1 10k NTC thermistor ($1.75 from my local electronics shop)
60cm of signal wire
30cm of shrink wrap
2 part high temp epoxy resin
Tools:
10mm open ended spanner (to hold the axle)
17mm open ended spanner (to remove the bearing retainer nut rhs)
Circlip pliers (opening) (to remove the gears lhs so they dont get covered in metal grindings)
Philips screwdriver (to open the motor)
die grinder
bench grinder (to redress the grinding stones as they wear out)
stone grinding bits
small ~2.5mm boring bit (or a 2.5mm drill would also do at a push)
soldering iron
bench vice (to hold the axle while grinding)
The guys from Grin sent me some pics of a similar install they did using a dremel to cut two smaller channels in the shaft for the 2 wires, but i dont have a dremel and couldnt really see a reason to make 2 narrow channels rather than one wider one of the same depth.
Hope this helps someone!!

