Recumbant Mid-Drive Scrapbuilt Buildlog. Pics & Questions.

Progress:

[youtube]sc0HNuTwcBg[/youtube]

Notes:

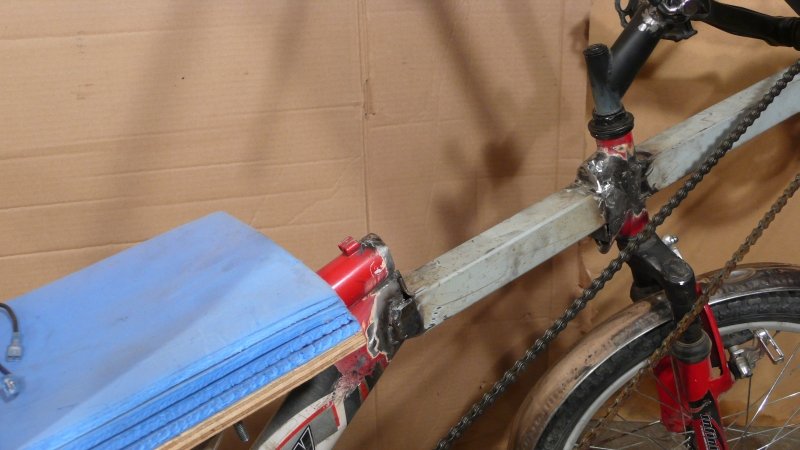
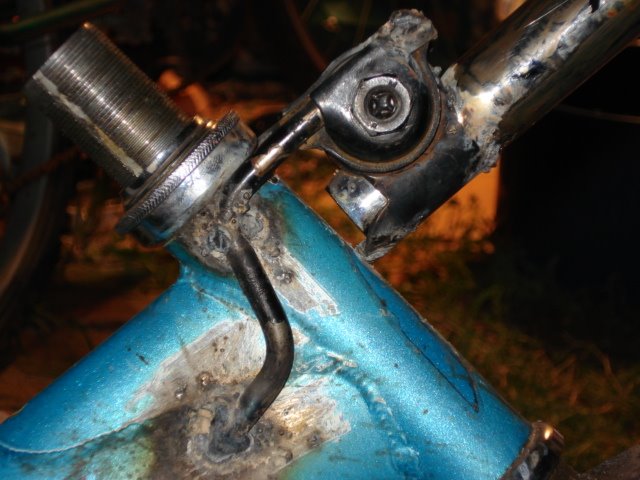
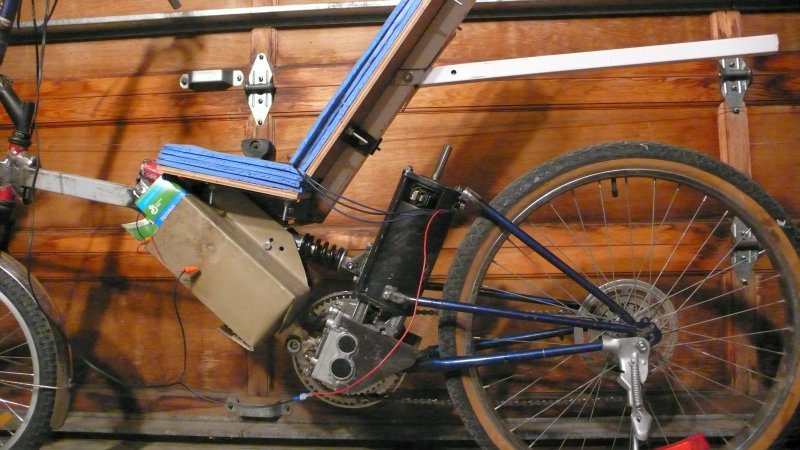
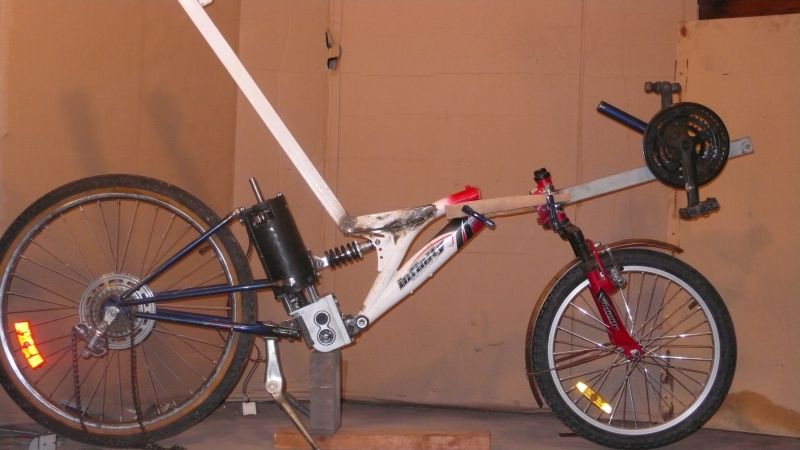
- Bent second pair of seat stays down to top of motor.
- Drilled and tapped upper motor housing for top mount.
- Cut and welded top mount, welded to upper seat stays.
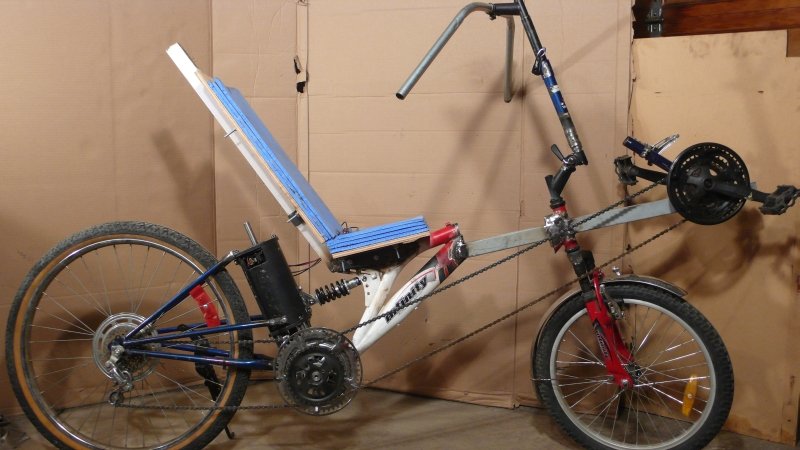
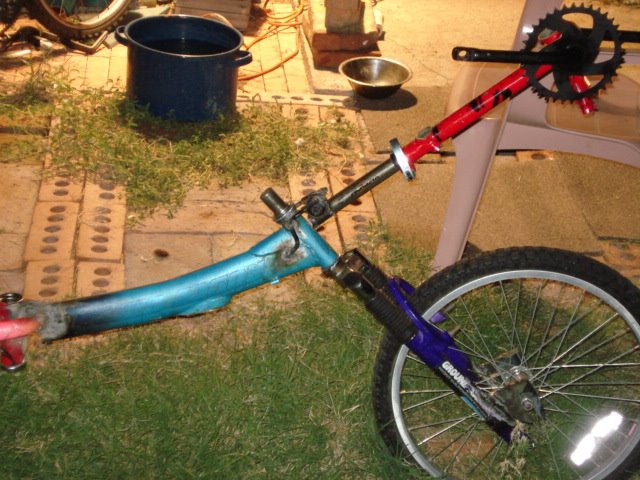
- Assembled most of the rear end of the bike.

The clanging sound is the chain rubbing/bouncing off the edge of the motor. It needs a pulley to redirect it (knew that already).

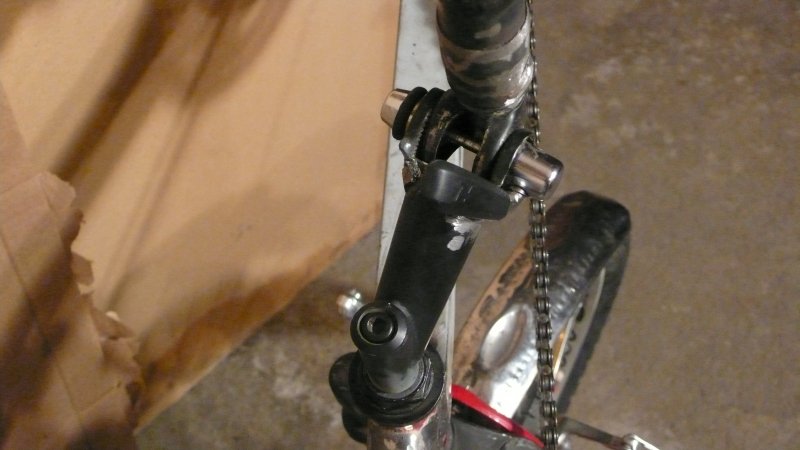
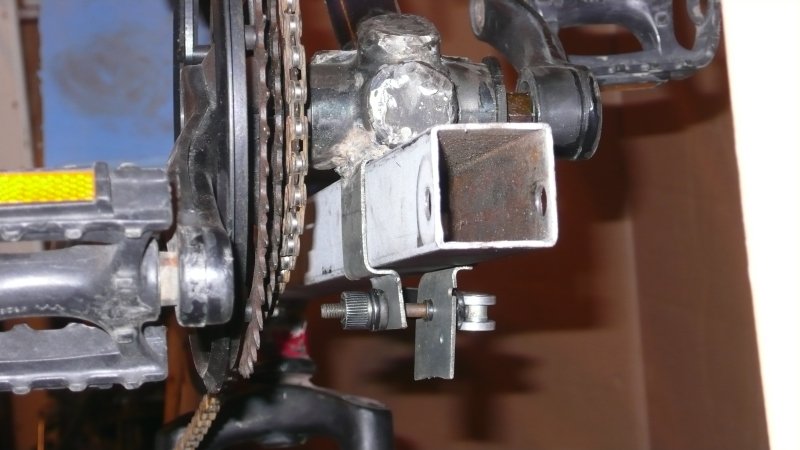
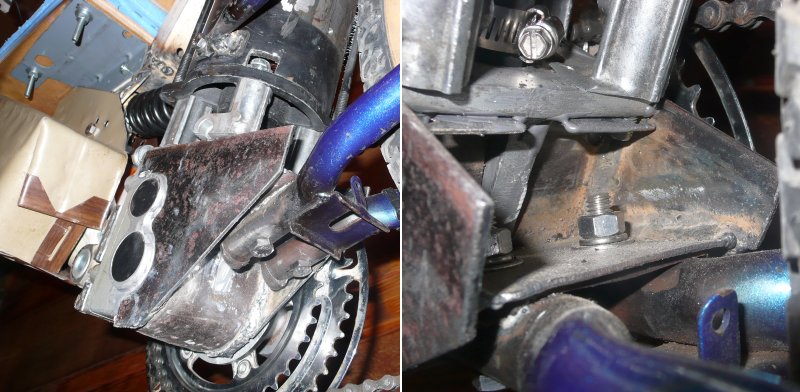
I screwed up the top mount alignment, so it pulled the gearbox off its mounts (which it's floating on still, they need to be bolted to the frame). Since I started with the gearbox mounts, they're my crappiest design and welds, I'll probably just cut them better to size and replace them anyway.

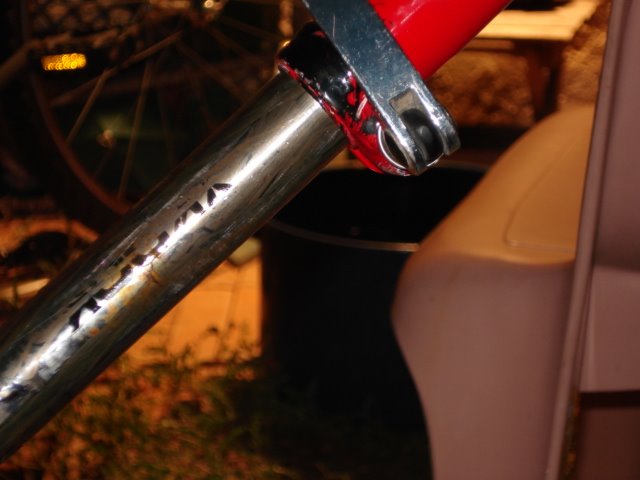
My hose coupler is far too weak. If the tire isn't lifted, the motor shaft just slips rather than turning the gearbox. I already cut some slots into the end of the shaft for grip, no effect. I might put heavier/more/tighter wireclamps on it, or just replace it with a proper hose clamp if necessary. In the mean time, having it slip when non-trivial torque is required is kinda beneficial, for safety.

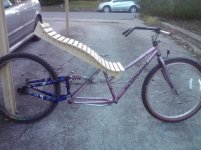
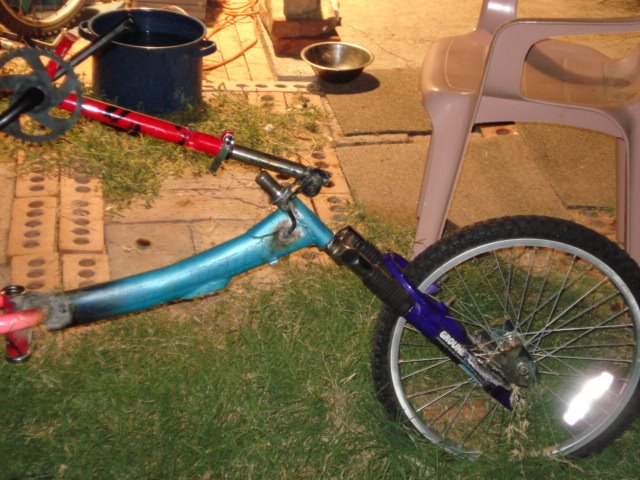
I'm sick of working on the back end, so next up I'll try to figure out the front end geometries and get that made.
 
Progress:

EVB%20050.jpg


My "bike".. ugly as it is..

Notes:

- Cut and welded the front post.
- Figured front post is probably at the wrong angle, oh well.

- Cut and welded seat/rack frame. Figuring that angle took me 5 tries and all day. Every time I thought I had it pegged, a new variable would arise. Clearance for compressed suspension while still having the right seat height and angle, ugg.

- Cut apart old bottom bracket (the bearing thing that holds the cranks/pedals).
- Used my bending brake for the first time to make a sheet metal sleeve so the bottom bracket is adjustable.
- Welded the sleeve to the old bottom bracket.
- Realized I welded it wrong, since polarity matters as one side is reverse threaded (so neither side unscrews while pedaling). Cut the post off instead of the sleeve and welded it in the right direction.
- Welded end-caps on the 4 holes where pipes used to be (a lot more time than I thought it would be).
- Realized I spend like, 16 hours on the bottom bracket & post, ugggg.

So, front end is done-ish. Back end is done-ish. They need to be joined. Right now they're just clamped with two pieces of wood.

The seat post will be bent flat to serve as the cargo rack, and then a smaller post for the upper 1/2 of the seat and headrest will be added later.

I think I want superman steering, not hamster.. but, to fit in superman and some (4"?) of tiller, I gotta move that front wheel forward at least another 5". Having the motor behind the seat and the rear suspension (it can barely bottom out now without slamming the seat into the motor), ended up moving the seat forward quite a bit.

So that makes a "short" wheelbase of 52", not sure if that's stupid (43-47" seems normal).

To be figured out at the same time:

1 - Head tube angle.
2 - Handlebar position.
3 - Space between front/rear frame.

Once I get that figured, it's just cut and weld and go go go until I'm done. No more figuring, just work.
 
Its looking good. no post for a while, hope your making progress. I really like the way you mounted the motor in the rear arm like that. I would've never thought of that. I guess you not being to reserved with cuting and choping bits and pieces to get the end result, witch is cool IMO. I hope to see more updates, so much effort so far, YOU MUST FINISH! lol. i tell myself that cos i used to half finish things all the time. when you feel the wind rushing past you cruzing at faster speed than you can pedal it will all be worth it :)
 
Its looking good. no post for a while, hope your making progress. [...] I hope to see more updates, so much effort so far, YOU MUST FINISH!

Thanks for the encouragement. Yes, I was getting quite discouraged, sick of working on it, not knowing how to figure the last few things out. Too many interdependent variables needed to be lined up at once and I didn't really know any of them. But, still working on it.


Month and a half update.

Milestone: Bike is technically, minimally, rideable.

--
Tangent: In other news, most years I quit biking when the weather hits ~5'C (41F), just because I presume "That's too cold". This year, I decided "Just go out and do it, until it's actually too cold 5 minutes into biking." This so I'd actually know the bottom limit.

I've always known there are people who bike here every day year round and I, like everyone else, presumed them to be crazy.

So far I've hit -17'C + wind (0'F + wind) and -25'C (-13'F) when calm. Both times sweating enough that I unbuttoned my coat a bit to cool down. And not for 5 minutes, for long trips, 2 hours across town. It's really amazing how much warmer biking is than walking in the same temperature. I wrongly guessed that the added wind from traveling faster would have made me colder.
--

Progress:

Cut and welded this filler piece. This took the last 6 weeks to figure out and settle on length and angle. Everything about bike handling came down to this. It may need to be cut and adjusted later. I eventually realized it was less work to cut and start over than to engineer it perfect the first time. Just rough welded, filler pieces to smooth it out will come later.

EVB%20052.jpg


Adjustable steering tilt, using the adjustable seat things from a seat post and a quick connector for quick disassembly. This failed, it doesn't grab hard enough and slips. But it was necessary to have something variable to tweak while figuring out the handling. Replacement soonish.

EVB%20053.jpg


New bottom bracket and rough clamp with quick release. Not sure about riding position, so the whole crank/pedal assembly is adjustable for depth.

EVB%20054.jpg


First rideable test assembly.

EVB%20055.jpg


Other progress:

- Steering is also adjustable telescoping-wise and flap-wise. The telescoping can't get tight enough, needs wider slots. Steering might be simplified greatly once I settle on angle and depth.

- Has rough seat. Found some foam, laid a 1" perimeter to make a cup shape, added 2-3 layers glued on top. Will wrap with vinyl of some sort. Forgot to add lumbar support. Seat bottom is too narrow, right on the edge of my sit bones. Might scrap and replace. Upper seat and headrest to be added when I trim the post and make the cargo rack.

- Handlebars. Tried using the inside of a shower curtain bar (very thin pipe). It's 7/8", but I only had a 5/8" bender. I filled the pipe with water and froze it before bending. One bend smooth, the other side started to fold twice. They also need to be trimmed 6" on each side. But it's junk. It was for a test-fit and served its purpose.

- Chain to pedals. Needs a chain tensioner, redirection pulley, and other stuff. Minimal test fit.


The big news is that, holy crap, I assembled it sat down in it, and it didn't break. Mondo soft suspension though, need to tweak that. I pedaled the length of my garage twice and it seems to work, mechanically. Until I wire the rear derailleur, I'm stuck in highest gear which is impossible to balance with on a recumbent.


So, umm, yeah, maybe done by spring.
 
looks like a godo statr. handlebbars you coudl use cruiser bars or ones liek on my crazybike2 that cmae off an old postal biek..
 
I am building a recumbent with a similar basic structure - using cheap walmart frames and such. Your seat looks so easy to make, I may have to look at redoing mine again.

I'm interested to know where you got your old laptop batteries? I really like the idea of making use of 'dead' batteries that no one thinks are good anymore.

Here's what mine looks like so far. Might give you some ideas. I like your crank mount. I was planning on just hoping my measurement is right and welding straight to the headtube with no adjustment.
 

Attachments

  • clwb.jpg
    clwb.jpg
    320.8 KB · Views: 4,184
weld a seatpost to yuor headtube. cut the whole seatube and bb off a bike. slide it over the seatpost and now you have an ajudustable lenthg boom. leave some of downtube on bb for a front deralire or accessory moutn.

if boom is otoo long cut the seattube by enough to let ti shorten, slit the end of the seatutube, and put the seattube clamp bakc over that end.

use a qr clamp for easy adjustement and stowage of bike

http://electricle.blogspot.com/2008/08/recumbent-bike-from-scrapped-bikes.html
http://2.bp.blogspot.com/_zHr5qzOZQ9g/SLuDvVfnCkI/AAAAAAAAAis/AA6IWjHSEPU/s1600/Recumbent%2BImprovements%2B8-31-08.png

http://electricle.blogspot.com/2008/09/seat-vibration-absorbers-anti-theft.html
i'd also mneat to make it stowable cuz its so long, and ahd it foldup but i probaly wouldn' t do that now.
SeatTubeClamp.JPG


SeatMountingBracketWeldedSideFull.JPG


PedalTubeExtendedSide.JPG


PedalTubeStowedSide.JPG
 
Your seat looks so easy to make, I may have to look at redoing mine again.

Two ways to make the bottom part of the seat:

1 - Wedging your ass from between your cheeks, to support it. __/\__
2 - Cupping your ass from outside your cheeks, to support it. \______/

Or both. \__/\__/

I took the width measurements from #1 (~220mm), but built the cupping, not the supporting wedge shape. So all my weight is on my sit bones (fine) except the sit bones barely fit on the seat width-wise. Poor choice.

I'm interested to know where you got your old laptop batteries?

Generally, any recycling place that doesn't try too hard. I actually had huge difficulty getting laptop batteries, but expired LiIon tool batteries I have a service center put in a box for me to pick up monthly. They take in old batteries still under warranty, if they fail (if so much as one cell is dead) then they junk them. It's not worth the labor/risk/annoyance/reputation of having the next worst cell fail later.

Pick a brand and search for "service center" or "warranty center", usually it's off in an industrial park, not a retail store.

I like your crank mount.

Not particularly novel, I think the gentleman at Atomic Zombie invented/popularized it. It adds practically zero weight.

weld a seatpost to yuor headtube.

Hot damn isn't that a great idea. I wish I'd read about that earlier. Makes it far easier to break-down/fold-up for car-transport. Looks fragile but I'll trust you that it's strong enough. If ever I get foolish enough to make another one, or one for someone else, I'll keep that trick in mind.
 
Cool, thanks for the tips on batteries. Thanks AW on those ideas too.
 
MattsAwesomeStuff said:
Makes it far easier to break-down/fold-up for car-transport. Looks fragile but I'll trust you that it's strong enough.
i dunno if teh hinged one would be strong enough cuz i nevre tested it bt the seatpost direc to headtube def owuld be. best would be weld gussets around the seatpost just in caes.
 
Demoralizing last couple weeks. Lack of updates.

Started adding the rear rack out of 1.25" box tubing, would add the rail bar for panniers later. Wanted to just get somewhere to mount batteries so I could take it for a test spin.

I noticed two of the hollow pillars that act as spacers between the motor and the gearbox were loose and freespinning. That means a complete teardown to get at those bolts (bolted at the bottom of the inside of the motor case). So I do that and I find that nothing is holding those two bolts at all. They've ripped the alum threads right off the gearbox.

I never even rode it, a couple pedal pushes inside the garage and maybe 15 seat sits was enough for the steel bolts to tear off the alum threads.

They're not nuts, they're into the frame of the gearbox itself. No way to repair it. Can't think of an alternative. Maybe I'll come up with one, but feeling pretty weary of everything being far harder than I expected and unanticipated design problems surfacing over and over. Found at least 2 or 3 other issues in the last month that I can't think of a solution to either. Might be calling it quits and just going with a less ambitious design, just do a friction drive or something that I won't screw up.

Know when to hold 'em, know when to fold 'em.
 
MattsAwesomeStuff said:
I never even rode it, a couple pedal pushes inside the garage and maybe 15 seat sits was enough for the steel bolts to tear off the alum threads.

They're not nuts, they're into the frame of the gearbox itself. No way to repair it.
Helicoils are inserts that can be used to replace threads (or create them) for situaitons like that. But I don't know if they are made for the loads; you'd wanna check with someone like Bigmoose, Miles, etc. that has more mechanical engineering experience than I do.

What I would recommend is creating a "box" shell around the motor and gearbox that you can use for structural purposes, which the motor and gearbox bolt to--that would resolve the issues of things coming apart. It can be an "open" box, for ventilation purposes.

What are the other issues you've run into?
 
Pics pics pics pics.

So, umm, yeah, maybe done by spring.

"done" is a relative term. But, it's, electrically rideable.

The big news is that, holy crap, I assembled it sat down in it, and it didn't break.

Update: A 120 pound friend sat on it, and it ripped the aluminum gearbox threads right out on 4x M10 bolts.

FFFFFFFUUUUUUUUUUUU

Oh wait, backing up farther, 2 of the 4 bolts that connect the motor to gearbox also ripped out, tore their threads right off. Luckily only 2 or 3 threads were catching, so I bought longer bolts and threaded them right through. Also luckily it was the 2 that were through holes, not the 2 that disappear into the case.

So, replaced all the M10s with 5/16". There are zero out of ten original M10s in the gearbox anymore. Al. 5/16" now, as all have ripped out.

EVB%20056.jpg


- Added a power switch with zipties.
- Added a cheap mirror.

EVB%20057.jpg


- Added the start of a cargo rack.
- Added a temporary battery case made from old microwave cases, didn't even bother to clean the exploded food stains from it. 70s wood veneer metal.
- Removed front chain, battery box is in the way, don't need to prove I can pedal.
- Replaced the wire-wrap hose clamps (motor-gearbox coupler) with proper hose clamps, was slipping.
- Marettes are vibration and weather proof, yes?

EVB%20058.jpg


- Added battery straps made of hair ribbons.
- Added battery insulators made from Apple Cinnamon Cheerios and Sugar Cones boxes.

EVB%20059.jpg


- Replaced the first brackets (and first thing I ever welded) with a 1/2 diaper for the gearbox out of steel, half a tube of JB weld to try to bond it to the alum gearbox. *fingerscrossed*


Obviously at some point I crossed a line where I stopped trying to avoid the shittiness of this bike and started celebrating it.


- Took the bike down the street with 40v of batteries bungie corded to the frame. It went about walking speed. Barely fast enough to stay upright. But, first official ride complete. Zero fatalities.

- Took the bike across the garage 3 or 4 times, somehow shredded the hose that was coupling the the motor and gearbox. One hose clamp was right next to the end of the shaft, so maybe that was why. Replacement hose and clamp bridge across the joint. Hopefully doesn't happen again.

- Upgraded to 100V (eventually will be 170V) of batteries.

- Attempted to add "soft start" by paralleling up all the suitably ranged power resistors I could find and ziptying on another switch to selectively short them out:

EVB%20060.jpg


Big one's a 120 ohm ~30W.
Mid one's a 170 ohm ~20W.
Little chain adds up to ~290 ohms of 5 and 7 W.

All in parallel, ~58 ohms (?).

At first I only had the 170 ohm one, and at 100V it did not even have enough power to crank the motor over with no load (empty shaft, not even a chain), or keep it turning if I started it by hand. 60 watts won't turn it over, I'm scared of efficiencies.

With all 3 resistor blocks joined up, works great with the ass end lifted, but is not powerful enough to move the bike under its own weight, let alone with me. It's close though. I'm scared to flick the switch that bypasses them though.

I think it will be appropriate for the 170V final version, but still underpowered right now and I'm out of power resistors. Considering lightbulbs.


Front brakes close, once, and then need to be manually retracted. No rear brakes. Steering stem is bent from bike getting dropped several times. Seat is bent from same. Chain rubs against motor even in highest gear.

Lots of problems to solve still.
 
Hey Amberwolf, long time no see.

Umm, I solved some of them.

I moved and haven't had my shop in a long time. Just getting back to it now.

It's discouraging to see what a POS this thing is, but I have a perverse desire to finish it.

It's on my list of things to get to this summer.
 
Look at my early stuff on the http://electricle.blogspot.com site; and you'll wonder why I didn't quit...but here I am, still working on new contraptions. Though now I usually use hubmotors cuz it's easier and less destructive of drivetrain parts, I still have "plans" to use powerchair motors for middrives again at some point, when life is not hitting me with one thing after another.
 
One of my ebike versions could really have used soft start if I had thought of it.
 
Back
Top