dogman dan
1 PW
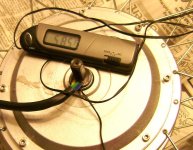
Living in the desert, and having an uphill ride home of 15 miles makes it easy for me to melt a motor. This summer I am using a cooler running Aotema (WE) brushed motor at 36v. It runs about 40 F cooler than the brushed hub, that is on the verge of overheating at all times. But I still want to know when I am flirting with a meltdown and when I am not, to better learn to ride cool. So I am installing a cheapie indoor outdoor thermometer sensor in my motor. A Bell product, I got it at wallmart for ten bucks. Look in the car accessories section. I took a pair of snips and cut off the plastic from the sensor, but I doubt it was really required.
This seemed like a good time for a tutorial on opening an Aotema brushless motor so it gets a bit heavy on the pics. It's the first peek inside for me on an aotema brushless.
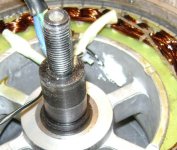
There is a metal collar around the wires like a bushing, that I pulled out of the way first. It protects the wires from rotational rubbing, but looked to me like it could cut the wires when the cover is lifted.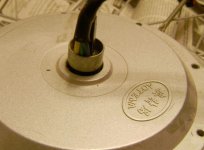
After removing all the hex nuts from the cover, I very gently tap a knife blade into the seam. It's easy to strip the inside of the hex nuts, since they a put it while the paint is still a bit green. sometimes a vise grip may be needed to get em started. But with this whole procedure, BE GENTLE. Everything is done very slowly and patiently, and in tiny increments.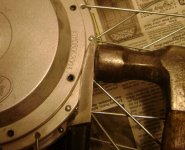
After this step, the hammer is put away, and any tapping in of screwdrivers or prybars is done with the handle of a screwdriver. Again, easy does it. Next is a thin screwdriver. Do not shove anything in very far, seriously, past a quarter inch and you are going to mash the windings inside! so it's just the very tips of all the tools.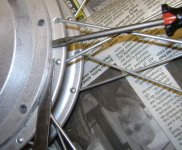
Slowly and patiently, work around the cover, getting in a bigger screwdriver, then another, till you have three in place. The idea is to genlty pry the cover off with even pressure all the way around. Of course a gear puller the right size works great, but at my local auto parts place, I haven't seen the perfect one yet. Most of em don't have jaws wide enough, and thin enough at the same time.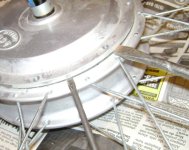
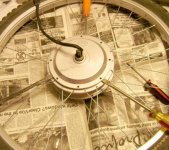
By the time I got the third screwdriver in, I heard a pop and the cover came up a bit. Still not loose completely, I switched to a big flat bar. The flat bar is not for more leverage, it's just thicker and less awkward to pry with as the cover comes up. It might be possible to just wiggle the cover off by hand once it pops up a little, but I just use a thicker thing to pry. You never pry hard on any thing, and just tap in the screwdrivers with the handle of another driver. It's an easy pull, but you can bust stuff easy if you act like it's your car you are taking apart.View attachment 4
And there you have it. the cover off. This aotema brushless motor was bought from High Tech Bikes, and in my opinion, it is very high quality looking inside. Its a 7 wire winding, so I guess it compares to a clyte 407. The motor is pretty happy in the 15-22 mph range at 36v. Looks to have lots of magnets, and they appear to be pretty wide. If they are just as long on the other side, they would be 35 mm wide.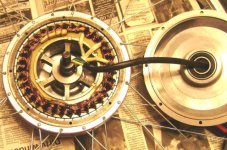
Now for the thermometer sensor. Two wires, it doesn't seem to care about polarity. My favorite epoxy is pc 11. Marine grade, it takes heat well, so that should do. Just a dab to mount the sensor on the inside and a zip tie to keep the wire from getting wild in there.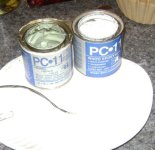
Replacing the cover is sort of the reverse of pulling it. Pay a lot of attention to the wires, and the collar goes in after the cover is in place. I gently tap the cover back on with a screwdriver handle.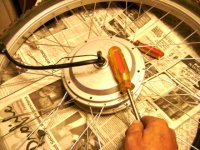
And finally, the sensor wires connected, I cut it about where the motor wire plug is, and the thermometer works, goody I didn't cut the wire. After I got the cover on, I realized, dooh, I could have put some shrink tube on it! pic in the next post, I'm too pic heavy on this one.
Now this summer, when I am riding up a looooong hill in 105 F, I'll know if my motor is running too hot. Anything over 140-150 F is getting to the damage zone in my opinion, if you ride for a full hour at a time like I do.
This seemed like a good time for a tutorial on opening an Aotema brushless motor so it gets a bit heavy on the pics. It's the first peek inside for me on an aotema brushless.
There is a metal collar around the wires like a bushing, that I pulled out of the way first. It protects the wires from rotational rubbing, but looked to me like it could cut the wires when the cover is lifted.

After removing all the hex nuts from the cover, I very gently tap a knife blade into the seam. It's easy to strip the inside of the hex nuts, since they a put it while the paint is still a bit green. sometimes a vise grip may be needed to get em started. But with this whole procedure, BE GENTLE. Everything is done very slowly and patiently, and in tiny increments.

After this step, the hammer is put away, and any tapping in of screwdrivers or prybars is done with the handle of a screwdriver. Again, easy does it. Next is a thin screwdriver. Do not shove anything in very far, seriously, past a quarter inch and you are going to mash the windings inside! so it's just the very tips of all the tools.

Slowly and patiently, work around the cover, getting in a bigger screwdriver, then another, till you have three in place. The idea is to genlty pry the cover off with even pressure all the way around. Of course a gear puller the right size works great, but at my local auto parts place, I haven't seen the perfect one yet. Most of em don't have jaws wide enough, and thin enough at the same time.


By the time I got the third screwdriver in, I heard a pop and the cover came up a bit. Still not loose completely, I switched to a big flat bar. The flat bar is not for more leverage, it's just thicker and less awkward to pry with as the cover comes up. It might be possible to just wiggle the cover off by hand once it pops up a little, but I just use a thicker thing to pry. You never pry hard on any thing, and just tap in the screwdrivers with the handle of another driver. It's an easy pull, but you can bust stuff easy if you act like it's your car you are taking apart.View attachment 4
And there you have it. the cover off. This aotema brushless motor was bought from High Tech Bikes, and in my opinion, it is very high quality looking inside. Its a 7 wire winding, so I guess it compares to a clyte 407. The motor is pretty happy in the 15-22 mph range at 36v. Looks to have lots of magnets, and they appear to be pretty wide. If they are just as long on the other side, they would be 35 mm wide.

Now for the thermometer sensor. Two wires, it doesn't seem to care about polarity. My favorite epoxy is pc 11. Marine grade, it takes heat well, so that should do. Just a dab to mount the sensor on the inside and a zip tie to keep the wire from getting wild in there.


Replacing the cover is sort of the reverse of pulling it. Pay a lot of attention to the wires, and the collar goes in after the cover is in place. I gently tap the cover back on with a screwdriver handle.

And finally, the sensor wires connected, I cut it about where the motor wire plug is, and the thermometer works, goody I didn't cut the wire. After I got the cover on, I realized, dooh, I could have put some shrink tube on it! pic in the next post, I'm too pic heavy on this one.
Now this summer, when I am riding up a looooong hill in 105 F, I'll know if my motor is running too hot. Anything over 140-150 F is getting to the damage zone in my opinion, if you ride for a full hour at a time like I do.


