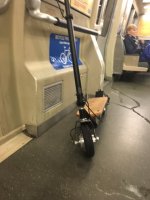
Your speeds are about what I would expect. The only way you are going to get those hub motors rolling faster is more voltage which will get you a bit more or do a complete motor rewind. I know space is limited on your kick scooter, but you have access to machining tools to make custom parts. Consider going back to an unpowered front wheel. Build a bracket for an inrunner or outrunner on the back wheel with a small belt or chain. You will free up a lot of internal space for more batteries since there will only be one speed controller and you wont have to worry about motors fighting each other. You have lots of room over the back wheel to build a bracket for an external motor. I think you are better off in the long run with a single motor rather than 2 motors. Also, a non-hub style motor allows you to mess with gear ratios. If you get an inrunner, they tend to run at high RPM's so that means a pretty small sprocket on the motor and a large one at the wheel. you can totally play with the gearing ratio so that your top speed is 30+ mph. Outrunners tend to be the most efficient since the magnets spin outside the coils rather than inside the coils. This also helps keep the magnets cool. Heat is a real killer for magnets. You will be able to find an outrunner that does everything you want for a reasonable price on HK and elsewhere. All brushless motors have a Kv rating. Get one that can deliver the watts you need plus a little and then look for the one with the highest Kv. That effectively translates into RPM's per volt. With any brushless motor, they tend to run more efficiently at higher RPM's than lower RPM's so going for a high Kv motor just means you need to gear it down more for the wheel speed you want. The idea is you spend most of your riding time cruising around, not taking off from a dead stop. Also gearing down all those RPM's means more torque at the wheel.
On the subject of your hub motors, have you tried taking one of them apart yet? Replace the feild wires with the largest silicon wires you can cram in there. I have noticed that a lot of Chinese motors have low grade wire going into the hub. More strands in the cable means lower wire resistance and more current handling ability. AS you know silicon wire has hair fine strands in the cable. Electrons travel best on the surface of the wire strands so more strands is better. Also, while you have them apart, add halls.
")
You will also be able to see how the motor is wound. It is not uncommon for motors to have multiple wire strands per field and that the wires are not wrapped very tightly. Many small strands gives you decent current handling and are easier to wind than a single large strand. Each strand is generating its own magnetic feild and multiple strands per feild creates multiple magnetic feilds that may interfere with each other and make the motor less efficient. A single large strand per winding which is much harder to wrap since it is stiffer but is the best way to wind a motor. Look at AstroFlight motors. They are all single strand windings per field. You can buy the wire and rewind your hubs for more RPM's. You will likely get more torque too. I have seen many threads on here and elsewhere for building up brushless motor windings. You can find out how to do it easily enough.
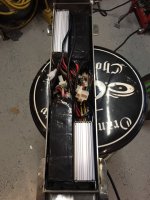
If you get a chance, take apart one of the Lyen controllers and post some close-up pics of the circuit board inside. There is going to be a single square IC mounted on it with pins coming out of all 4 sides. Let me know the numbers on that part. I can find out pretty easily what pin you will need to detach from the rest of the circuit board and is the clock signal. getting both your controller IC's in sync is as easy as disconnecting the clock signal on one board and running a wire from the other controller to the one with the disconnected clock. If you can do some minor soldering on small electronic parts, then you can handle this.
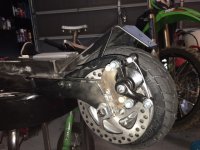
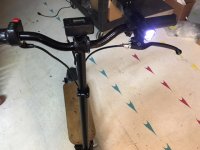
That rear rotor looks great. For the light weight build you are doing those mechanical calipers will work pretty well. I had them on my scooter until I went hydraulic. I'm still using the exact same pad for braking, but I get 80% more braking power out of the hydraulic than the mechanical calipers. My scooter is close to 100 pounds so I'm stopping lots more weight. One thing to watch out for is your brakes will drift out of adjustment slowly over a few weeks time. The pads wear, the cable stretches or slips a little in its clamp...whatever. You want crisp breaking where they are creating no rolling resistance or if needed tons of rolling resistance when you need to stop fast. As things drift out of adjustment, you will find you need to squeeze harder on the levers and the lever travel will grow longer to get stopped. I found that at even 15mph this was disconcerting if I needed to stop fast. I nearly got into a collision with a car because my brakes had drifted out of adjustment. That was after 6 months of constantly adjusting my brakes every couple of weeks. I had gotten complacent and hadn't kept on top of the mechanical brakes. Hydraulic brakes dont suffer from drifting out of adjustment. You may want to look at bicycle hydraulic brakes. The brake lines are the same size as your brake cables and I bet that they would work super well for your kick scooter. I'm looking into using the hydraulic lines on my scooter. Bicycle calipers are probably too light weight for my purposes. There's companies like JagWire that specialize in the fittings and hose part and don't charge a lot for their parts. You can find all the JagWire product line on ebay. Calipers are made by just about every major bike part company. I'm sure you can find something that will suit your design needs really well and weigh half as much as those mechanical brakes and will never give you any trouble.
Regarding XT60 connectors. I know everyone says they are rated for 60 amps. That's pushing it. OK 60 amps momentarily, but continuous and they will overheat. They do fine for 40-50 amps continuous. If that's inside your current handling range, then they will work well. Otherwise go with XT90's or individual bullet connectors. An XT connector is just 2 bullet connectors held together with some plastic and is keyed. When you solder wires to the connectors, have the other gender connector plugged into it. I found that the heat from soldering tends to soften the plastic and allows the pin to wallow out the plastic a little. Having the other gender plugged in keeps things centered up and unmovable until things cool down again.
You mentioned arcing and pitting on your anderson connectors. I assume you mean you get a spark when you connect the batteries to your controller. That is not uncommon and there is a super easy fix for it. The spark is caused by the large electrolytic capacitors inside the speed controller drawing a lot of current momentarily while they charge up. This is commonly referred to as "inrush current". You want to eliminate inrush current for multiple reasons. The biggest one is you are slowly damaging your speed controllers. Secondly is your connectors will be all scarred and useless after a while and need to be cleaned or replaced. The answer to eliminating inrush is simple, but you will need to connect +v and ground separately from each other or have 2 separate power connectors. One power connector will be very small and light weight and needs to handle maybe 1 or 2 amps. The second power connector will be the main current handler. Since I am using 2 8mm bullets for my power connections, I connect the ground wire together. I have a small wire off of my main +V 8mm connector with a 3mm bullet connector on it. It runs in parallel with the main +V bullet connector. On one end is a 5 watt 2K resistor. When I connect the two small bullet connectors voltage is going to the speed controller, but the current is greatly reduced so the capacitors charge slower. I completely eliminate all the inrush current and the arcing issue. By the time you have the small connector connected and you have your hands on the main +V power connection, the capacitors are already charged and you wont get any arcing or inrush. Here's a simple schematic to follow for clarity. If you see some arcing in the small connector use a 10K, 5 watt resistor instead. The capacitors will still charge up quickly.
Sorry for the sloppy drawings. It's 4am...LOL!
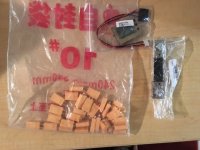
For this one use something like these parts for the small connection.
http://www.ebay.com/itm/5pair-12V-5-5x2-1mm-Male-Female-DC-Power-Socket-Jack-Connector-Cable-Plug-Wire-/262131949455?hash=item3d08481f8f:g:0IUAAOSwgyxWVU3l