DIY Torque Arm: A pictorial guide

Kingfish

100 MW
Joined
Feb 3, 2010
Messages
4,064
Location
Redmond, WA-USA, Earth, Sol, Orion–Cygnus Arm, Mil
Greetings and salutations fellow travellers!

In a
man-running.png
:?:

Short on
chimp-change.jpg
:?:

- - -

eye.jpg


made something like one of these

torquearm0.jpg


using

corner-brace.jpg


and

bracket-emotor.jpg


:)

- - -

First, go to

hardware-stores.png


OR

<insert picture of your favorite hardware store>

and buy one of these

corner-brace.jpg

5 x 5 inch zinc-plated heavy-Gauge Steel Corner Brace; alt: 6 x 6

for

chimp-change.jpg


:!:

Make sure the

corner-brace.jpg


is good and

strong!.jpg


:!:

- - -

Then take one of these

crescent-wrench.jpg


or one of these

4way-tire-iron.jpg


and with one of these

vise.jpg


twist it like a

pretzel-big&salted.jpg


:!:

- - -

Fasten with

carriage-bolt.jpg

1/4-20 UNC

and

flat-washer.jpg

1/4 inch, zinc-plated

and

nylon-locknut.jpg

1/4-20 UNC, zinc-plated

and

bracket-emotor.jpg


and mount it like this
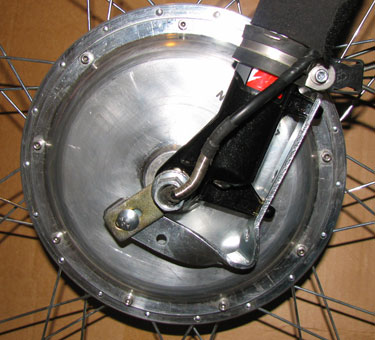
Hub-DIY-TorqueArm0.jpg


:!:

Alternate View:
Hub-DIY-TorqueArm1.jpg


OR - use a

clamp-ss.jpg


to make it good and

secured.jpg


to the

front-fork.jpg


:!:

Guaranteed to make you extremely

ren_crazed.jpg


Enjoy! KF
 
Certainly better than nothing at all. Love the way you made it work with the mounts for a disk brake! McGuyver genius award winner. :idea:

If using just hose clamps, it might work to just use a flat L bracket that should be found in the same area of the store.

Best of all, doable with few tools in an apartment.
 
Kingfish,

Better than nothing...but not by much. The reaction force is applied to the 90 degree bend in that shelf bracket...the weakest possible use of the metal. You'd be much better off running the torque arm straight up the inside of the fork leg, and securing it with a hose clamp. Lighter, cheaper, simpler..and much stronger.

Warren
 
If you can bend it, so will the motor... you really need some hardened metal for torque arms.
 
Um, actually – it depends. For the less illuminated…

Disclaimer: Not intended for use with drag racing or over 150V or 150A. Typical commuter should be fine. Use wisely; this is meant to be a temporary solution for fast speeds and not for use off-road.

Also, hardened metal is great if properly crafted, however the finest metal in the land is worthless if it isn’t fastened down well. And that’s what I have done.

The salient pieces of information are:
  • Heavy-gauge steel – resists bending well enough on its’ own; it took quite a bit of leverage and my body weight to bend it
  • Twisted corner – both sides must now transfer energy not just at the bend but also must compress in three vectors, with twisting adding strength & rigidity to flat surfaces.
  • Short segments – not much there to deflect.
  • The moment is locked in by precise fit prior to installation. In addition, the carriage bolt was selected to fit precisely within the slot of the axle bracket; it can’t spin.
The failure point on the design I predict will be at the bottom disc brake mounting post; I made sure that is a long-threaded screw with a large 7mm flat washer. Blue Loctite was applied to all threads.

In situ testing:
Been using this on my daily commutes since Tuesday at WOT (AveS @ 28 mph) and racked up about 100 miles running over nasty stuff; it is solid and performs like a champ. If I were into cross-country I’d probably do something different, or put one more on the other side with the spare axle bracket – though that would have to use strapping.

Which brings up a good point: The stainless steel clamp is pretty flimsy; it stretches – meaning constant tension-checking and there is risk of failure at the helix screw. FWIW, there is a torque arm like one pictured at the top of the thread on the opposite side and though diminutive it is tied down with the strap.

I think it is fair to say that I am not a fan of steel strapping:
Front Suspension: R&R for older bikes possible? :(

Cost:
Corner Bracket - $5.18
Carriage Bolt - $0.22
Flat Washer - $0.20
Nylon Locking Nut - $0.48?
Bag of 7mm washers (Qty-4) - $0.98
------------------------------
Total $7.06 not including tax

In parting, it is a heavy-duty stamped-steel plate, with high-tensile bolts mounting into chrome-moly. It has at least thrice the durability of strapping. The only way to improve upon this is with a direct metal clamp that reaches around the entire leg of the fork and affixed to the hub axle, but that’s another project; I definitely want something that can fit and clamp down on both sides in the near future. :)

~KF
 
If you look at the pic, you can clearly see that that particular torque arm won't fit pointed the other way on that set of forks.

but yeah, if you just happen to have the tools, then cutting a better adapter out of heavy steel would be stronger.

Looks fine to me, for typical use, 48v at 25 amps. My race bike would pretzel it more in a jiffy of course. 100v at 40 amps. But you don't do those kind of bikes on no money.
 
True words Dogman. :)

To be clear: I am not saying throw away your store-bought torque arms.

It was New Year’s: I had one dinky torque arm, one dead bike, one to build in time to get to work, and no way to fetch another torque arm in time. I fabricated a temporary by cutting an old pedal in half and used that to get to REI on January 2nd to get the rear wheel made, and while there the idea of using the corner-bracket popped into my pointy little head. :idea:

It’s proven to be a good fix for my commute. However just like Dogman said – I don’t race this bike; I take it easy starting and stopping… not wimpy-easy, just wisely e.g. no burnouts. :wink:

If I had it my way, I’d run over to the local machine shop and have the guy cut me one right out of a billet of top-grade material – though I would still use the axle bracket and I’d mount it to the disc brake standoffs. As soon as I get some time free I might do exactly that for this bike. For now, it’s doing a great job. BTW – the plate thickness of that corner brace is 0.150-inch / 3.82 mm ≈ 9 Gauge.

Presently my nominals are: 63V hot, MaxA = 30A, MaxS = 42 mph, and AveS = 28 mpg, although I prefer to cruise at 34 mph which is a good fast pedal.

If it inspires & works for you: Great! 8)
Cheers, KF
 
I love the pictures king 8)

I'm considering having a machine shop make a custom torque arm/bar/thingy for my frame when I get my student aide money. I'm hoping it won't cost more than $50

Something like this

TorqueArms.JPG
 
Checking in for a quick status after 2 weeks of aggressive use:

Auraslip: That certainly looks workable; thickness is going to be your friend :)
I wish o’ how I wish I had access to a metal/machine shop! Perhaps in my next life…

BTW – I just checked all the fittings; everything is still locked down tighter than a gnat’s ass. Been giving the hub wicked WOT and it feels rock solid. The other side with the wimpy arm is snug as a bug too.

OT: When I put this assembly together I didn’t have C-Washers so I fabbed some soft spacers out of thick copper wire; the downside is that the nut needs periodic checking as the copper seats down. This is definitely a temporary fix. In fact – I noticed my throttle was beginning to get wonky in the last week and yesterday on the way home it developed a mind of its’ own and became unresponsive/stuck. Later I figured out that the spring-return had failed. Throttle still works though; it just needs overt control. I ordered up a replacement and requested C-Washers at the same time; should arrive next week.

So far, so good. KF
 
Back
Top