Hello everyone,
I’m new to this great forum, so please bear with me if I ask some dumb questions.
I have an ebike that I have not used for a few months and when I went to ride it, it turns out that the battery is totally discharged.
It’s a 36V / 9AH li-ion bottle battery that I purchased with an electric kit 3.5 years ago.
Before this problem, I experienced an abrupt decrease in autonomy about a year ago, which meant I had to recharge the battery every 15 miles or so (this sudden drop in capacity points to some dead or disconnected cells, I suppose).
But at least it worked.
Yesterday, when I tried to charge it, the power supply’s green light did not change to red (“charging”) and the battery did not charge. BTW, I checked the charger voltage and it is fine (42V).
From what I read in Spanish forums, it seems that the battery charge may have fallen below the minimum required for the charger to work and therefore the battery is "blocked". I also read that by individually charging the lowest cells, you can increase the total battery charge above that minimum and the charger will start working (for an example, click here: http://perso.maicas.net/ebike/battery1.htm).
Two problems: I do not own an individual cell charger (although I think that a hacked 5V USB phone charger can do the trick) and, what's worse, I do not have ANY IDEA on how and where to connect it to the battery to charge the cells individually (or in groups, because the poles of each separate cell are not directly accessible).
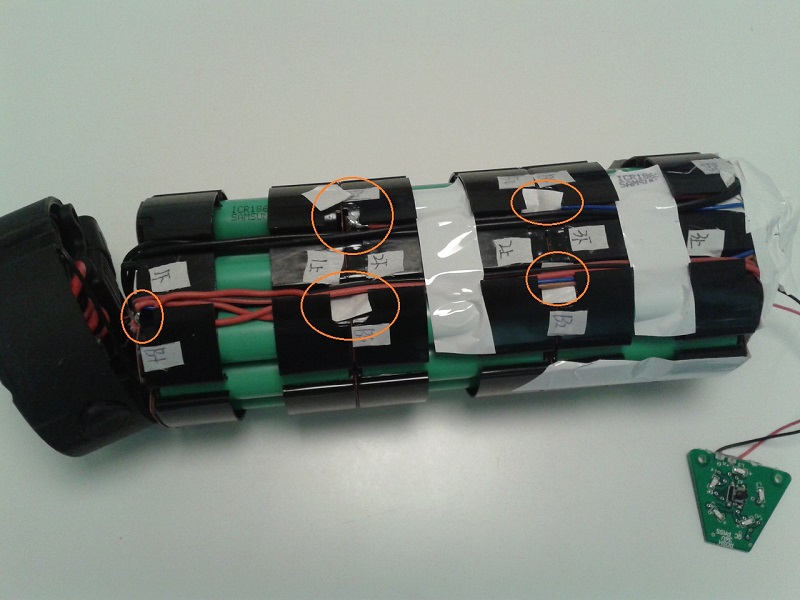
In the attached photo, I have marked in orange the connectors where I guess I should connect the individual charger, but I need someone to please tell me how to do it (the cells are SAMSUNGs ICR 18650-22F of 3.6V, by the way (about 36 in total - three groups of 12)).
Better yet, if by some coincidence someone from Madrid reads this and can lend me a hand in person, it would be awesome .
.
Thanks a lot for your help,
Alex
P.S. Since I’m a newbie, I probably cannot send PMs yet, so if you want to contact me directly, please send me a message with your email address. THANK YOU.
I’m new to this great forum, so please bear with me if I ask some dumb questions.
I have an ebike that I have not used for a few months and when I went to ride it, it turns out that the battery is totally discharged.
It’s a 36V / 9AH li-ion bottle battery that I purchased with an electric kit 3.5 years ago.
Before this problem, I experienced an abrupt decrease in autonomy about a year ago, which meant I had to recharge the battery every 15 miles or so (this sudden drop in capacity points to some dead or disconnected cells, I suppose).
But at least it worked.
Yesterday, when I tried to charge it, the power supply’s green light did not change to red (“charging”) and the battery did not charge. BTW, I checked the charger voltage and it is fine (42V).
From what I read in Spanish forums, it seems that the battery charge may have fallen below the minimum required for the charger to work and therefore the battery is "blocked". I also read that by individually charging the lowest cells, you can increase the total battery charge above that minimum and the charger will start working (for an example, click here: http://perso.maicas.net/ebike/battery1.htm).
Two problems: I do not own an individual cell charger (although I think that a hacked 5V USB phone charger can do the trick) and, what's worse, I do not have ANY IDEA on how and where to connect it to the battery to charge the cells individually (or in groups, because the poles of each separate cell are not directly accessible).
In the attached photo, I have marked in orange the connectors where I guess I should connect the individual charger, but I need someone to please tell me how to do it (the cells are SAMSUNGs ICR 18650-22F of 3.6V, by the way (about 36 in total - three groups of 12)).
Better yet, if by some coincidence someone from Madrid reads this and can lend me a hand in person, it would be awesome
.Thanks a lot for your help,
Alex
P.S. Since I’m a newbie, I probably cannot send PMs yet, so if you want to contact me directly, please send me a message with your email address. THANK YOU.