My Ride

disadvantage

100 W
Joined
May 23, 2007
Messages
126
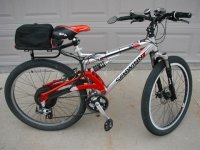
It's a Schwinn S40 dsx mountain bike from Target.
http://www.target.com/Men%E2%80%99s-40-Schwinn-26-Bike/dp/B000A8POI0/
I put smooth-rolling, bump-absorbing 26" x 2.5" Maxxis Hookworm tires on the front & back. Combine those with the full suspension and potholes really don't bother me much.

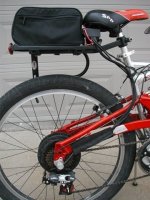
The motor in the rear wheel is a BMC from EV Tech.
http://www.texaselectricbikes.com/catalog/brushless-geared-motor-p-163.html
I changed the wires inside of the BMC motor to make it work with Crystalyte controllers, turning it into a Puma motor. My previous bike had a front 5303 Crystalyte motor, but I like this one better. The BMC is half the weight of the Crystalyte, so my bike rides better and is more maneuverable. The no-drag freewheel allows me to coast silently past other bikers and pedestrians. The geared BMC motor provides lots of torque for climbing hills, much more than the Crystalyte.
 

Attachments

  • SchwFS082.jpg
    SchwFS082.jpg
    31.5 KB · Views: 9,668
  • SchwFS089.jpg
    SchwFS089.jpg
    36.7 KB · Views: 9,667
I made a cap out of 1" round aluminum to protect the wires which exit the motor on the right hand side. It attached with two M5 set screws, one on the top and the bottom. I cut a slot in the front of the cap, where the motor wires exit inside of a thick plastic tube. The tube hides the multi-color wire until it reaches the stretchy Velcro sleeve, where it connects to the wires from the controller. Braided sleeving hides the multi-color wires coming down from the controller.

I got the stretchy Velcro sleeve from ebikes.ca, but I don't see them for sale there any more. I wonder if they are out of stock temporarily.
 

Attachments

  • SchwFS095.jpg
    SchwFS095.jpg
    40.2 KB · Views: 9,651
  • SchwFS096.jpg
    SchwFS096.jpg
    32.7 KB · Views: 9,637
  • SchwFS107.jpg
    SchwFS107.jpg
    35 KB · Views: 9,457
  • SchwFS108.jpg
    SchwFS108.jpg
    30.6 KB · Views: 9,589
I chose to fabricate my own torque arm from scratch, instead of using the one from EV Tech.

All the torque arms I've seen depend upon a oblong-shaped hole to hold the flats of the axle -- to keep the axle from spinning, tearing the motor wires, and sometimes destroying the bike fork or frame. If this oblong is cut narrow, it has a better chance to hold the axle securely, but it will be difficult to slide the arm onto the axle. Cut the oblong wide and the arm is easier to install, but the axle can more easily spin and tear things up.

To get around this problem, I made my torque arm in two pieces. The first part is an L shaped piece, with an adjustable foot that presses against the chain stay. If you think about it for a moment, the motor torque attempts to make the bike pop a wheelie, so it's a push-force with the arm on the underside. It would be a pull-force if the arm was on the topside.

A second piece clamps the motor axle flats against the L shape, with two M5 screws. This way, I can loosen the screws and easily place the torque arm on the axle. Then I tighten the screws, and the flats on the axle are securely clamped by the torque arm. A third M5 screw for the torque arm foot allows me to twist the axle and torque arm. This way the motor isn't twisting against the bike, it's twisting against the torque arm, which is made to control this force.

I made this two-piece torque arm out of 0.25 x 1.25 mild steel bar. I chose this material becaust it's cheap and easy to cut. Since this torque arm, a new and unusual design, lasted all last biking season with no problems, I'd like to remake it in stainless steel. Aluminum might work also, since it is so thick.

I need to replace the screws with stainless steel hardware also; no doubt you've notice the rust. This bike has been stored in my garage all winter long, but it still rusted.

I've also got a child trailer connection on this side of the bike. I'm a bachelor; I use my bike with it's trailer to get groceries. I'm able to go car-free during the warmer months.
 

Attachments

  • SchwFS118.jpg
    SchwFS118.jpg
    35.6 KB · Views: 9,418
!!

WTF why you stole my bike!!

:p

You've added a few things, I see. Weird to see it with those road tires. Mine still has the stock ones on there. I swapped out my seat, too, though.

How's the suspension with that hub on there?

Nice job on the torque arms. I was thinking of doing similar.
 
Hey, thanks for the compliments, Vanilla Ice! I still got a bit more to show off though.

In a previous picture you saw the controller from the right-hand side; this is the left-hand side showing the key switch and the U-shape bike lock & mount.

I cut a piece of aluminum angle to mount the controller to the bike rack. The plastic shell on the controller is on top and the wires all exit down, so rain shouldn't get inside, and if it does somehow it will simply drain down the wires coming out the bottom. The key switch is mounted with a 1" nylon cable clamp. I had to wrap the switch with a few layers of black vinyl electrical tape to build up it's diameter so the camp would hold it.

Since the battery bag is so small, I had to come up with some way to carry my U-lock somehow. I usually have a backpack when I ride, but not always. I screwed a couple of 0.5" vinyl-dipped clamps on the side of the bike rack to hold my lock. The lock swings a bit when I ride, and it gets scuffed by the wheel (picture 089), but it doesn't bother me when I ride.

The controller is a high-voltage but low-current 72V 20A controller. The original idea was to use one 36V battery for lightweight commuting & shopping, two batteries in series for a one-time high-speed run (to prove I could do it), and two in parallel for long distance rides. Unfortunately, I've had *very* bad luck with controllers with this bike... :evil:

I blew up an irfb4110 modified controller last May, when I went on my 72V maiden voyage. I then put a non-modified controller on the bike, set aside my hopes for membership into the 40 mph club, and rode the bike with a single 36V battery thru October, when it got too cold for me.

While taking these pictures, on a whim I got out the key for the bike and tried to turn it on, and heard a sickening pop... I'm so angry! Someone needs to make a robust BLDC controller for these bikes!

A piece of Masonite wood holds the battery bag to the bike rack. The bag is actually for toiletries when you go on a vacation or business trip. Two Andersons connect the battery to the controller.
 

Attachments

  • SchwFS115.jpg
    SchwFS115.jpg
    27 KB · Views: 9,529
  • SchwFS128.jpg
    SchwFS128.jpg
    26.1 KB · Views: 9,368
  • SchwFS129.jpg
    SchwFS129.jpg
    37.1 KB · Views: 9,514
:eek: damn I was going to make my torque arm very similar to that as well! But mine will be one piece arm with a screw for gripping as well as blocking the axle, but from inner side of the fork, not the axle flats. This will mean grinding a groove on the axle for the screw to fit through. And tensioner screws for acceleration torque and regen/ebrake/locked motor torque, so it stops the axle either direction. Is that "foot" adjustable for tension too?

I'm about to buy those power tools I posted about

http://endless-sphere.com/forums/viewtopic.php?f=3&t=3035&p=53556#p53556

to make my torque arms and possibly a rear extension/from 20" to 26" wheel conversion, like an Extracycle 8)

Anyway, nice work! :wink:

J
 
Hi Link, thanks for the comments. The suspension really helps out. I do dearly love those Maxxis Hookworm tires; I highly recommend you get them also. They are grippy and they really smooth out bumps. Big Hanks by Bontrager are arguably the same thing if you can't find Hookworms.

Next are pictures of my repackaged EV Tech battery. The BMS blew up, and I had to cut the aluminum case open to find out what the problem was. When I opened up the EV Tech battery, I wasn't happy with what I saw. I should have taken pictures, but this was June last summer, and I wanted to get my bike running again as quickly as possible. I'd rather ride my bike than take the bus to work.

Doug Canfield at EV Tech has new, different EV Tech batteries for sale. I do hope the quality control has improved. I appreciate what he is doing for electric vehicles, and keeping prices down with Chinese imports, but we've got to have quality control. I think the problem is Chinese manufacturers who send pristine samples for review to American vendors, then once they've got orders they send the crap over. At best I can only *cautiously* recommend the EV Tech batteries.

The last two pictures show me zipping up the battery, all 8 x 5.5 x 3.5" and 9 lbs of it, into the toiletries bag screwed down to the bike rack. The zipper encounters some resistance, so the bag securely holds the battery down even over potholes and curbs, which is exactly what I want to happen.

The box I made for the 10 EV Tech LiPo cells is a piece of 8 x 18" aluminum, folded 4 times into a C shape. After folding the aluminum, I cut 3/16" PVC sheet into 2 3.5" x 5.5" pieces to make end caps. I carefully shaped them with a bench-top belt sander to fit exactly. A dozen or so 2-56 size button-head machine screws hold the aluminum and PVC together; I drilled small pilot hole to thread them in like wood screws. A 0.75" wide strip of 1/16" aluminum covers the gap on the top of the battery.

I put a coaxial power jack on the side of the battery for charging with the original EV Tech 42.5V charger, and a 9-pin D-sub connector for manual balancing the internal ten cells. The D-sub connector (from Radio Shack) is small but has enough current capability for balancing with a 1.5A 4.2V single LiIon charger from Battery Space.
http://www.batteryspace.com/index.asp?PageAction=VIEWPROD&ProdID=1231
 

Attachments

  • SchwFS132.jpg
    SchwFS132.jpg
    24.6 KB · Views: 9,337
  • SchwFS138.jpg
    SchwFS138.jpg
    26.2 KB · Views: 9,494
  • SchwFS146.jpg
    SchwFS146.jpg
    27.9 KB · Views: 9,476
Hi Dee Jay,

Yes, the torque arm foot is adjustable with a third M5 machine screw. This allows me to remove all motor torque from the bike frame and put it on the arm. I can even pre-tension the arm against the axle. The remaining two M5 screws clamp the axle between the two parts of the arm.

I chose to use M5 screws instead of 10-32 screws, because everything else on the bike is metric. That way, I don't have to carry around so many tools to work on my bike.

Since there seems to be so much interest in my torque arm, I'll take it off the bike and post some more pictures of it. Maybe even the drawing I made, if I can find it. Then you guys can copy it or improve upon this torque arm.

I saw your thread with the assload of a123 cells. I'm "in the same boat" as you, but with an assload of Moli cells. I'll post what I'm doing... soon.

It's after 3 am here, and I got to get up in four hours to go to work. It took me literaly hours to put this thread up.

disadvantage
 
That is a nice clean install. I like it a lot.

Now that my Suzuki is near completion, I am starting to look at a bicycles. I have a very similar bike I bought at Target as well. Badged a Mongoose, the frame is nearly Identical, but does not have front disc brakes.

Thanks for the inspiration.
 
disadvantage said:
The first part is an L shaped piece, with an adjustable foot that presses against the chain stay.
Oh my bad, disadvantage. I just skimmed through your pics without reading.

I also wondered about stainless steel thinking it would be easy to work with. You don't think it might be to soft?

Well thought-out designs, too many to mention. But I have to warn you, if no one already has, about the power cables' insulation.

Picture 9.png

They could vibrate and rub against the aluminum causing a short. Plus you'll need fenders for puddles to keep you, the batts, and controller high-n-dry. just my 2mv :wink:

Ya, assloads of batteries will need some solidly built torque arms. Would be great if you show us the parts whenever you get the chance. I've taking many photos of my projects but post only a few. However, if anyone request more details, I'd be happy to share more info.

Got my power tools this evening, only because I compromised with my wife and promised her I'd get rid of about four boxes of old records to make room for my new toys. DEAL!

Thanks for taking the time to share the details.

J
 
Hey !! great work on the bike !! well done and nice creative use of household materials !! ( i like that ! )

I agree wit DJ, watch those wires.. if the edges of the hole are sharp, file them down and add a gromet(s) or some thick plastic or other insulating material to prevent a short..

Other than that, keep up the good work ! 8)
 
Kudos, Dis...

Nice job all way around; excellent pix. The S40 looks like a fine platform.

I also use a kid-trailer to haul stuff. Very handy as a wheelbarrow too.

Fenders could add some creature-comfort for when you hit the occasional puddle.


:)
 
Disadvantage, my rack is very similar to yours, and even with a double connection to the seat pole + reinforcement, it failed.

Also, you know they make stainless steel metric screws don't you? ;)

Nice ride though :)
 
The weekend is *finally* here, and I have time to take & post more pictures, and describe things more clearly.

Here's a shot of the torque arm on the bike, but with the nut and washer removed, so you can see how much steel is clamping the axle.
ArmWONutWasher153.jpg

A picture of the rear dropouts on the Schwin S40 dual-suspension bike. There's a lot of metal back here relative to some higher-priced bikes I've seen.
DropOutWOArm154.jpg

A picture of the torque arm removed from the bike.
I heated and bent the arm along its length; about where the foot is beside it. The bend centers the foot on the rear stay.
ArmRemovedFromBike163.jpg

Tomorrow I may take a picture from the underside showing how the bend helps alignment, and another with a magnet that shows how the frame in the back is all aluminum.

disadvantage
 
Nice.

I like how the torque arm actually clamps onto the axle to eliminate any slop.
Could use a shot of spray paint...

Your version of Ghetto Cad seems to be a bit more advanced than the the one I have.
Perhaps it's really ver. 2.1 or something.
 
good stuff disadvantage!

check out my plans!

http://endless-sphere.com/forums/viewtopic.php?f=3&t=3035&p=55116&sid=9b8b89ef9c23d757fb6e9de5bcee0c5c#wrap
 
Hi Mark_A_W, I took more pictures this past weekend.

I feel safe with this battery and rear rack combination.

By making a lightweight battery case for my lipoly cells, I was able to hold the overall pack weight to less than 9 lbs -- 8 lbs 13 oz to be exact.
8lb13ozLiPoly37VBattery227.jpg

My rear rack is rated for 20 lbs, and it's made of welded steel. I put my mini-horseshoe magnet on it for the picture.
20lbCapacitySteelRearRack229.jpg

Maybe I don't ride agressively? I just commute to work, and shop in my neighborhood. I try to avoid curb jumping and potholes.
 
Dee Jay, I 've got more pictures showing how my battery case goes together.

In this picture, I removed the 3/16" x 2-56 button-head screws from the top and sides. I left them in on the bottom; I can work on the connections and remove the cells without completely dismantling the case. The aluminum outer shell is curled so it peels away from the opening. The voltmeter shows the peak voltage fresh off the charger.
ScrewsRemovedTop&Sides190.jpg
I slid wooden chopsticks between the aluminum shell and plastice end pieces, and folded back the foam to show the connections. Here's the really sucky part about my battery pack: no LVC, no BMS, not even a fuse. Yes, I know better; the shame is all mine. :oops: The original BMS blewup and I couldn't reuse it, but there's no excuse for no fuse. The electrical tape hides a pair of three-way adapters I made to connect together the +/- of the cells, pack-output, and charger-inputs.
View attachment 2
I pulled the lipoly cells out. They are wrapped with clear mylar shipping tape, with a thin piece of sticky-back crafting foam rubber to pad the inter-cell connections on top. The main red & black wires are 12 gauge, and the inter-cell wires are 22 gauge.
LiPolyCellsConnections202.jpg
This picture shows the connectors attached to the 3/16" thick PVC plastic end pieces. I know I don't have a rubber grommet or strain-relief around the output wires; I couldn't find one that would fit in the thick plastic end pieces. I had to use a nylon zip-tie to keep the wires from pulling out. The computer DB-9 nine-pin connector brings the inter-cell connections out. The package for the DB-9 from RadioShack says it's good for 5A for one minute. It's worked great all last summer with the 1.5A 4.2V single-cell charger from batterspace.com. The coax power jack on the right came from TheShack also.
CloseUpConnections205.jpg
 
More pictures showing how I button-up the case.

Basically, I use squeeze bar-clamps to hold the sides and top in, until I can pin the top down.
AssemblyPinTop1st212.jpg
Then I put the top strip in place; the one that covers the gap. The big clamp holds the sides in and squares the plastic and aluminum, so I can get the screws started.
AssemblyStrip2nd213.jpg
Finally, I put in the screws that hold the sides in. The big clamp presses the plastic in and aligns the holes.
AssemblySides3rd218.jpg
Even after removing and replacing the screws several times, the PVC plastic end pieces still got strong threads in them. The 0.050" allen key wrench twists springy when the screw head reaches the surface. When building the case. all I did was drill 5/64" holes through the aluminum into the plastic, and power the screws in. Even though they are ordinary machine-thread screws, they cut their own threads into the PVC. The aluminum is 0.022" thick, and doesn't present much resistance.

Setting aside momentarily the lack of cell protection, I'm proud of my ingenuity with this case. It's exacty the size I need, it's much lighter than a thick steel surplus ammo box, and it provides much better protection than duct tape.
 
Fenders could add some creature-comfort for when you hit the occasional puddle.

Yes TD, I need fenders, badly. No doubt you've noticed the splattered dust marks.

I got some PlanetBike fenders, but I gotta figure out how to mount them. The fenders are the kind with the SS wire braces; I didn't like the kind that mount without these supports.
 
disadvantage said:
Hi Mark_A_W, I took more pictures this past weekend.

I feel safe with this battery and rear rack combination.

By making a lightweight battery case for my lipoly cells, I was able to hold the overall pack weight to less than 9 lbs -- 8 lbs 13 oz to be exact.
View attachment 1

My rear rack is rated for 20 lbs, and it's made of welded steel. I put my mini-horseshoe magnet on it for the picture.


Maybe I don't ride agressively? I just commute to work, and shop in my neighborhood. I try to avoid curb jumping and potholes.

Well, I'm glad you listened, but just FYI:

My rack is the same, it had the same 9kg rating red sticker, same steel attachment. I then bought another and doubled the attachements, and coupled them together (although not that well). My battery + box weighs about 5kgs.....and it still failed.

However I do jump up and down gutters at speed A LOT. Maybe 15 times everyday. I ride very aggresively, I'm the bane of all car drivers in Melbourne :) Except they have 2 tonnes of steel and I have a foam helmet...

I would keep a very careful eye on yours ....it makes me nervous.

Mark
 
Here's some more pictures of my clamping torque arm. In some private messages, I discovered confusion on how the arm attaches to the rear stays of the bike.

The arm does not screw into the rear stay. No holes are drilled and tapped into the rear stay on the bike. I do not weaken the bike frame in any way.

Instead, a round cylinder at the end of the arm presses against the rear stay.

The cylinder has a saddle shape on one end, to match the round of the tubing in the rear stay.
TorqueArm261.jpg
On the other end of the cylinder is a small hole, not drilled clear through and not threaded. This provides a dimple area for the screw to press against on the inside.
TorqueArm267.jpg
When the screw at the end of the arm is tightened, the arm twists the axle against the direction the motor twists the axle, pre-loading the arm against this torque force.

I posted plans for the clamping torque arm earlier in this thread:
http://endless-sphere.com/forums/download/file.php?id=8254

On Monday I received a bar of 304 stainless steel from McMaster-Carr. Soon I will cut myself a rust-proof version of the arm. Goodbye rust!
 
Back
Top