Yamaha XS400 - 8000W QS273 - 10kWh Samsung SDI - CL1000 controller

TorgueRPM

100 W
Joined
Jan 9, 2019
Messages
185
Location
Milwaukee, Wisconsin, USA
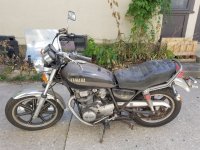
My first full conversion, a 1980 Yamaha XS400.

Main Components:
  • QS273 8000W V4
  • 3Shul CL1000, 500bA, 1000pA
  • 30s1p Samsung SDI 94Ah prismatics, capable of 400A peak, 110V nominal, 10kWh
Goals:
  • Highway speed capable (60mph) with some headroom for safety (max of ~75mph)
  • Close to the weight of the ICE bike (ICE was 410lbs, emoto is 425lbs)
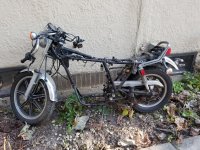
The motorcycle started as a beat up old cruiser that I got for $200 off facebook marketplace:

20200806_151910.jpg20200806_182202.jpg

Battery/Frame
After stripping most of the ICE parts, I designed a frame weldment and aluminum battery boxes:
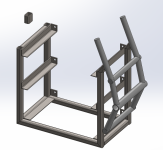
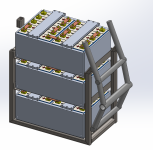
Screenshot 2025-06-08 115944.pngScreenshot 2025-06-08 120605.png

The battery modules themselves were made from 1/4in aluminum plate and 3/8" aluminum bar. The goal here was to be able to completely disassemble the modules if needed for repairs/cell replacement. I definitely overbuilt the boxes, but I did design them to the specs listed in the Samsung SDI cell datasheet, so there is an appropriate amount of compression and the modules are pretty tough. The downside is that the whole battery weighs 180lbs 😐
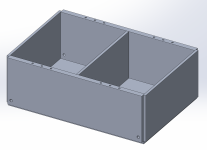
Screenshot 2025-06-08 121742.png20250212_195632.jpg

Somehow I don't have any pictures of the welded up frame, but after a while it looked like this:

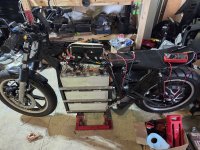
20250515_134006.jpg20250516_165613.jpg

Controller and other components
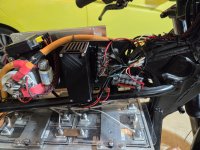
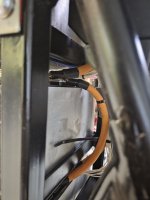
All of the other components fit under the hollowed-out gas tank, aside from the 12V battery and the DCDC converter:

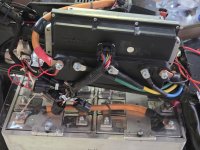
20250516_165544.jpg20250516_165608.jpg20250520_153247.jpg

DCDC Converter

The DCDC converter is a Vicor VI-2T1-CV, quite compact for what it is capable of:
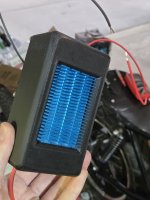
20250516_165532.jpg20250516_165457.jpg

BMS

The BMS is an Ennoid Master XLITE, which connects to the controller via CAN so that I can see everything through the VESC app:

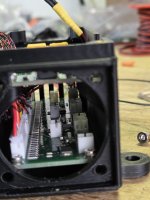
20250531_181053.jpg20250531_181111.jpg

Torque Arms
The torque arms are 1in thick 1018 steel and they clamp onto the axle with M12 bolts:
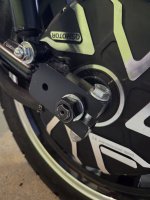
20250608_114127.jpg


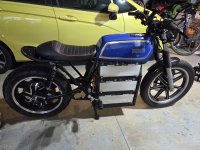
Final Product

There are still a few thing to do, such as ordering a custom seat, replace the fork springs with stiffer ones (center of mass has moved forward by a good bit), and add statorade, but this is how she sits now.
20250608_113955.jpg
 
Last edited:
Nice build! That's a huge battery. Did you reach your goals of 60-75mph capable? At 30s, I think it's quite achievable.

What's your plan for covering those battery terminals?
 
What's your plan for covering those battery terminals?
^ This. I see the polycarb. top cover. Will you also cover the sides?

How's the Vicor with heat dissipation? I picked up another same form factor but different rated model and its around 85% efficient by spec. Testing TBD. Did you utilize its trigger on function, or another method of connection?

Also, excellent Tetris level with the component order inside the tank. Well done!
 
Last edited:
Nice build! That's a huge battery. Did you reach your goals of 60-75mph capable? At 30s, I think it's quite achievable.

What's your plan for covering those battery terminals?
The battery boxes look super (over)built, but what about water/dirt ingress? Aren't you going to seal them in any way?
I have hit 60 because I wanted to test the acceleration, but I'm waiting on some stiffer fork springs before I ride it on the highway for safety reasons. I would like to get field weakening working, even though it might not be very efficient with such a low saliency motor, but when I've tried it, the motor goes into runaway mode where it just keeps spinning the motor even without throttle, so I'm holding off on that for now.

The cells are all thermally connected to the aluminum boxes with thermal gap pad because I was worried about heat generated in the cells, but I haven't noticed any increase in temperature of the modules, so I will be adding side covers for aesthetics and just in case a bystander is stupid enough to stick their fingers in there. Unfortunately I didn't plan far enough ahead to even think about waterproofing, so that will likely never happen.

^ This. I see the polycarb. top cover. Will you also cover the sides.

How's the Vicor with heat dissipation? I picked up another same form factor but different rated model and its around 85% efficient by spec. Testing TBD. Did you utilize its trigger on function, or another method of connection?

Also, excellent Tetris level with the component order inside the tank. Well done!
I am using the trigger on function, but the contactor is triggered by the 12 volt battery. There's a schottky diode between the vicor and the battery for charging purposes because I wasn't sure whether the vicor would be okay with reversed current from the battery should that ever happen. The load is pretty light, around 6 amps maximum, so I haven't bothered to check on the cooling there. There is plenty of air flow going over the heat sink during riding anyways.
As for the tetris, I kind of winged it, so I'm pretty glad it turned out well 😅
 
I know unsprung mass will always be an issue with hub motors, but if anyone has any tips for hub motor suspension I'd love to hear them. The most I've been able to do is turn the preload adjustment on the rear shocks all the way up.
 
Unfortunately I didn't plan far enough ahead to even think about waterproofing, so that will likely never happen.
You'll never be totally waterproof, no. But some polycarb or ABS top covers for each of those 3 cases, with lips that come over the sides an inch or so, tightly fitted... you'd be fine for most rain conditions.
 
Can you elaborate a bit more on this? Both are engaged simultaneously, by the key-ignition switch? Also, Is that a dragonfly precharge?
The 12V battery is engaged by the key switch, and then the vicor can be turned on and off by a separate switch. The precharge is a ZEVA precharge circuit, and while ZEVA no longer sells them, they did release all of the files as open source. I had one left over from an old project. The precharger checks for anomalies during precharging, and it doesn't like it if the vicor is draining power during that process, so the vicor needs to be switched on after precharging is complete and the contactor closes. The vicor is trimmed to output 13.2V and the diode has a Vf of 0.5V, so the battery should be kept charged at around 12.7V if I'm understanding all that correctly.
 
You'll never be totally waterproof, no. But some polycarb or ABS top covers for each of those 3 cases, with lips that come over the sides an inch or so, tightly fitted... you'd be fine for most rain conditions.
The module interconnects have to be hooked up after the modules are slid into the frame, so covers would not fit. I even went as far as making aluminum sheet metal covers with abs plastic on the inside for insulation before I realized I had kind of boxed myself in design-wise. I think any covering for the modules would have to encompass the entire midsection of the bike.
1000004737.jpg
 
I think any covering for the modules would have to encompass the entire midsection of the bike.
The sides are flat enough that two large tinted 3mm PC panels (with a bit of heat gun persuasion) would shield them quite well.

Alternatively, you could always make a nice round composite fairing curving around the entire bottom.

I know unsprung mass will always be an issue with hub motors, but if anyone has any tips for hub motor suspension I'd love to hear them. The most I've been able to do is turn the preload adjustment on the rear shocks all the way up.

Turning the preload will mostly raise the rear height when settled. This will actually put even more weight over the front. If the entire bike sits too low, getting spring rates correct is an absolute necessity and the first order of business before attempting any other changes.
 
The sides are flat enough that two large tinted 3mm PC panels (with a bit of heat gun persuasion) would shield them quite well.

Alternatively, you could always make a nice round composite fairing curving around the entire bottom.


Turning the preload will mostly raise the rear height when settled. This will actually put even more weight over the front. If the entire bike sits too low, getting spring rates correct is an absolute necessity and the first order of business before attempting any other changes.
I will likely go the route of side panels, potentially with a curved top cover to shield the top module.
Ground clearance isn't really an issue, I was mostly tuning the preload to try to hit 30% sag and maybe increase the force on the hub motor to help maintain traction.
 
Nice build. Inspirational!
 
I will be interested to see that Zero build, but I wonder if it really is the most suitable bike for lots of power :unsure:
Lots of room for battery and a motor position that helps with that, but it sure doesn't seem like the stiffest frame I have seen..
At least if it is the same as the 2011 I have?
 
Back
Top