Commuter Booster - <1kg Friction Drive

adrian_sm

1 MW
Joined
Feb 22, 2009
Messages
2,429
Location
Melbourne, Australia
_________________________________________________________________________________________________________
[EDIT #2] 23-May-20011
New website, that tries to summarise everything from here.
http://sites.google.com/site/commuterbooster/

[EDIT #1]
For those new to the thread, there is a now index in the next post that might help you navigate
Now back to the original first post....
_________________________________________________________________________________________________________
I have been ebiking for more than a year now as my primary means of transport. Commuting to work every day, and loving it.

Originally I had a crystalyte 408 on a hard-tail mountain bike, that weighed in at ~ 29kgs. At 48V I was seeing about 700W, and flat road speed of ~40kph. This was a nice set-up which I would recommend to others. Then I went to a full suspension bike, as the hardtail was getting a pounding due to the extra weight. I also upped the volts to 72V @ 30 Amps, giving me 2kw peak, and flat road speed of ~50kph. These speeds and power levels are more than enough for the commuting type ride, in rolling hills that I do around Melbourne. But I still felt like the bike was a big heavy beast. Due to the weight of the hub motor, and batteries you have to build it on a strong bike, with good wheels, and fatter tyres. IMHO.

So this got me thinking about how to achieve a light weight system, aimed at your commuting type rider. I loved Kepler's drive but want to do things slightly differently. To try and make it more compact, less visually obvious, less parts, and hopefully cheaper to manufacture.

This is what I came up with on CAD. I call it the "Commuter Booster"
It is mounts at the top of the seat tube, below the seat stays, and should weigh in at less than 1kg, excluding batteries.
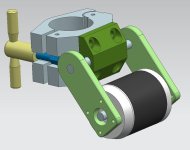
Commuter_Booster_ver1.png

The clamp is a modified OEM.
The motor is a $40 - Turnigy AerodriveXp 90 SK Series 50-65 270Kv
The controller I plan to try is a $37 - Turnigy Brushless ESC 85A w/ 5A SBEC
Batteries will be $50 - Turnigy 5000mAh 6S 20C Lipo Pack

There are three main custom parts, which are green in the above image, the main pivot block, and the two pivot arms.
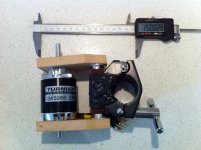
Before making these properly, I mocked them up from wood, and here are some images of how they turned out.
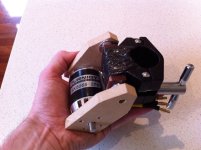
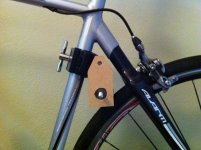
IMG_1126.JPG
IMG_1120.JPG
IMG_1112.JPG
IMG_1127.JPG
IMG_1130.JPG

Next steps:
- finalise dampening, springs and dead stop adjustment
- make the pivot block and arms properly from acetal, and aluminium
- resolve throttle type and placement (may be just a 3 position switch, and ramp control)

Oh and I found a frame mounted bag that is just large enough for two 6s 5000mah batteries. Here's a pic....
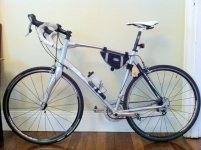
IMG_1111.JPG

- Adrian
 
[EDIT]
Okay this thread is now huge, I can't find stuff in it when I need to so I pulled some links out to key posts and have created this index, and I'll put a few more recent pics in here as well as a good starting point for anyone.

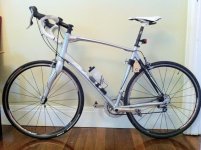
Commuter Booster v2 with a 6374 motor on a road bike, 2 5s5000mah batteries in the frame bag.
Total weight of the bike in this configuration is 12.7kg. Not bad for a >2kw efficient ebike.
file.php


INDEX:
p1 - First Post
p3 - HOWTO - Make the swing arm
p3 - HOWTO - Replace the shaft in the 5065 motor

p4 - First CAD image of integrates pivot/clamp block design
p4 - HOWTO - Make the pivot/clamp block
p4 - HOWTO - Make the swing arm v2

p4 - First attempts at limit stops and torsion springs
p5 - First Grip Tape used
p5 - First Weigh-in
p6 - First real road test + failure
p7 - Pics of first burnt 5065 motor
p9 - No Load Power Test Results (5065 motor)
p9 - Friction Drive Geometry & Maths - First Attempt
p10 - Button Throttle on Road Bars
p10 - Adjustable Torsion Spring - Mark 1
p10 - Performance Stats & Throttle Musings
p11 - Mudguards that would play nice with the Commuter Booster
p12 - umejopa's Amazing mods to the Turnigy Watt Meter
p12 - Modified servo-tester and hall thumb throttle
p13 - Major Update: Commuter Booster version 2
- single swing arm design
- easily adjustable (spring preload, engage deadstop, and disengage deadstop)
- lots of pics of all the components of the drive

p13 - PICS: CBv2 on a hard tail MTB
p14 - Test ride notes on CBv2
p14 - 3D PDF of CBv2
p14 - Test Ride Stats
p16 - adried's cool solution for mounting a thumb throttle on drop bars plus final parts image
p17 - Thoughts on a custom throttle interface based on a modified Turnigy Watt Meter
p18 - hillzofvalp's trigger throttle contribution
p18 - Test Ride - Grip Tape failure, stats [PICS]
p19 - Turnigy Watt Meter - Remote Shunt Mod
p19 - CBv2 6374 on road bike [PICS]
p19 - Weigh-in, and size comparison [PICS]
p20 - Optimum pivot angle discussion
p20 - Installation Template
p23 - How it works

p23 - Debate on suitable controllers

Videos:
p4 - Bench Test #1
p5 - Bench Test #2
p21 - CBv2 On-road test + failure

Here are all the parts of the Commuter Booster, except the grip material for the motor.
The custom parts are the clamp/pivot block, the swing arm, and a spring.
All other parts are standard, or only require a hole drilled in them or something.
file.php


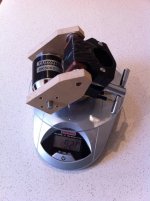
Here is the small version of the drive with a Turnigy 5065 motor, 646 grams total
file.php


Here is the large version that shows the Turnigy 6374 motor, 1239 grams total.
file.php


- Adrian
 
Looks good. I like the stealthyness of it. That frame mounting location is perfect.
 
Nice bike, and nice build. :)
 
I just realized that your running the motor directly on the tire, you sure you want to do that? These motors don't have a skirt bearing so they are not going to last long been pounded onto the tire. You might have to build it with a roller on the tire or change the motor.
 
Thanks everyone from dropping by and checking it out. Still a long way to go. Thankfully it looks like it will fit, which was the first hurdle.

Bluefang said:
I just realized that your running the motor directly on the tire, you sure you want to do that? These motors don't have a skirt bearing so they are not going to last long been pounded onto the tire. You might have to build it with a roller on the tire or change the motor.

This design will never have a roller, I want to refine this down to the bare minimum # of parts.
I have offset the location of the motor, so the contact point is biased to the bearing mounted side of the can. This will help but I am not holding my breath.

If it doesn't work, the next two motor options with skirt bearings are:
1) $55 - HXT 63-74 200kv bigger, heavier, but sitting on my desk ready and waiting
2) $84 - Hyperion Z4045 320 kv, lighter, better quality, but not purchased yet

The design geometry can suit the bigger 63mm diam HXT motor, but it weighs 900g on it's own. So I am keen to try the smaller guys first. I want to keep this as a light weight assist, not replace my 2kw hub motor bike. But I do want to make it ultra-reliable/idiot proof in the long run. So that might end up meaning a bigger motor, or smarter control to ensure it doesn't over heat.

But before I get too ahead of myself, lets just focus on get the mechanicals working first. There is still heaps to sort out and refine.

- Adrian
 
Bluefang said:
I just realized that your running the motor directly on the tire, you sure you want to do that? These motors don't have a skirt bearing so they are not going to last long been pounded onto the tire. You might have to build it with a roller on the tire or change the motor.


It sure doesn't seem like it would work for long, but in practice it seems to perform pretty well.
Definately want to bias the contact area as clost to the supported end as possible, and then things are pretty effectively supported dispite no skirt bearing.

You can also always replace the bearings with ceramics, and replace the butter-steel they use for motor shafts with something strong, like drill shaft stock, or 4340 steel etc.
 
Really neat idea, but just a few tip to help you refine the ideas and possibly avoid problems...
.As Bluefang pointed out, i would worry about the lack of skirt brg on the Aerodrive motor.
Also, if you wanted to make it a little more compact (in width) , you should remove the prop adaptor and move the shaft through to directly run in the support bearing. It also eliminates the possibility of failure of that alloy prop adaptor and its mounting screws.We discussed that on Keplers sale thread.

I am still suffering with sync problems on my Turnigy KF 100 A ESC, so unless you are confident in your choice, you may want to bite the bullet and spring for the Castle ESC first off to minimise the risk of unwanted problems.
Is the clamp one of the music stand devices that Kepler used ?

Keep us updated on progress & good luck.
 
liveforphysics said:
....It sure doesn't seem like it would work for long, but in practice it seems to perform pretty well. .

Well, in the past month we have had two threads where similar motors had the casing work itself loose on the end bell.
The Turnigys with skirt bearings also seem to have extra locking screws to secure the casing to the end bell
 
Hillhater said:
liveforphysics said:
....It sure doesn't seem like it would work for long, but in practice it seems to perform pretty well. .

Well, in the past month we have had two threads where similar motors had the casing work itself loose on the end bell.
The Turnigys with skirt bearings also seem to have extra locking screws to secure the casing to the end bell

Locking it yourself before it fails is always an option. :)


And I absolutely agree with your ESC comment. Go castle HV160 the first time, and save the endless hassles and failures caused by crap ESCs.
 
Hillhater said:
Really neat idea, but just a few tip to help you refine the ideas and possibly avoid problems...
.As Bluefang pointed out, i would worry about the lack of skirt brg on the Aerodrive motor.

Thanks. Always welcome input, that is why I posted it up as a WIP, rather than a finished unit. :D

Hillhater said:
Also, if you wanted to make it a little more compact (in width) , you should remove the prop adaptor and move the shaft through to directly run in the support bearing. It also eliminates the possibility of failure of that alloy prop adaptor and its mounting screws.We discussed that on Keplers sale thread.

Yep. That's the plan, and how I modeled it up. See the first image in the thread.

The wood mock-up with the prop adapter was just for fitment purposes, before I pull the motor apart, and get the required flats, and grooves to have the shaft hanging out the other end so I can support it in the bearing.

Hillhater said:
I am still suffering with sync problems on my Turnigy KF 100 A ESC, so unless you are confident in your choice, you may want to bite the bullet and spring for the Castle ESC first off to minimise the risk of unwanted problems.
Is the clamp one of the music stand devices that Kepler used ?

Keep us updated on progress & good luck.

No. Not confident at all. But happy to throw $40 on the table to find out, as some others have had very positive results with this same ESC. Time will tell.

Thanks again for the tips. Always good to get a fresh set of eyes on the design.

- Adrian
 
liveforphysics said:
Hillhater said:
liveforphysics said:
....It sure doesn't seem like it would work for long, but in practice it seems to perform pretty well. .

Well, in the past month we have had two threads where similar motors had the casing work itself loose on the end bell.
The Turnigys with skirt bearings also seem to have extra locking screws to secure the casing to the end bell

Locking it yourself before it fails is always an option. :)

Great idea. Thanks.

liveforphysics said:
And I absolutely agree with your ESC comment. Go castle HV160 the first time, and save the endless hassles and failures caused by crap ESCs.

Too late on the ESC. Got it now. Happy to pony up for a decent one later.
 
Very cool! That would be a great little setup for my old beater mountain bike. It has a very tall frame and it's a pain to mount a friction system to. I'm not a big fan of pivoting systems but you can sure make them small!

As long as you don't have sync issues that esc will probably be just fine in your application. I would add at least one larger cap and see how it goes.

Nice ride too. Every time I see something like that I want to go out and get a road bike.
 
Adrian,
Very clean and minimalist, sorry off topic but the placement of your drive brings to mind old tunes:

Traveling in a fried-out combie
On a hippie trail, head full of zombie

...

Lyin' in a den in Bombay
With a slack jaw, and not much to say
I said to the man, "Are you trying to tempt me
Because I come from the land of plenty?"
And he said,

"Do you come from a land down under?
Where women glow and men plunder?
Can't you hear, can't you hear the thunder?
You better run, you better take cover."
Yeah!

Apologies Men at Work, you gotta name your drive Down Under!
 
Adrain,

Good to see another variant of a pivoting direct drive system. Good luck with it, I am sure you will get a good result. Nothing better then a lightweight and efficient roadie with an occasional assist.

Few observations with the current design:
I am concerned that you will have trouble getting the motor to pick up on the tire with that geometry. With the drive that low on the tire, I think the climb angle is too high. If you draw an arc from the pivot, ideally the motor needs to be pressed into the tire at its maximum contact pressure at the top of the arc. It can be a little before the top of the arc also without too many problems. This is especially important with high pressure tires as they don’t have the give a wider mountain bike type tire has. If climb angle is too high, the motor is just going to bounce off the tire. You may need a setup some sort of mechanical pressure mechanism to make this work in its current design.

I really like the mounting position and I am sure you will get it work. Just thought I should point out some issues you may possibly have.

In relation to the motor, I think it will be marginal but considering this is a short burst assist, It should be OK. The main reason I went to the large motor is that I needed a motor that would survive a constant duty, not just an assist duty.

Look forward to seeing the results.
 
kevo said:
"Do you come from a land down under?
Where women glow and men plunder?
Can't you hear, can't you hear the thunder?
You better run, you better take cover."

I thought the lyrics were:

"Where women blow, and men chunder!"

:lol:
 
Kepler said:
Adrain,

Good to see another variant of a pivoting direct drive system. Good luck with it, I am sure you will get a good result. Nothing better then a lightweight and efficient roadie with an occasional assist.

Thanks John. Still a long way to go. But I don't need to tell you that.

Kepler said:
Few observations with the current design:
I am concerned that you will have trouble getting the motor to pick up on the tire with that geometry. With the drive that low on the tire, I think the climb angle is too high. If you draw an arc from the pivot, ideally the motor needs to be pressed into the tire at its maximum contact pressure at the top of the arc. It can be a little before the top of the arc also without too many problems. This is especially important with high pressure tires as they don’t have the give a wider mountain bike type tire has. If climb angle is too high, the motor is just going to bounce off the tire.

Yeah. Agree. The mockup doesn't have any of the springs, dampening, or dead stops in yet. So the motor is just hanging under it's weight at the moment, with a decent gap to the tyre. The geometry should still have enough adjustment to get the near perpendicular pressure.

But do you really want to go that far? In my head I had it that angle was really dictated by the coefficient of friction between motor and tyre. A more acute angle would ensure you don't get slip, when things like bumps, wet tyre etc happen. But if you go too far, aren't you just creating more rolling resistance. I didn't think I would have to go near vertical... but since I haven't even spun this thing over yet, I should make sure I give myself the room to do this if I need.

I'll check I have the room to do it. Cheers.

Kepler said:
You may need a setup some sort of mechanical pressure mechanism to make this work in its current design.
I should have the space to slide it up the seat post, and give me the correct contact angle. But I may need to change the pivot mount and/or pivot arms to suit the bigger motor as well as the little baby one.

Kepler said:
I really like the mounting position and I am sure you will get it work. Just thought I should point out some issues you may possibly have.
I like the position too, but it comes with some decent compromises compared to your drive. It won't suit as many bikes, and means I have to house the controller etc, seperately. But hey it's something different.

Kepler said:
In relation to the motor, I think it will be marginal but considering this is a short burst assist, It should be OK. The main reason I went to the large motor is that I needed a motor that would survive a constant duty, not just an assist duty.
I am guessing I will end up doing the same. As I have got used to riding around full throttle on a low power system. I was just hoping that on a light efficient bike I might feel different, and only use it on the hills, or in an efficient region of the motor on the flats, so I don't overheat.

Unless I get really fancy with the electronics, to ensure I restrict power, and monitor heat etc.

Kepler said:
Look forward to seeing the results.

So am I. Once I get geometry sorted, and resolve springs, dampening, and deadstops. I'll make the parts properly, so I can actually put the theory to practice.

Thanks again John, for dropping by and letting me build off your experience. I probably would never have tried this with out seeing your drive. You were definitely the inspiration I needed. Thank you.

- Adrian
 
EVTodd said:
Very cool! That would be a great little setup for my old beater mountain bike. It has a very tall frame and it's a pain to mount a friction system to. I'm not a big fan of pivoting systems but you can sure make them small!

Cheers. Been watching your drive with interest too, but preferred the compactness/simplicity potential of the pivoting system.

BTW. Why do you prefer the sliding verses pivoting engagement? It might help me understand some off the trade offs I have made without knowing it.

EVTodd said:
As long as you don't have sync issues that esc will probably be just fine in your application. I would add at least one larger cap and see how it goes.
Thanks. Will have to raid the elec workshop at work. :D As I don't have anything at home.

EVTodd said:
Nice ride too. Every time I see something like that I want to go out and get a road bike.

Yeah. This is the first decent road bike I have ever had. Always had mountain bikes, since being a kid. As I kept busting them, I didn't think it was wise to get something more fragile. But it is amazing how much more efficient it is even than my hard-tail mountain bike with narrow road tyres on it. I think it only weighs about 12kg. So I should even when I put a couple of 6s5000mah batteries on, it should still be <15kg ! That is half the weight of my Giant dually, or Avanti hardtail MTB eBike builds.

It is less than my mountain bikes weighed before I put batteries, and hub motors on them.

Can't wait to try it.
 
adrian_sm said:
BTW. Why do you prefer the sliding verses pivoting engagement? It might help me understand some off the trade offs I have made without knowing it.

From everything I've seen it seems like a sliding system has smoother action as it tightens against the tire. It has none of the all or nothing movement some pivot systems have.

My theory is that it is because it's moving on a horizontal plane directly into the tire instead of swinging on an arc which needs to be almost perfect or the roller (or motor) will either not engage hard enough or engage and move up off the tire.

The sliding mount just gets tighter and tighter depending on how much movement you have.

As for compactness, you can easily make a sliding mount smaller than a pivot mount if you use the motor as a roller. In your case it could be VERY small since you wouldn't need much movement at all for maximum engagement. The issue there would be making sure the motor is totally disengaged when it's not in use but you have that to think about now anyway.

The sliding mechanism can be very simple too. I just think people have seen a lot of nice, simple examples of pivoting systems, so they assume they're easier.

Btw, I plan on using my new keychain cam tomorrow to get some video of my mount during a normal ride.
 
Nice thinking!
I have build a wery simalary system .
E-bike_01.JPG

E-bike_02.JPG

One thing I hade to do was put the arms togheter so the not twist else the bearing will fall in the motor .
http://www.hobbycity.com/hobbycity/store/uh_viewItem.asp?idProduct=4913
Running it at 6S 4500mA
http://www.hobbycity.com/hobbycity/store/uh_viewItem.asp?idProduct=11933
and it peak out at 2000W at my watt meter , dont now how accurat that is
http://www.hobbycity.com/hobbycity/store/uh_viewItem.asp?idProduct=10080
Only running a 60A controller but it have not broke yet and I get about 105A peak , They say it will be bulletproof time will tell.
http://www.hobbycity.com/hobbycity/store/uh_viewItem.asp?idProduct=2166
Will get a bigger motor this get to stressed.
 
Thats a great build, umejopa! For anyone who wants to copy something like this, there are many options. The metals supplier "onlinemetals.com" has square and rectangular aluminum tube that can easily be cut to the shape needed. It is difficult to find aluminum channel in the dimensions I needed, but the square/rectangular tubing provided the raw stock to make any one of these shapes.

I recommend 3/16" (0.187") wall thickness. Very strong and still light, but easy to drill and cut with only a hacksaw.

http://endless-sphere.com/forums/viewtopic.php?f=28&t=21365&start=45#p318868

An option for a mount is a bike handlebar stem, such as this BMX unit from Niagra Bikes.

http://endless-sphere.com/forums/viewtopic.php?f=28&t=21365&start=45#p318293

SM1602md.jpg
 
Yes see many good part here that povopoint can be made from :D I made my from some part a hade left from my priors motobike (Husaberg)
I was only testing if I could make RC interface by a microcontroller to start with. Then I see Keplers first build . Thanks :)
 
umejopa said:
Nice thinking!
I have build a wery simalary system .
First up. Welcome to ES, and thank you for sharing your bike on my little thread. Next ....

Wow. Nice thinking indeed. Awesome work. Very very similar.

Now I have so many questions.

umejopa said:
One thing I hade to do was put the arms togheter so the not twist else the bearing will fall in the motor .
http://www.hobbycity.com/hobbycity/store/uh_viewItem.asp?idProduct=4913

Yep. I plan on the same but was going to use the main pivot axel to tie the two arms together.
But I like your c channel solution. Much simpler, and gives an easier solution to some of the other design goals like limit stops and how to adjusting of them.

Q1: Does you motor totally disengage from the tyre, or is it nominally just touching when not in use? How well does it pick up the tyre?

Q2: What controls how far the motor can move away from the tyre?

umejopa said:
Running it at 6S 4500mA
http://www.hobbycity.com/hobbycity/store/uh_viewItem.asp?idProduct=11933
and it peak out at 2000W at my watt meter , dont now how accurat that is
http://www.hobbycity.com/hobbycity/store/uh_viewItem.asp?idProduct=10080
Only running a 60A controller but it have not broke yet and I get about 105A peak , They say it will be bulletproof time will tell.
http://www.hobbycity.com/hobbycity/store/uh_viewItem.asp?idProduct=2166
Will get a bigger motor this get to stressed.

Q3: What sort of performance are you getting?
- max speed on the flat
- wh/km
- what sort of hills can you get up
- how hot do things get, and how fast

Q4: What are you using as a throttle?

Q5: Are you using a proper bearing to support the motor shaft on the right hand side?

Q6: Any videos of it in action??? :D :D :D

Again fantastic work, and thanks for dropping by and sharing. It is great to make use of the wisdom you have all created.

- Adrian
 
Back
Top