RustyKipper
100 W
OK, I thought I might you might like to see my latest battery on my commuter hack, this is the 4th battery in just under 40,000 miles.
The last battery looked good but was a PITA from day one as it wouldn’t keep balance for more than a couple of weeks and very nearly caught fire when balance charging one set of cells as the charger decided to drift from 4.20V to about 4.7V…Yikes.
It needs to be 100% weatherproof as the UK is often battered by Atlantic storms and I wanted a degree of fireproofing so I decided on a welded / brazed aluminum box lined with fiberglass exhaust wrap, I need to use the bike in temperatures down to about -20C so incorporated a couple of silicone heaters so I can pre-heat the battery pack before setting off and if needed can heat it to above zero for charging. Conversely, I need to protect it from the full sun in summer so have a silver foil heatshield that I clip onto the battery and the motor to reflect the sun’s rays.
I’ve used 50 x US18650VTC5D cells that I had shipped over from Holland. I needed something to handle the abuse, my last battery would die after only 4 miles if riding up a steep incline and into a 40mph head wind blowing along the valley, this is when you realize how hard the motor is working when standing on the pedals in the lowest gear the bike won’t move!
I’ve incorporated a power board that gives a fused 12V supply for the instrumentation and rear lights, brake lights and turn signals ( in the winter all traveling is done in perpetual darkness so sitting in the middle of the road waiting to turn right without turn signals is highly perilous they also get me a lot less abuse from other road users, also I’m doing traffic speed (low 20’s) so again the brake lights make things safer as drivers subconsciously expect to see brake lights when a vehicle slows. The power board also gives a fused 36V supply to the front custom-built lights that flash alternately in daylight and provide static illumination after dark.
I’m currently cycling around 15 miles a day which is way less than the 30 I used to do a couple of years ago, this means the battery will easily cover me for both the work and return journey with a good degree of reserve for diversions such as road closures from flooding, accidents or snowfall.
I had to carry a generator / charger out to the bike shed every day to charge the last battery for the home run, this charger has covered well over 200 miles traveling from its hiding place at work to the bike shed!
The journey is VERY hilly, some of the hills will let me freewheel at 40mph if there is no head wind, however there is almost always a full on headwind as I’m heading west in the morning, its not unheard of for the wind direction to turn 180 degreed during the day so I get the same head wind on the way home especially if there’s rain moving in, the homeward journey has some savage climbing, remember that hill that I can freewheel down at 40mph? in fact there is a five mile unbroken climb.
The battery is currently discharging between 7 and 8Ah per day and charging at 2A has the battery ready in 4-5 hours, this is a problem as the bike is charged in my workshop at home and even though its on a timer its not good to leave it unsupervised. So, I’ve built a solar charger that I can clip on my Kevlar composite rear mudguard and then with the aid of a MPPT algorithm charges the battery all the time its at work, the idea being that it will reduce the charging time so its fully charged before I leave my workshop at 8pm. To be fair it hasn’t been tested fully as the sun didn’t come out between building it and taking it to work but testing on the bench showed it was capable of charging at over 300mA @ 42V, it’s never going to charge the battery fully but should shave a few minutes off the time, it had its first test in the sun yesterday and the results were quite promising for late October. The best thing is it looks quite cool, people walk past the bike shed at work, stop, and then walk back to the bike in disbelief as if they have never seen solar panels on a bike…priceless!
I’m working on a wind turbine at the moment, the Neanderthal management won’t allow any sort of PV panel or turbine on or near the bike shed so it needs to be done by stealth….keep tuned, I think you’ll like it.
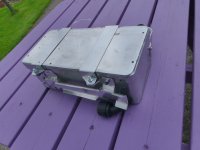
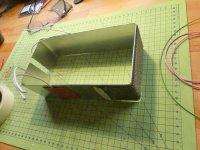
Bare aluminum box ready for paint
Charging at work late in the day hence the shadows

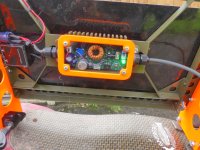
Closeup of the control / charger board, red flash for inadequate light, green flash for charging.
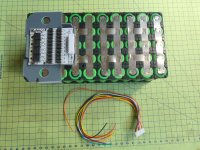
Battery block after welding
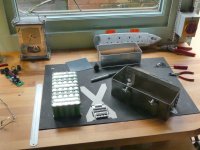
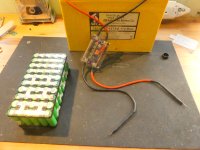
Component parts and working out the BMS insulator / mount
Panels mounted, no sun sadly so unable to do much of a test

Inner frame with silicone heaters
Heatshields in place on a rare hot day

Close up of the battery box exterior, fake water bottle houses the controller, main circuit breaker under the water bottle.

The old battery, bike is in winter mode with nobly tires and reflective tape

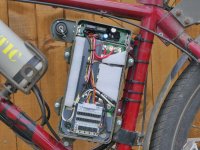
Closeup of battery internals, the fuses can be seen at the top, main circuit breaker is on the frame under the fake water bottle (controller), lots of thermal and electrical insulation on inside of lid (not shown). liberal use of hot glue and zip ties.
Spot welding the cells, welder and probes have to cool for a couple of minutes after each row of cells.
Solar charger removed, this takes around 10 seconts to fit or remove, its stashed in my work locker when not in use.

controller side of charger

The dreaded charger that needed carrying out to the bike shed every day, worked like a charm for a good 3 years. Moddelled here by the lovely Roxanna.

The last battery looked good but was a PITA from day one as it wouldn’t keep balance for more than a couple of weeks and very nearly caught fire when balance charging one set of cells as the charger decided to drift from 4.20V to about 4.7V…Yikes.
It needs to be 100% weatherproof as the UK is often battered by Atlantic storms and I wanted a degree of fireproofing so I decided on a welded / brazed aluminum box lined with fiberglass exhaust wrap, I need to use the bike in temperatures down to about -20C so incorporated a couple of silicone heaters so I can pre-heat the battery pack before setting off and if needed can heat it to above zero for charging. Conversely, I need to protect it from the full sun in summer so have a silver foil heatshield that I clip onto the battery and the motor to reflect the sun’s rays.
I’ve used 50 x US18650VTC5D cells that I had shipped over from Holland. I needed something to handle the abuse, my last battery would die after only 4 miles if riding up a steep incline and into a 40mph head wind blowing along the valley, this is when you realize how hard the motor is working when standing on the pedals in the lowest gear the bike won’t move!
I’ve incorporated a power board that gives a fused 12V supply for the instrumentation and rear lights, brake lights and turn signals ( in the winter all traveling is done in perpetual darkness so sitting in the middle of the road waiting to turn right without turn signals is highly perilous they also get me a lot less abuse from other road users, also I’m doing traffic speed (low 20’s) so again the brake lights make things safer as drivers subconsciously expect to see brake lights when a vehicle slows. The power board also gives a fused 36V supply to the front custom-built lights that flash alternately in daylight and provide static illumination after dark.
I’m currently cycling around 15 miles a day which is way less than the 30 I used to do a couple of years ago, this means the battery will easily cover me for both the work and return journey with a good degree of reserve for diversions such as road closures from flooding, accidents or snowfall.
I had to carry a generator / charger out to the bike shed every day to charge the last battery for the home run, this charger has covered well over 200 miles traveling from its hiding place at work to the bike shed!
The journey is VERY hilly, some of the hills will let me freewheel at 40mph if there is no head wind, however there is almost always a full on headwind as I’m heading west in the morning, its not unheard of for the wind direction to turn 180 degreed during the day so I get the same head wind on the way home especially if there’s rain moving in, the homeward journey has some savage climbing, remember that hill that I can freewheel down at 40mph? in fact there is a five mile unbroken climb.
The battery is currently discharging between 7 and 8Ah per day and charging at 2A has the battery ready in 4-5 hours, this is a problem as the bike is charged in my workshop at home and even though its on a timer its not good to leave it unsupervised. So, I’ve built a solar charger that I can clip on my Kevlar composite rear mudguard and then with the aid of a MPPT algorithm charges the battery all the time its at work, the idea being that it will reduce the charging time so its fully charged before I leave my workshop at 8pm. To be fair it hasn’t been tested fully as the sun didn’t come out between building it and taking it to work but testing on the bench showed it was capable of charging at over 300mA @ 42V, it’s never going to charge the battery fully but should shave a few minutes off the time, it had its first test in the sun yesterday and the results were quite promising for late October. The best thing is it looks quite cool, people walk past the bike shed at work, stop, and then walk back to the bike in disbelief as if they have never seen solar panels on a bike…priceless!
I’m working on a wind turbine at the moment, the Neanderthal management won’t allow any sort of PV panel or turbine on or near the bike shed so it needs to be done by stealth….keep tuned, I think you’ll like it.
Bare aluminum box ready for paint

Charging at work late in the day hence the shadows

Closeup of the control / charger board, red flash for inadequate light, green flash for charging.

Battery block after welding

Component parts and working out the BMS insulator / mount

Panels mounted, no sun sadly so unable to do much of a test

Inner frame with silicone heaters

Heatshields in place on a rare hot day

Close up of the battery box exterior, fake water bottle houses the controller, main circuit breaker under the water bottle.

The old battery, bike is in winter mode with nobly tires and reflective tape

Closeup of battery internals, the fuses can be seen at the top, main circuit breaker is on the frame under the fake water bottle (controller), lots of thermal and electrical insulation on inside of lid (not shown). liberal use of hot glue and zip ties.

Spot welding the cells, welder and probes have to cool for a couple of minutes after each row of cells.

Solar charger removed, this takes around 10 seconts to fit or remove, its stashed in my work locker when not in use.

controller side of charger

The dreaded charger that needed carrying out to the bike shed every day, worked like a charm for a good 3 years. Moddelled here by the lovely Roxanna.

Last edited:

