dogman dan
1 PW
This one's been a sloooow build. Got the bike last summer, but spent the summer riding instead of wanting to spend time moving stuff from my old mongoose dirtbike to the new one. Finally I trashed the motor and rim a bit, and ended up taking some time to get all that sorted.
Basic components. 2810 (6x10) winding 9 continent rear hubmotor, 72v 40 amp 12 fet Lyens controller, 20s lipo for 72volts.
The whole bike. 81 pounds including 72v 15 ah battery.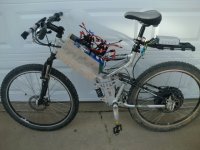
2810 9 continent rear hubmotor in 26" rim.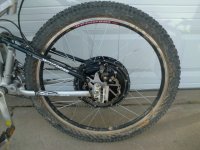
Detail of no weld pinch dropout on the wire side of the motor. Regular nut on the other side. The beauty of the mongoose blackcomb is a steel rear swing arm. So lots of flat space, and no worries about an extra hole where needed to bolt on some 1/4 " thick angle iorn. The second angle could be bolted on too, but seems to not need it so far. We'll see how this holds up when I get around to higher amp and higher volt controllers. For now, it's working good on 72v 20 amps. Next ride I'll put the CA on, to see what the peak wattage is. I'm expecting about 1600 watts, so about 2 hp.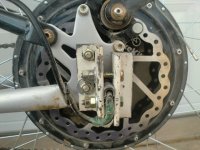
Here are some of the clearance issues. Maybe the pic too small, but there is a freewheel spacer behind the screw on disk brake mount that gives me just a hair of space between the caliper and the motor cover. Then there are a few extra washers on the axle to get the alignment of the disk good with the caliper. Disk and rear hubmotor is a pain in the rear, but I'm loving disk brakes on the new bike, even if they are cheapos with cables. I feel a lot better descending hills on some steep pipeline roads now compared to canti brakes.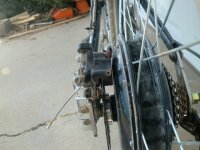
Fat rear tires for floating in sand are nice, but continental diesels in 26 x2.5 lead to some tight fits. Had to take the kickstand off and grind down the mount to clear the fat tire. And I better keep this rim straight as I can with this little space on the sides. View attachment 1
Controller can be changed to anything I want very quickly. I've been riding this bike a bit on 48v 20 amp. That can be nice, because it allows me onto the local blm singletracks. Right now it's sporting a 12 fet Lyens 72v 40 amp. later I may lower it to a 20 amp wattage that I hope will run the motor cool enough to keep riding 72v all summer in 105F temperatures. I did lose some halls last summer, but only after a LOT of riding. Now that it's nice and cold though, I will do at least some riding with a controller that can go as high as 120v. I'm riding now with 72v 40 amps.
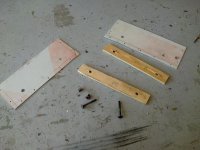
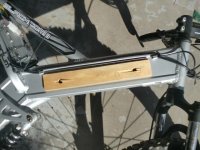
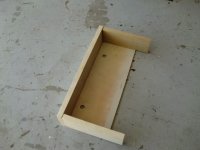
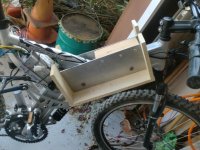
Battery box. More on how I built it in a later post, but for now just a shot of it loaded up with 72v 15 ah of hobby king lipo. The pack is 2 zippy 20c, paralelled with one turnigy 30c then 4 of those blocks series connected. Ends up a lot of wire. There are much neater ways to do it, but I do it a bit the hard way. The reason why is I require the abiltiy to reconfigure my lipo stash one way for this bike, another way for the death race bike, and no telling what I'll be up to next. So no nice neat paralelled permanently rigs for me yet. The box is huge eh? but that is so it can take whatever I want to put in it, up to about 30s 10 ah.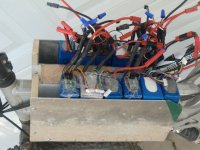
How does it go? SWEEEET! Yes the cheap bike needs upgrades, particularly the rear shock. And the front shocks are nuttin special too. But the bike frame is super stiff, and feels great. My old mongoose dirtbike had a swingarm design that allowed a lot of flop like a dog wagging it's tail. I got used to it, but never liked it. This bike is solid, and I really feel exactly what the rear tire is doing.
The 2810 is the perfect motor for dirt. I'm gonna go over the bars, so how fast do you want it? Slower is fine with me on dirt, where a huge hole can appear in the road at any moment. It could hit 20 mph on 48v. I haven't put a speedo on it yet at 72v, but it sure feels close to 30 to me. About the max I want to go flying over the bars! :lol: Now that I've put 72v to the 2807, I really feel like the torqe I've been craving is there. I can't quite climb straight up 30 degrees of sand, but I'm real close to it. I think there will be very very few places this bike won't go now.
Now that I finally commited to lipo, I can put the battery where it belongs. and the handling stays nice whether I ride with 6 pounds or 20 of battery. The huge box does bonk my knees just a bit though, so I may swap it with my race bike boxes eventually. Those hold 72v 10 ah, and should be better when I start riding in shorts come summer.
Basic components. 2810 (6x10) winding 9 continent rear hubmotor, 72v 40 amp 12 fet Lyens controller, 20s lipo for 72volts.
The whole bike. 81 pounds including 72v 15 ah battery.

2810 9 continent rear hubmotor in 26" rim.

Detail of no weld pinch dropout on the wire side of the motor. Regular nut on the other side. The beauty of the mongoose blackcomb is a steel rear swing arm. So lots of flat space, and no worries about an extra hole where needed to bolt on some 1/4 " thick angle iorn. The second angle could be bolted on too, but seems to not need it so far. We'll see how this holds up when I get around to higher amp and higher volt controllers. For now, it's working good on 72v 20 amps. Next ride I'll put the CA on, to see what the peak wattage is. I'm expecting about 1600 watts, so about 2 hp.

Here are some of the clearance issues. Maybe the pic too small, but there is a freewheel spacer behind the screw on disk brake mount that gives me just a hair of space between the caliper and the motor cover. Then there are a few extra washers on the axle to get the alignment of the disk good with the caliper. Disk and rear hubmotor is a pain in the rear, but I'm loving disk brakes on the new bike, even if they are cheapos with cables. I feel a lot better descending hills on some steep pipeline roads now compared to canti brakes.

Fat rear tires for floating in sand are nice, but continental diesels in 26 x2.5 lead to some tight fits. Had to take the kickstand off and grind down the mount to clear the fat tire. And I better keep this rim straight as I can with this little space on the sides. View attachment 1
Controller can be changed to anything I want very quickly. I've been riding this bike a bit on 48v 20 amp. That can be nice, because it allows me onto the local blm singletracks. Right now it's sporting a 12 fet Lyens 72v 40 amp. later I may lower it to a 20 amp wattage that I hope will run the motor cool enough to keep riding 72v all summer in 105F temperatures. I did lose some halls last summer, but only after a LOT of riding. Now that it's nice and cold though, I will do at least some riding with a controller that can go as high as 120v. I'm riding now with 72v 40 amps.
Battery box. More on how I built it in a later post, but for now just a shot of it loaded up with 72v 15 ah of hobby king lipo. The pack is 2 zippy 20c, paralelled with one turnigy 30c then 4 of those blocks series connected. Ends up a lot of wire. There are much neater ways to do it, but I do it a bit the hard way. The reason why is I require the abiltiy to reconfigure my lipo stash one way for this bike, another way for the death race bike, and no telling what I'll be up to next. So no nice neat paralelled permanently rigs for me yet. The box is huge eh? but that is so it can take whatever I want to put in it, up to about 30s 10 ah.

How does it go? SWEEEET! Yes the cheap bike needs upgrades, particularly the rear shock. And the front shocks are nuttin special too. But the bike frame is super stiff, and feels great. My old mongoose dirtbike had a swingarm design that allowed a lot of flop like a dog wagging it's tail. I got used to it, but never liked it. This bike is solid, and I really feel exactly what the rear tire is doing.
The 2810 is the perfect motor for dirt. I'm gonna go over the bars, so how fast do you want it? Slower is fine with me on dirt, where a huge hole can appear in the road at any moment. It could hit 20 mph on 48v. I haven't put a speedo on it yet at 72v, but it sure feels close to 30 to me. About the max I want to go flying over the bars! :lol: Now that I've put 72v to the 2807, I really feel like the torqe I've been craving is there. I can't quite climb straight up 30 degrees of sand, but I'm real close to it. I think there will be very very few places this bike won't go now.
Now that I finally commited to lipo, I can put the battery where it belongs. and the handling stays nice whether I ride with 6 pounds or 20 of battery. The huge box does bonk my knees just a bit though, so I may swap it with my race bike boxes eventually. Those hold 72v 10 ah, and should be better when I start riding in shorts come summer.


