You are using an out of date browser. It may not display this or other websites correctly.
You should upgrade or use an alternative browser.
You should upgrade or use an alternative browser.
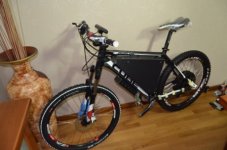
E-bike + carbon frame + 52V. 18650 + BMC motor
- Thread starter soaresdacosta
- Start date

sacko
10 kW
I tried wrapping my controller in the vinyl you linked me to.
You have far more patience than I do!")
You have far more patience than I do!
soaresdacosta
10 kW
Hi sacko,
One off the reasons this build its taking so long. Not always I'm with patience to work in the little stuff like this. And you need trucks of patience to do this...
Take care,
Luis Costa.
One off the reasons this build its taking so long. Not always I'm with patience to work in the little stuff like this. And you need trucks of patience to do this...
Take care,
Luis Costa.
soaresdacosta
10 kW
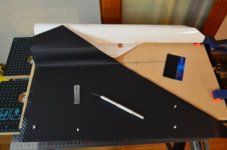
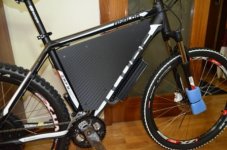
Hi guys,
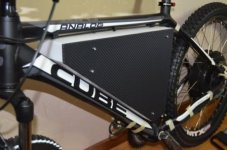
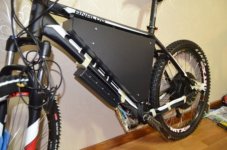
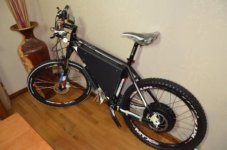
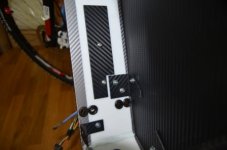
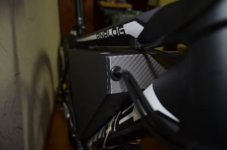
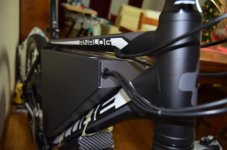
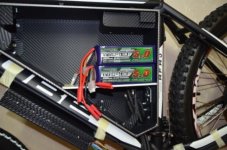
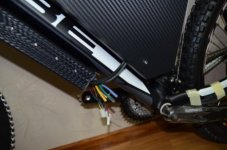
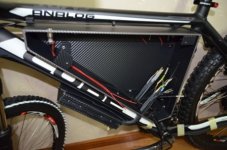
Some work done...I finish the outside of my battery box.
I drill the holes, for cables coming from the motor, controller and the handlebars. I'm going to do, all the connections inside the box. The batteries, going to be removal, to charge and store outside the bike.
I chose two color for the box...I think it looks better.
I'm waiting for a mounting plate for my controller, some anti-spark connectors and torque-arms.
Take care guys,
Luis Costa.
Attachments
-
 DSC_0166.JPG57.8 KB · Views: 3,958
 -
 DSC_0167.JPG57.2 KB · Views: 3,958
 -
 DSC_0170.JPG57.8 KB · Views: 3,957
 -
 DSC_0172.JPG58.3 KB · Views: 3,957
 -
 DSC_0174.JPG64.6 KB · Views: 3,957
 -
 DSC_0175.JPG57.2 KB · Views: 3,957
 -
 DSC_0179.JPG57 KB · Views: 3,957
 -
 DSC_0176.JPG66.1 KB · Views: 3,957
 -
 DSC_0186.JPG70.4 KB · Views: 3,957
 -
 DSC_0183.JPG62.2 KB · Views: 3,958
cwah
100 MW
How did you fix the battery box to your bike? Did you clamp it with hose clamp? Or did you bolt it to your bike frame?
And how did you fix different sheets together? Did you glue them?
And how did you fix different sheets together? Did you glue them?
soaresdacosta
10 kW
Hi,
I secure the box with four screws...they are the mounting points from 2 water botles.
And I use epoxy to glue the acrylic toghether.
Luis.
I secure the box with four screws...they are the mounting points from 2 water botles.
And I use epoxy to glue the acrylic toghether.
Luis.
cwah
100 MW
aaah ok. You're lucky to have 2 water bottle mounting points. I usually only have one.
I have pvc foam but they are not good to combine together. That's my only pain with that
I have pvc foam but they are not good to combine together. That's my only pain with that
beast775
100 kW
Battery box looks awesome!
soaresdacosta
10 kW
Hi beast775,
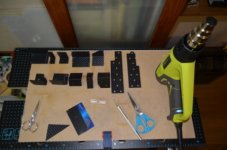
Thanks... I never work with acrylic, and I can say, the end result its pretty good. Its a material easy to work, and easy to cover your mistakes. Ok, if I can, I prefer metal...but its another story, other tools.
I build this box withne x-knife, glue, sand-paper...in my living-room. I think the skills needed to build something like this, a lot of people here can build one, or better. You just need time.
Luis.
Thanks... I never work with acrylic, and I can say, the end result its pretty good. Its a material easy to work, and easy to cover your mistakes. Ok, if I can, I prefer metal...but its another story, other tools.
I build this box with
ne x-knife, glue, sand-paper...in my living-room. I think the skills needed to build something like this, a lot of people here can build one, or better. You just need time.Luis.
samoloh
10 W
very neat build, nice
soaresdacosta
10 kW
Hi guys,
Hope, everyone have a nice Christmas.
samoloh, thanks for the nice words.
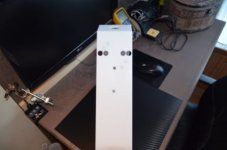
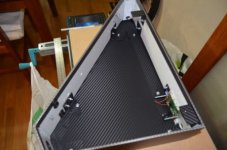
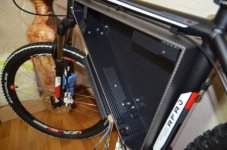
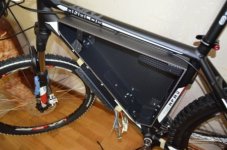
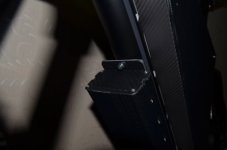
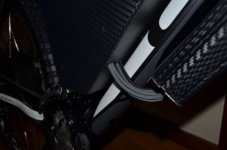
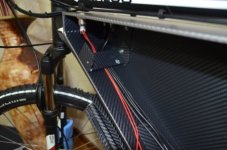
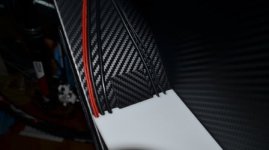
Ok, just a little work done, still in the battery box...
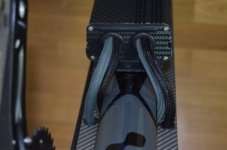
Just put some vinyl in the brackets. This brackets give a lot of rigidity to the box, if the epoxy glue doesn't work, this brackets do the job.
Start to put some vinyl in the inside of the box and try if the cables fit in the holes.
Take care,
Luis.
Hope, everyone have a nice Christmas.
samoloh, thanks for the nice words.
Ok, just a little work done, still in the battery box...
Just put some vinyl in the brackets. This brackets give a lot of rigidity to the box, if the epoxy glue doesn't work, this brackets do the job.
Start to put some vinyl in the inside of the box and try if the cables fit in the holes.
Take care,
Luis.
Attachments
-
 DSC_0187.JPG63 KB · Views: 3,926
 -
 DSC_0189.JPG57.1 KB · Views: 3,926
 -
 DSC_0195.JPG60.3 KB · Views: 3,926
 -
 DSC_0198.JPG66.8 KB · Views: 3,926
 -
 DSC_0199.JPG64.8 KB · Views: 3,926
 -
 DSC_0200.JPG66.1 KB · Views: 3,926
 -
 DSC_0203.JPG62.8 KB · Views: 3,926
 -
 DSC_0204.JPG71.1 KB · Views: 3,926
 -
 DSC_0206.JPG59.3 KB · Views: 3,926
soaresdacosta
10 kW
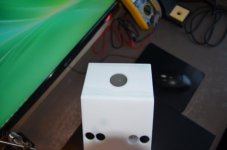
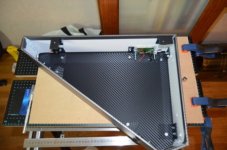
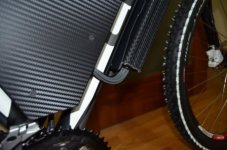
Hi guys,
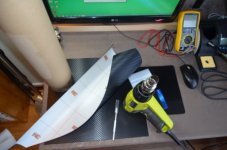
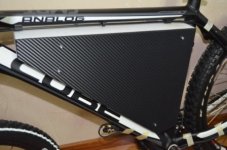
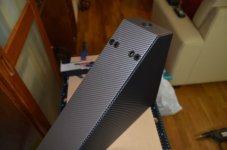
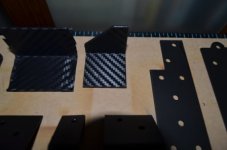
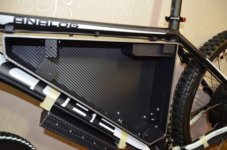
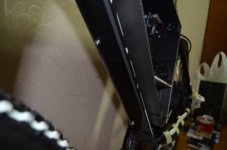
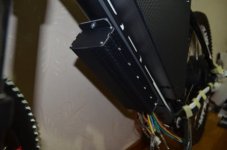
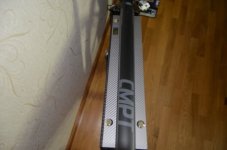
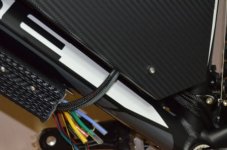
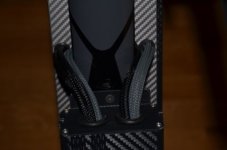
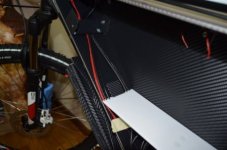
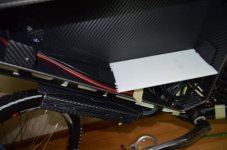
Almost finish the inside of my battery box. At least I'm finish with the vinyl carbon fiber. It looks god, but its very time consuming.
Before I start to play with high-voltage, I need to decide about torque-arms. Buy or make.
Luis.
Almost finish the inside of my battery box. At least I'm finish with the vinyl carbon fiber. It looks god, but its very time consuming.
Before I start to play with high-voltage, I need to decide about torque-arms. Buy or make.
Luis.
Attachments
soaresdacosta
10 kW
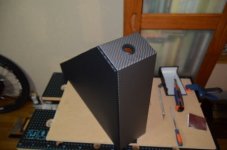
Hi guys,
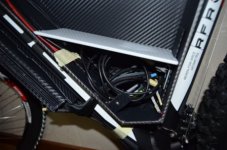
minor work done...better than nothing. :wink:
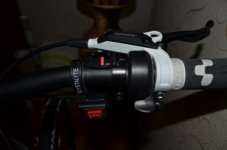
I install my thumb-throttle and 3 speed switch. Start to route the cables inside of my battery-box.
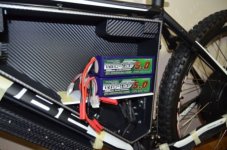
Start the layout for my lipos.
And start to take some dimensions for my torque-arms. I decide, after some advice, (thanks Dogman) to make custom ones.
Luis.
minor work done...better than nothing. :wink:
I install my thumb-throttle and 3 speed switch. Start to route the cables inside of my battery-box.
Start the layout for my lipos.
And start to take some dimensions for my torque-arms. I decide, after some advice, (thanks Dogman) to make custom ones.
Luis.
Attachments
soaresdacosta
10 kW
Hi guys,
Since life got in the way...I miss my deadline.
But ok, I'm working on my bike, wen I have the spare time...And I really like working on her.
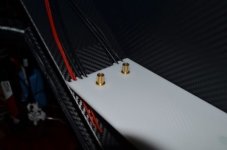
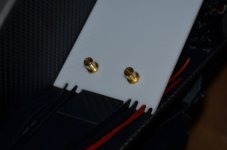
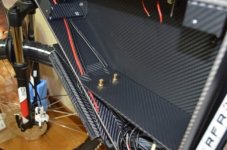
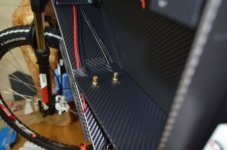
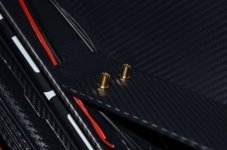
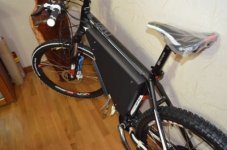
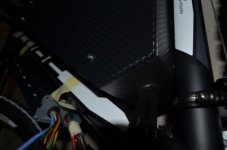
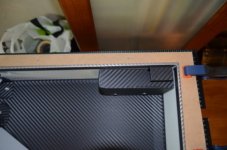
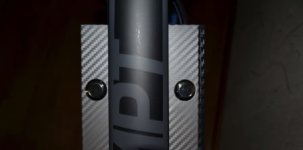
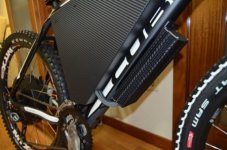
My battery box, move a little, so I decide to put a "riv-nut", and now the box have 5 mounting points. Hard as a rock. Very pleased with that. Its 100% finish.
Since I was messing with "riv-nuts", I mounted 2 for the controller. Happy with that to. Now, I need to put the cables coming out of the controller, inside of my battery box...and make all the connections.
I install one more switch. I have 3. One for the temperature-meter, one for the on-off the controller and, one for the pre-charge. For the controller, later, I will change, for one with key.
Luis.
Since life got in the way...I miss my deadline.
But ok, I'm working on my bike, wen I have the spare time...And I really like working on her.
My battery box, move a little, so I decide to put a "riv-nut", and now the box have 5 mounting points. Hard as a rock. Very pleased with that. Its 100% finish.
Since I was messing with "riv-nuts", I mounted 2 for the controller. Happy with that to. Now, I need to put the cables coming out of the controller, inside of my battery box...and make all the connections.
I install one more switch. I have 3. One for the temperature-meter, one for the on-off the controller and, one for the pre-charge. For the controller, later, I will change, for one with key.
Luis.
Attachments
-
 DSC_0264.JPG50 KB · Views: 3,748
 -
 DSC_0263.JPG60.6 KB · Views: 3,747
 -
 DSC_0277.JPG57.6 KB · Views: 3,747
 -
 DSC_0278.JPG57.7 KB · Views: 3,747
 -
 DSC_0280.JPG51.7 KB · Views: 3,747
 -
 DSC_0281.JPG62.6 KB · Views: 3,748
 -
 DSC_0287.JPG70.6 KB · Views: 3,748
 -
 DSC_0286.JPG63.9 KB · Views: 3,748
 -
 DSC_0266.JPG55.6 KB · Views: 3,748
 -
 DSC_0267.JPG52.2 KB · Views: 3,748
soaresdacosta
10 kW
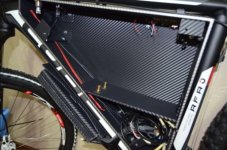
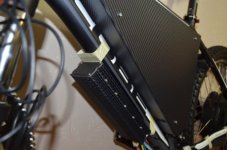
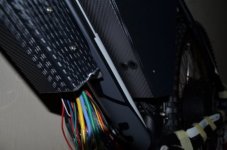
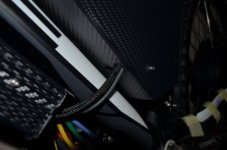
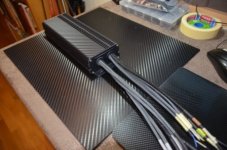
Start to put cables inside of battery box, coming from the controller.
Since I don't want a rainbow of colors, I put "sleeving" in the cables. Grey and black. "Computer guys" use this, to tuned there computers.
Its not finish, but take some pictures, for you can see the idea...
Luis.
Since I don't want a rainbow of colors, I put "sleeving" in the cables. Grey and black. "Computer guys" use this, to tuned there computers.
Its not finish, but take some pictures, for you can see the idea...
Luis.
Attachments
soaresdacosta
10 kW
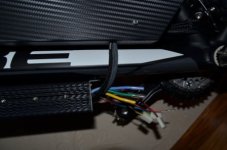
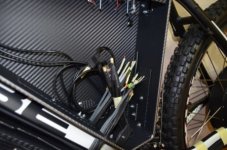
Ok, finish this task.
All the cables, are inside of my battery box...now is just the connections.
I'm waiting for a torque-arm, and need to do the assemble of my lippos. Almoooooossssssttttttt finisssshhhhhheeeeee.....
Luis.
All the cables, are inside of my battery box...now is just the connections.
I'm waiting for a torque-arm, and need to do the assemble of my lippos. Almoooooossssssttttttt finisssshhhhhheeeeee.....
Luis.
Attachments
-
 DSC_0314.JPG69.3 KB · Views: 3,643
 -
 DSC_0327.JPG71.6 KB · Views: 3,643
 -
 DSC_0328.JPG58.8 KB · Views: 3,643
 -
 DSC_0329.JPG68.5 KB · Views: 3,643
 -
 DSC_0331.JPG72.6 KB · Views: 3,643
 -
 DSC_0333.JPG73.2 KB · Views: 3,643
 -
 DSC_0334.JPG68.8 KB · Views: 3,643
 -
 DSC_0335.JPG66.6 KB · Views: 3,643
 -
 DSC_0336.JPG65.3 KB · Views: 3,643
 -
 DSC_0339.JPG57.7 KB · Views: 3,643
 -
 DSC_0341.JPG57.8 KB · Views: 3,643
agniusm
1 MW
Very clean build. A lot of detail. Congrats. A+++ for the skill and patience required for such result
soaresdacosta
10 kW
Hi agniusm,
Thanks. :wink:
Yes, a lot of patient to do this...but I like. The reverse of the medal, 2 years to build. Ok, not working on this every thay, sometimes passe more than a month...
Take care,
Luis Costa.
Thanks. :wink:
Yes, a lot of patient to do this...but I like. The reverse of the medal, 2 years to build. Ok, not working on this every thay, sometimes passe more than a month...
Take care,
Luis Costa.
chucho
1 kW
Thank you for sharring it is very nice made. I wil take some idears for my next built :wink:
soaresdacosta
10 kW
Hi chucho,
Thanks. Take many ideas as you need. This build is a collection of others ideas. :wink:
This build was the main inspiration... http://endless-sphere.com/forums/viewtopic.php?t=23290
Luis.
Thanks. Take many ideas as you need. This build is a collection of others ideas. :wink:
This build was the main inspiration... http://endless-sphere.com/forums/viewtopic.php?t=23290
Luis.
soaresdacosta
10 kW
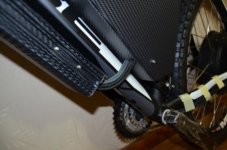
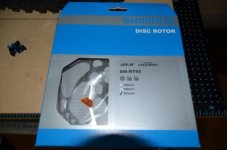
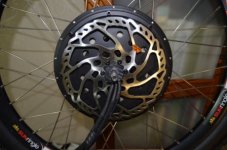
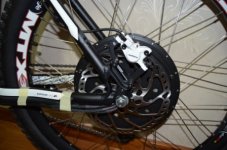
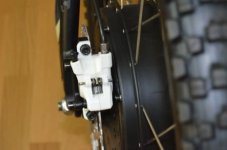
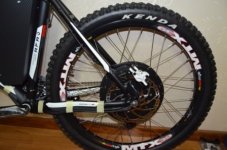
Since I was having some clearance problems with my disc-brake, I upgrade to 203mm.
In the meantime, I buy 60amp fuses and fuse holder.
Tomorrow I will start my battery assembly.
Luis.
In the meantime, I buy 60amp fuses and fuse holder.
Tomorrow I will start my battery assembly.
Luis.
Attachments

chucho
1 kW
Hello Luis,soaresdacosta said:Hi chucho,
Thanks. Take many ideas as you need. This build is a collection of others ideas. :wink:
This build was the main inspiration... http://endless-sphere.com/forums/viewtopic.php?t=23290
Luis.
My conmute bike is very similar to that one but with smaler battery box :wink: i like your wires and your controler... but i am not sure how well the controler will manege heat with the 3m on. The 203 disc great upgrade on mine!! i also use a 60amp fuse holder cause you never now...
Thank you for sharing,
chucho.
soaresdacosta
10 kW
Hi guys,
chucho, do you have a build page ?
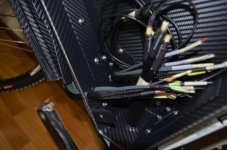
Today I start to organised the "spaghetti" wiring...tomorrow it will continue.
Luis.
chucho, do you have a build page ?
Today I start to organised the "spaghetti" wiring...tomorrow it will continue.
Luis.
Attachments
chucho
1 kW
soaresdacosta said:Hi guys,
chucho, do you have a build page ?
Today I start to organised the "spaghetti" wiring...tomorrow it will continue.
Luis.
No, i did my build before coming to endless but i will do one with my new gng kona proyect :wink:
soaresdacosta
10 kW
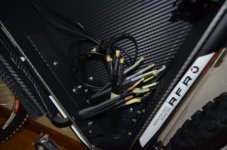
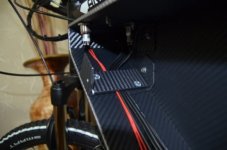
Layout of cables and connectors continue...
Since my bike going to stay inside the house, I need to remove the battery and store it in my "bunker". I install the bullet stile connector "jeti 300amp anti-spark", in the controller side.
Tomorrow will continue this...
Luis.
Since my bike going to stay inside the house, I need to remove the battery and store it in my "bunker". I install the bullet stile connector "jeti 300amp anti-spark", in the controller side.
Tomorrow will continue this...
Luis.