enrengineering
100 mW
- Joined
- Apr 2, 2020
- Messages
- 41
Sorry for not posting the last week, I've been busy with exams.
Before the exams I shrunk the design and remade the rotor, I've printed two stators, one wound like the bavaria scheme AaBbCc (12 coils and 10 magnets) and the other one wound like ABCABC, none of them worked.

I went back to the 36 coil OG design and remade completely the stator. Here's the stator after printing:


The 6 inside tabs are for attaching a plate with a bearing embedded to it (I also changed the bearings to smaller ones) on each side,

the two outer tabs are for mounting the motor to test it. I increased the number of turns per coil to 10 and connected it in star.
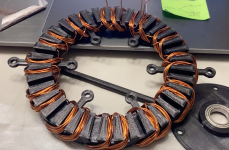
Here's the stator fully wound:

I temporarily assembled the whole thing using only three screws to hold the bearing plates and then slid the same axle that V1 used. I was very nervous, I connected it to the cheap aliexpress bldc board and... IT WORKS!! I have to give it a gentle push and it starts up, I measured the current, about 0.3 amps (power supply) at full speed ∼1200rpm @12V, all the windings are cold to the touch with this setup. You can see it in action here:
https://youtu.be/2NKh9ckicXU
Following improvements to do this easter holidays:
-Machine an iron plate to replace the aluminum one
-Machine custom stainless axle with the flange at the end
-Improvise a jig for balancing the rotating assembly
I got in touch with a 3d metal printing company in my country, I asked them if they had a high magnetic permeability material, they have this ones available:
AlSi10Mg / A13600 / 3.2381 aluminum
316L / S31673 / 1.4404 stainless
18Ni300 / K93120 / 1.2709 they call it hard steel (I think this would be the chosen, but I think it would create more heat)
I also considered purchasing like the protopasta magnetic PLA to see if it improves anything, but before this I'm going to try the iron back plate; I also tried to source silicon steel sheet but no luck, maybe in a scrapyard. I will make a youtube video about the full process of machining and assembling the motor, I will keep you updated here!
Before the exams I shrunk the design and remade the rotor, I've printed two stators, one wound like the bavaria scheme AaBbCc (12 coils and 10 magnets) and the other one wound like ABCABC, none of them worked.
I went back to the 36 coil OG design and remade completely the stator. Here's the stator after printing:
The 6 inside tabs are for attaching a plate with a bearing embedded to it (I also changed the bearings to smaller ones) on each side,
the two outer tabs are for mounting the motor to test it. I increased the number of turns per coil to 10 and connected it in star.
Here's the stator fully wound:
I temporarily assembled the whole thing using only three screws to hold the bearing plates and then slid the same axle that V1 used. I was very nervous, I connected it to the cheap aliexpress bldc board and... IT WORKS!!
https://youtu.be/2NKh9ckicXU
Following improvements to do this easter holidays:
-Machine an iron plate to replace the aluminum one
-Machine custom stainless axle with the flange at the end
-Improvise a jig for balancing the rotating assembly
I got in touch with a 3d metal printing company in my country, I asked them if they had a high magnetic permeability material, they have this ones available:
AlSi10Mg / A13600 / 3.2381 aluminum
316L / S31673 / 1.4404 stainless
18Ni300 / K93120 / 1.2709 they call it hard steel (I think this would be the chosen, but I think it would create more heat)
I also considered purchasing like the protopasta magnetic PLA to see if it improves anything, but before this I'm going to try the iron back plate; I also tried to source silicon steel sheet but no luck, maybe in a scrapyard. I will make a youtube video about the full process of machining and assembling the motor, I will keep you updated here!