
Red_Liner740
100 W
- Joined
- Apr 22, 2011
- Messages
- 109
Anyways i guess its time to show off my "beast"
This whole thing started 2 months ago....it started basic but it kept growing and getting bigger and more expensive...i'm sure u all know that feeling.
The goal of the build was a commuter bike to travel 22km one way to work across hilly terrain.
Enter K2 Zed 3.3.

I chose it for its nice seat to handlebar angle, disk brakes, front suspension and a very large frame triangle, plus the price...on sale for 349.99, very few things can touch it in terms of quality per $$.
I bought a Magic Pie from Gary, excellent transaction, and quick shipping. I did run into a problem where during trial fitting after about 10 min of spinning the motor it just decided to die. Gary was great in exchanging the wheel ASAP.

Here is the bike next to my friends e-bike....i got him hooked...

his setup is a HS3540 with Lyen 12fet controller and 5S 5a zippys.
next came the battery fitment...i decided to build a battey box that will fit eight 6s 5a/h zippy in the frame triangle. Made up a mockup of the battery sizes and confirmed how and where the batteries will fit

But then i got thinking that maybe only eight zippys wont be enough and that if i wanna run more down the road i should make more room....so final design calls for some frustrating polycarbonate work to create a box that will fit two zippys side by side in the forward section but narrow down to a single zippy width underneath your legs so when you are pedalling it doesnt impede.
i dont have pictures of the battery box build as it was done during work breaks but one word of advice. Create your bends first and THEN shape the center section first to the bends...the way i did it i made the center section first and then tried to bend the side panels to fit it. Not very easy when u dont have a proper bending jig.


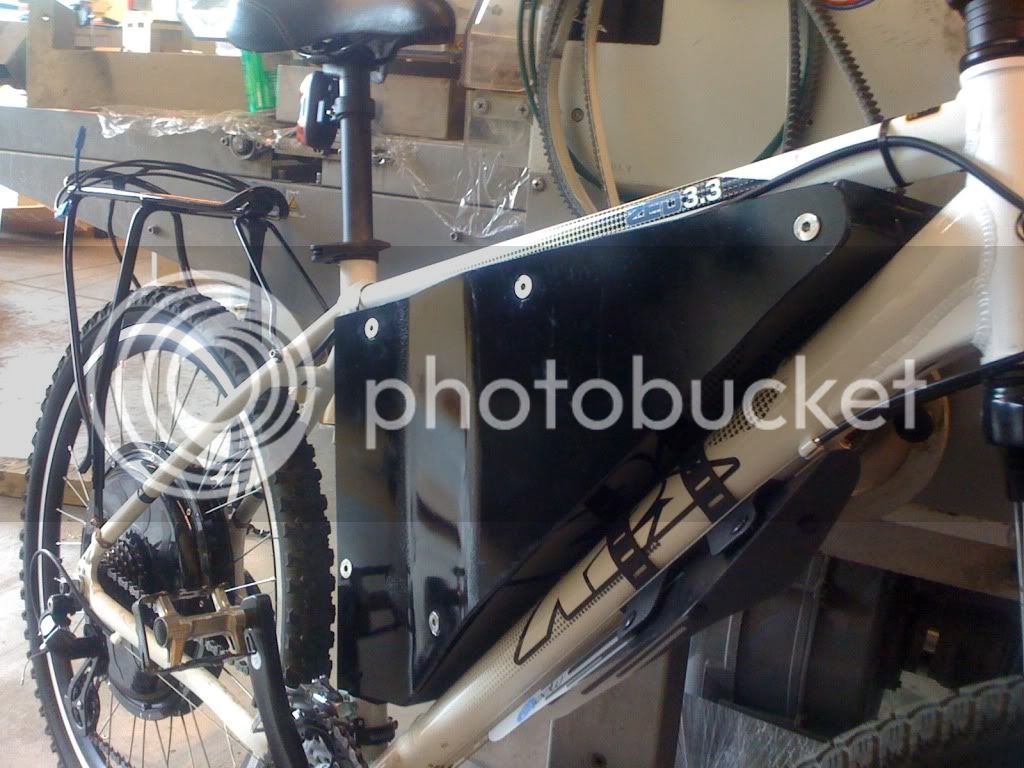


as you can see, this way it can comfortably hold 10, possibly 12 5AH 6S zippys...
This is where the BPU++ Comes in. LOL, BPU is the term Supra guys used back in the day to let other know that their dyno queen has Basic Power Upgrades (BPU) and then ++ stood for different levels...cheeeezy!!!
anywho, to rewind a bit, i ran the Magic Pie at 48v and my friend ran his HS3540 at 36V ( 12S vs 10S ). Guess what, he was faster! i was doing approximately 36km/h and he was slowly but surely pulling away. Some of that i attributed to having a recycled laptop battery test pack which was sagging pretty bad. In its defense it was only 72 cells in a 48v configuration. None the less, i wanted more speed down the road. Seeing my friends Lyens 12Fet controller and how nice it was to be able to tweak it, i ordered it. As fate had it, when i finished building the laptop batter pack, i inadvertently switched leads on the main battery connection. Connected it to the magic pie and the internal controller decided it wasnt having any of it. Fried it!!!
I guess upgrading to external controller now was not an option but a necessity. This is where the BPU came in. Dissassembled the Pie and tossed the internal controller. Re-Used part of the stock wiring harness that ran into the pie and extended the Hall lines and extended the phase wires using 12 gauge wire. So it went from 8 signal lines and 2 14ga battery lines to 5 signal lines and 3 12 ga phase lines. The Magic Pie has a very small opening for the wires. Normally there is no way in hell you would fit those lines in there. Using another ES members trick (cant remember the name now) i removed the stock insulation and used shrink tubing. NOTE> take a file to the MP axle and grind down the sharp edges. Its very easy to cut the insulation. 5 hall lines were also shrink tubed for protection and the whole shebang was barely stuffed in the axle. Before proceeding, use your voltmeter to look for shorts between the phases and each other and the stator. I managed to nick the insulation on one phase and had i not checked who knows what would have happened.
With the wiring complete i installed the 12Fet controller and took it for a spin! Major difference between 48V and 72V (12S vs 18S). The stock MP controller is rated at 20amps and IMO it gives the pie a very lethargic take off (me being 220lbs might have something to do with that).
at 72V and 30Amps (75A phase) the bike hit an indicated 65km/h. Reverting back to 48V and upping the amperage to 40A/100A it cruises at 42km/h with the 120% throttle setting (120% setting was done from the start of 12fet controller use)
I'm waiting for my CA to arrive before i can give any watts per mile efficiency but so far its pretty good!!
anywho, doing 20km full throttle gets the pie warm to the touch....my voltmeter has a temp sensor attachment and the cover reading was 32C....controller wasnt even warm to the touch.
Success? Absolutely!! But there are some things i would have done differently....
1. I shouldnt have bothered with trying to recycle the laptop cells...Its only worth it if u have tons of time on your hands and are going for a low volt/low amperage commuter. I now have a 144cell battery pack which will most likely collect dust. Hobby King Lipos ARE that good!!
2. Buy everything in advance...thats the one thing that sucks about buying from China, it takes forever!
3. Magic Pie is a good combo if u want a slower commuter...but in the end i tossed the controller and had to rewire the pie for external. For a bit more money i could have gotten an HS3540. I paid $320 shipping and taxes in. The HS was $260 + throttle + Halls + shipping....so it would have come out about the same.
Final Verdict....i am gonna add more Lipos...with 8 packs i can run 48v 20ah, or 72V 10ah and have two spare lipos...i ordered two more so i can run 72v 15ah and have one spare or run all 10 and have a 48V 25a/h pack!
once i get used to this thing i'm thinking my next project will be an RC powered bike...
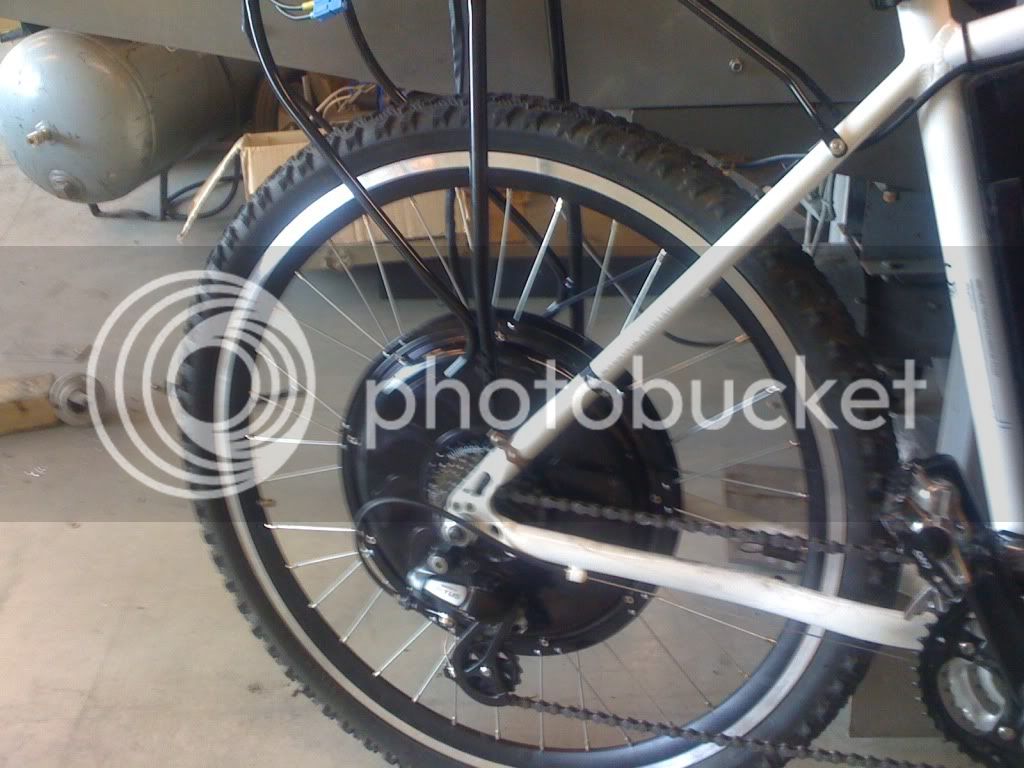
Things u cant see are: There is a torque arm made of 1/4 SS bracket on the brake side of the wheel.
For the love of god tighten up the MP spokes!!! And keep monitoring them! A trick i learned....do the spoke tightening and truing with the motor warm. I didnt tighten the spokes and after 10km i lost a nipple and 10 others were loose to the point that i could tighten them back up with my finger. After tightening and another 20km ride i lost ANOTHER nipple! Thats when i tightened it with the wheel warm and i had no issues since then. Its just a PIA to remove the wheel contantly.
The charging setup did consist of a 48V-350W meanwell clone that i accidentally blew up. I also have a cheapo ebay special S Lipo Balancing charger which is going to be used to balance the packs once a week. On order currently are 4 more Meanwell chargers....2 48V and 2 24V for a 72V charing system. One at home and one at work/spare.
Thoughts? Comments?
EDIT!
Just took it for an endurance run....did 32km at 48V and was 5 min from home when i looked down and saw smoke pouring out of the battery box. i quickly disconnected the controller and got off the bike...after a few min the smoke stopped, i didnt have my allen key to open the box so i risked it and pedaled it home.
Verdict. I guess one of the cells was a dud cuz it popped! the rest of the cells in the battery read 4.0V, that one reads 3.5mV LOL.
Brand new...just had about 5 shallow discharge/charge cycles on the battery packs to break them in. I wonder what my plan of action is with HK?

This whole thing started 2 months ago....it started basic but it kept growing and getting bigger and more expensive...i'm sure u all know that feeling.
The goal of the build was a commuter bike to travel 22km one way to work across hilly terrain.
Enter K2 Zed 3.3.
I chose it for its nice seat to handlebar angle, disk brakes, front suspension and a very large frame triangle, plus the price...on sale for 349.99, very few things can touch it in terms of quality per $$.
I bought a Magic Pie from Gary, excellent transaction, and quick shipping. I did run into a problem where during trial fitting after about 10 min of spinning the motor it just decided to die. Gary was great in exchanging the wheel ASAP.
Here is the bike next to my friends e-bike....i got him hooked...
his setup is a HS3540 with Lyen 12fet controller and 5S 5a zippys.
next came the battery fitment...i decided to build a battey box that will fit eight 6s 5a/h zippy in the frame triangle. Made up a mockup of the battery sizes and confirmed how and where the batteries will fit
But then i got thinking that maybe only eight zippys wont be enough and that if i wanna run more down the road i should make more room....so final design calls for some frustrating polycarbonate work to create a box that will fit two zippys side by side in the forward section but narrow down to a single zippy width underneath your legs so when you are pedalling it doesnt impede.
i dont have pictures of the battery box build as it was done during work breaks but one word of advice. Create your bends first and THEN shape the center section first to the bends...the way i did it i made the center section first and then tried to bend the side panels to fit it. Not very easy when u dont have a proper bending jig.
as you can see, this way it can comfortably hold 10, possibly 12 5AH 6S zippys...
This is where the BPU++ Comes in. LOL, BPU is the term Supra guys used back in the day to let other know that their dyno queen has Basic Power Upgrades (BPU) and then ++ stood for different levels...cheeeezy!!!
anywho, to rewind a bit, i ran the Magic Pie at 48v and my friend ran his HS3540 at 36V ( 12S vs 10S ). Guess what, he was faster! i was doing approximately 36km/h and he was slowly but surely pulling away. Some of that i attributed to having a recycled laptop battery test pack which was sagging pretty bad. In its defense it was only 72 cells in a 48v configuration. None the less, i wanted more speed down the road. Seeing my friends Lyens 12Fet controller and how nice it was to be able to tweak it, i ordered it. As fate had it, when i finished building the laptop batter pack, i inadvertently switched leads on the main battery connection. Connected it to the magic pie and the internal controller decided it wasnt having any of it. Fried it!!!
I guess upgrading to external controller now was not an option but a necessity. This is where the BPU came in. Dissassembled the Pie and tossed the internal controller. Re-Used part of the stock wiring harness that ran into the pie and extended the Hall lines and extended the phase wires using 12 gauge wire. So it went from 8 signal lines and 2 14ga battery lines to 5 signal lines and 3 12 ga phase lines. The Magic Pie has a very small opening for the wires. Normally there is no way in hell you would fit those lines in there. Using another ES members trick (cant remember the name now) i removed the stock insulation and used shrink tubing. NOTE> take a file to the MP axle and grind down the sharp edges. Its very easy to cut the insulation. 5 hall lines were also shrink tubed for protection and the whole shebang was barely stuffed in the axle. Before proceeding, use your voltmeter to look for shorts between the phases and each other and the stator. I managed to nick the insulation on one phase and had i not checked who knows what would have happened.
With the wiring complete i installed the 12Fet controller and took it for a spin! Major difference between 48V and 72V (12S vs 18S). The stock MP controller is rated at 20amps and IMO it gives the pie a very lethargic take off (me being 220lbs might have something to do with that).
at 72V and 30Amps (75A phase) the bike hit an indicated 65km/h. Reverting back to 48V and upping the amperage to 40A/100A it cruises at 42km/h with the 120% throttle setting (120% setting was done from the start of 12fet controller use)
I'm waiting for my CA to arrive before i can give any watts per mile efficiency but so far its pretty good!!
anywho, doing 20km full throttle gets the pie warm to the touch....my voltmeter has a temp sensor attachment and the cover reading was 32C....controller wasnt even warm to the touch.
Success? Absolutely!! But there are some things i would have done differently....
1. I shouldnt have bothered with trying to recycle the laptop cells...Its only worth it if u have tons of time on your hands and are going for a low volt/low amperage commuter. I now have a 144cell battery pack which will most likely collect dust. Hobby King Lipos ARE that good!!
2. Buy everything in advance...thats the one thing that sucks about buying from China, it takes forever!
3. Magic Pie is a good combo if u want a slower commuter...but in the end i tossed the controller and had to rewire the pie for external. For a bit more money i could have gotten an HS3540. I paid $320 shipping and taxes in. The HS was $260 + throttle + Halls + shipping....so it would have come out about the same.
Final Verdict....i am gonna add more Lipos...with 8 packs i can run 48v 20ah, or 72V 10ah and have two spare lipos...i ordered two more so i can run 72v 15ah and have one spare or run all 10 and have a 48V 25a/h pack!
once i get used to this thing i'm thinking my next project will be an RC powered bike...
Things u cant see are: There is a torque arm made of 1/4 SS bracket on the brake side of the wheel.
For the love of god tighten up the MP spokes!!! And keep monitoring them! A trick i learned....do the spoke tightening and truing with the motor warm. I didnt tighten the spokes and after 10km i lost a nipple and 10 others were loose to the point that i could tighten them back up with my finger. After tightening and another 20km ride i lost ANOTHER nipple! Thats when i tightened it with the wheel warm and i had no issues since then. Its just a PIA to remove the wheel contantly.
The charging setup did consist of a 48V-350W meanwell clone that i accidentally blew up. I also have a cheapo ebay special S Lipo Balancing charger which is going to be used to balance the packs once a week. On order currently are 4 more Meanwell chargers....2 48V and 2 24V for a 72V charing system. One at home and one at work/spare.
Thoughts? Comments?
EDIT!
Just took it for an endurance run....did 32km at 48V and was 5 min from home when i looked down and saw smoke pouring out of the battery box. i quickly disconnected the controller and got off the bike...after a few min the smoke stopped, i didnt have my allen key to open the box so i risked it and pedaled it home.
Verdict. I guess one of the cells was a dud cuz it popped! the rest of the cells in the battery read 4.0V, that one reads 3.5mV LOL.
Brand new...just had about 5 shallow discharge/charge cycles on the battery packs to break them in. I wonder what my plan of action is with HK?