My Kona Smoke 29'er

My original 36V Bafang lasted 3,000 miles before a hall sensor failure and the replacement 24V GM Mini Motor core hall wiring melted after one ride and while I was able to repair the Mini I still missed the torque of the 36V motor. I thought about running it sensorless but my experiment with another GM Mini and a dual-mode controller proved to me that a freewheeling geared motor does not work well sensorless. The problem as I understand it is that for a sensorless controller to pulse the phases at the right time it first needs to see back EMF to determine where the motor is. Unfortunately a freewheeling geared motor won’t turn until power is applied to it. In practice this meant it took a very light throttle to get the Mini to launch without the halls hooked up, a little too much throttle or load and the motor would make a hammering sound. Once under way the motor would run ok unless the throttle was fully released which caused the controller to lose its position. Once again then too much throttle too quickly and the hammering returned; it was very frustrating.


The solution to running the freewheeling geared motor without hall sensors was then obvious, don’t let it freewheel! Now I know what some of you are thinking, a big advantage of a geared motor is that it freewheels…well not really. The big advantages of geared motors is that they are small and light and have excellent torque for their small size but I have found especially after I switched to 48V that I use the throttle at least 90% of the time meaning the front wheel is freewheeling maybe 10% of the time at best.

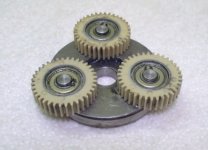
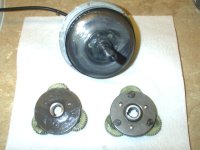
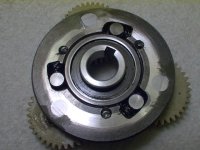
Once I was determined to make the Bafang non-freewheeling I had to figure out how it freewheeled in the first place and how to disable it. I drilled out the 3 pins holding the top cover of the gear assembly to find this;

Bafang 040.jpg


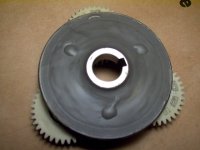
Inside the three pockets are cylindrical bearings which slide over the inner bearing with little friction and allow the wheel to freewheel. When power is applied those same hardened steel bearings are forced against the hardened steel inner bearing surface providing a strong positive lock-up. At this point the solution would have been simple if I had a welder, unfortunately I don’t nor do I know how to use one for that matter. I had never used the JB Weld products but the “cold weld” formula sounded like a solution to my problem. Perhaps my expectations were a little high but it doesn’t come close to real welding, it’s basically just a 2-part epoxy that feels like plastic when cured. Still I had little to lose. I roughed up the surfaces with a stone wheel on a dremel tool (the sparks really flew!) then applied the product to the inner bearing surfaces and slathered it on top of the assembly.

Bafang 071.jpg


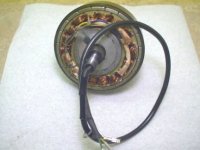
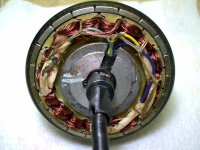
After it set-up I re-assembled the motor which was stripped of the hall wiring.


Bafang 044.jpg


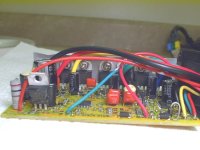
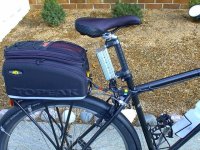
I mounted the sensored/sensorless controller from ecitypower on the seatpost, a departure from my usual handlebar mounted location. (You can check out my review of the controller here; http://endless-sphere.com/forums/viewtopic.php?f=4&t=13659 )


Bafang 065.jpg


I have just three connections now; the 3-wire cable to the motor, the throttle and battery.


I didn’t have high hopes for the JB Weld kluge fix when I took the bike out today for a short 18 mile ride. The controller requires the wheel to roll forward just a bit to sync-up and it works very well. The auto-cruise function also works great. The only thing is with the Watts-Up meter in the rear bag I didn’t have the ability to monitor the current so combined with the higher controller current limit of 21A (spec’d at 22A) and the cruise control I managed to use more power than I ever have before, 16.1 Wh/mile. It was a successful experiment however I feel uneasy about relying on the epoxied gear assembly.

-R
 
So what's the failure mode? It simply starts freewheeling again? I wouldn't worry then.

You should get a reverse switch now too :) and start riding backwards :lol:
 
I used more power per mile than I ever have on the ride yesterday which got the axle of the motor quite hot. If I can get a few more rides like that on it before it gets too cold in these parts it’ll raise my confidence in the fix. If it does fail then as Voicecoils said it may simply freewheel though if a big chunk of the epoxy breaks loose it might damage the gears. Either way it could mean a long, slow ride home on pedal-power alone.

The motor being so small has little cogging torque in fact I can spin the axle with my fingers. When combined with the drag from the permanently engaged gears the resistance as a whole is still probably less than the best direct drive. From a no-load speed of 20 mph the Bafang spins down in 8 seconds where it used to take about 50. I don't have my 9C in a wheel right now so I can't directly compare the two but I'd say the always engaged geared motor still has an edge.

The two motor failures I’ve had so far, the Bafang at 3,000 miles and one of my GM Mini’s on its first outing, were related to the hall sensors and wiring so not having to worry about them when I’m pushing the little motors hard would be nice. I think perhaps even on the bikes I do use the halls I will switch over to the dual-mode controllers so that if the halls do go out the controller will still run the motor to get me home.

-R
 
Russell said:
I feel uneasy about relying on the epoxied gear assembly.

So long as the rollers and springs were refitted to take the drive load it should work fine, but don't think about using regen with it, or you will definitely be asking for trouble!

Alan
 
My first thought was to push the cylindrical bearings over in to the drive position and keep them there but I wasn't successful so I roughed up all the surfaces and applied the JB Weld which is taking all of the load. Afterwards I thought of other solutions however the best bet would be to actually weld it up. As of this morning I have 6 rides and 160 miles on it at 48V w/21A controller with no problems so far (knock wood).

-R
 
Thanks for posting this. Glad it's working for you. When I bought my Bafang I wondered how to get rid of the freewheel as I'd possibly like to use the motor as a brake-- guess this is the answer!
 
I've posted much of this elsewhere but I figured I'd update this thread too. 8)

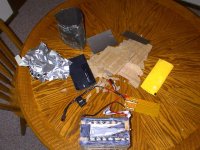
I purchased an Emma/Lau 48V/10Ah LiFePO4 battery in September '09 and used it for 38 cycles with not so much as a single glitch. My last ride of last season was on December 6th then the battery sat through the winter, though I did check the voltage regularly and top it off on occasion. Then one day checking the voltage I got nothing, nada, zero volts. I eventually found that the last cell group was low. I ripped the battery open, it was quite well built btw, and removed the two 5Ah cells which made up the last cell group. One of the cells was a lost cause but the other charged up to 3.35V, not that it's of any use to me.

battery 002.jpg

I believe what happened is the rather fragile tab on the last cell, the one to which the main red lead was soldered, failed due to stress. Anyway the BMS would not work with 15 cells so off it came. I wanted to try a battery without a BMS I just didn't think I'd have the opportunity so soon. My controller (21A peak) is well matched to the battery therefore I don't need a BMS to protect it from over-current and even at 93% DOD I didn't have a low-cell cut-off from the BMS so I don't really need that function either. In a way if you never have your BMS trip you probably don't need it. I did figure out how to jumper the BMS to use it as a balancer so it's still useful in that capacity however balancing of the cells isn't required very often.

BMSbalancer 003.jpg

I had a 240W charger on order from ecitypower because I blew up the original charger that came with the battery (don't ask :oops: ) but I ordered a 15 cell charger (Tenergy)from All-Battery just the same. They both ended up arriving on the same day. The Tenergy charger takes the pack up to 54.3V (3.62V/cell) which is perfect for every day charging. The charger from ecitypower was adjustable so I set it for 55.5V (3.70V/cell) for when I want to balance the pack with the old BMS.

I went for my first ride of the 2010 season on March 6th and for 6 cycles I dutifully recorded the individual cell voltages after a ride and after charging. After the first ride where I used 5.7AH all of the cells were within 0.01V. On the 5th ride I used 87% of the battery's theoretical capacity and the cells were still close though one cell I had already identified as a bit of a laggard was 0.04V lower than the average. After the 6th cycle I stopped recording the individual cell voltages as everything was looking good.

Without a BMS it's crucial to have closely matched cells and it appears mine are quite good in that respect. Since I mounted the controller on the seatpost I no longer have the Watts-Up meter in front of me to monitor the power use in real time though I do have it in the trunk bag for collecting trip totals. I wanted some kind of indicator so I purchased an LED headlight from China that has a few LED's on it to show the state of the battery.

Bike light.jpg

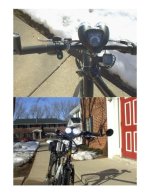
It has 4 blue LED's which I found light at 43,45,47 and 49V and 1 red LED off to the left. As it turns out while it's not as good as being able to watch the WU meter it still gives valuable information. I can roughly tell how much current I'm using by how many LED's go out and once the "45V" LED goes out under load it's time to take it easy on the throttle and get home. I use the RED LED as a final warning kinda like the low gas light on my car. The earliest the red LED has blinked on was after using about 7Ah though if I'm easy on the throttle it may not come on even at 8Ah. This is about the maximum capacity I want to use, with or without a BMS, so it works out well. Oh yeah it has a nifty horn too (green button) which is handy on the bike path.

As of today (April 1st) I have put 17 cycles on the BMS-less pack and covered 507 miles and all is well. My top speed unassisted with 15 cells of course is down from about 23 mph to 21.5 mph and I do miss that at times however I usually ride at part throttle so it's not a huge issue.

Hmmm...I might just slide the 24V GM/Bafang motor core I have back in :wink:

-R
 
Russel, I have an extra 15 cell BMS from a pack i had a couple years ago from Ebike.ca. You can have it real cheap... like, shipping costs if ya want it.
 
recumbent said:
Russel, I have an extra 15 cell BMS from a pack i had a couple years ago from Ebike.ca. You can have it real cheap... like, shipping costs if ya want it.

Recumbent,

That's a generous offer however I have discovered there's little reason to equip this pack with a BMS.

Russ
 
Hey russell I think you've sold me on the kona smoke.

I have one point of contention that I hope you can clear up for me:

You said your 700x50 marathons were a tight fit with the fenders. I was wondering if you feel like you could go bigger.

I recently fitted 26x2.40 tires on my specialized hard rock that took a bit of finagalin with the fenders to solve the clearance issue.

I wouldn't mind altering the fenders like I did on my bike. My hope is be able to fit a big apple 29x2.35. Do you think It could work?
 
I bought the bike mainly for the steel frame and hefty front fork, though the rigid straight fork might be a mixed blessing. The fork is definitely strong however it offers no "spring" action like curved forks do. Some parts are also on the cheap side so I replaced the heavy and w-i-d-e (high Q-factor) crankset right away along with the semi-sealed bottom bracket and pedals. I also replaced both derailleurs, cassette and seatpost because I had better parts on hand and replaced the saddle with another I prefer over the stock unit. Lastly I replaced the weak seatpost clamp with a big Surly Constrictor clamp. I have put just over 3,000 miles on the bike.

The original rear tire, a Continental 700Cx47mm, blew at 1,400 miles due to what must have been a manufacturing defect. That's when I replaced both tires with the Schwalbe 700C x 50mm models. I have put 1,600 miles on them so far and they still look great. I considered the 60mm (2.35") size but thought they might be a tight squeeze. Like your bike there would be no problem fitting the larger size to the front however to keep the fender on the back with the larger size would take some doing. With the 50mm tire I already have the plastic bracket on the bridge all the way up plus the fender is almost contacting the bottom of the rear rack. Another reason I was glad I went with the smaller 50's is the stock rear rim has an inside width of 19mm which would be a bit narrow for 60's.

I like the Kona Smoke however if I were to do it again I'd buy a bike with disc brakes (I had my eye on a Marin Muirwoods 29'er too). Besides the better braking performance discs afford if I wanted to fit REALLY big tires I could go down one wheel size. I'm considering doing this if I ever build a "moped" type E-bike for transportation, for example get a 26" hardtail mountain bike and fit it with 24" wheels with 3" tires!

-R
 
Thanks for the info boss.

Your talk got me thinking of the importance of good brakes.

Couldn't you just swap your Kona Smokes fork out for a suspension fork that is disc brake ready?

The Marin Muirwoods does look pretty good. I found the 09' for $500. I'm thinking the disc brakes might be worth the extra $100.

One thing I should note:

According to the sheldon brown gear calculator 29 inch wheels or 700c wheels have a ~2-3 mph higher speed than 26 inch wheels.
 
I could get a new Kona front disc fork for about $100, have a new headset installed for say $50 and buy front disc brakes for another $50 but that would be a rather expensive option and I'd still not have rear discs.

V-Brakes aren't so bad since I ride at pretty much normal bike speeds but I do have this one steep hill where I get up to 30 mph then have to stop at the bottom due to a cross road where their stopping power isn't inspiring. Also early in the year the snowmelt has all kinds of metal particles in it which embed in the shoes and quickly damage the rims if I don't get them out. That means removing the shoes, cleaning them and realigning the brakes after a sloppy ride. If I build a faster bike that can reach 30 mph on the flats then I'd want the stopping power of discs.

The difference between 26" (559mm) and 700C/29'er (622mm) wheels is about 11% so that's the speed difference you'd expect between two bikes using the different size wheels but with the SAME WIDTH and design of tire. When comparing the extremes however a 2.35" tire on a 26" rim is actually a bit bigger than a 700Cx28mm tire so the speed difference if any would come down to tire design. In practice there seems to be a 1-2 mph difference between folks running 700C and those using 26" wheels though the data is understandably scattered because of all the variables involved.

-R
 
In a quest to regain some lost efficiency I performed a core swap removing the 36V core with a locked-up clutch in favor of a 24V core with a freewheeling clutch. The bike sure was nicer to pedal without power with the freewheeling motor however the 24V motor is essentially what you might otherwise call a “20 inch” motor in that it is wound much higher than the 36V motor, about 9.4 RPM/V for the 24V and about 6.4 RPM/V for the 36V, therefore while the 24V motor was nice to pedal it was very inefficient under power so back in went the 36V core w/locked freewheel.

…but first the once over.

The first thing I did was clean up the gear/clutch assembly and take a look at the nylon (or whatever they are) gears. I tell ya the folks who turned their gears into “peanut butter” :twisted: sure must have been abusing the hell out of their motors because mine after 3,983 miles (6,424 km for the rest of the world) look great. :)

Motor 001.jpg

For the majority of its life the motor was operated at 48V with a 15A controller and that was bumped to a 21A controller when I locked up the clutch. Speaking of the clutch, the Cold Weld has held up well for 932 miles so far making sensorless operation a snap.

View attachment 2


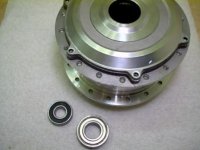
Oh yeah since I had this spare damaged case I took the opportunity to pop out the bearings and replace the well-used units in the motor housing on the bike. The left bearing (smaller one) still felt smooth however the bigger right side bearing was feeling pretty rough.

Motor 008.jpg


I do love the simplicity of having only the 3 phase wires and no hall sensors however I would like to get back to running a freewheeling motor now that I’ve had a reminder how nice the bike pedals without the extra drag. Perhaps one of the later model sensorless Bafangs with a better performing sensorless controller is in my future. :wink:

Motor 010.jpg


-R
 
Ecrazyman 350W sensorless controller

For the last 1,300 miles I’ve been running the Bafang motor sensorless with an ecitypower/bmsbattery 350W 9-FET controller. The controller works both sensored and sensorless however I found its performance with the freewheeling Bafang unacceptable as there was too much “hammering” unless the throttle was engaged ever so gently. The same problem existed whenever the throttle was released then re-engaged as once again the controller had to find the position of the motor. Once I locked up the clutch on the motor so it did not freewheel the performance was great with only a complete dead stop producing any hammering. Roll the wheel even slightly forward and it was off smooth as can be. I’ve been quite pleased with the controller and at under $45 delivered it was quite a bargain especially considering it has e-braking, which I never tried, and cruise control, which I did like.

Recently I’ve been on a conservation kick trying to reduce my power consumption back to where it was last spring. I’ve already achieved that goal however as part of the drive towards using the motor a bit less I wanted to go back to a freewheeling clutch on the Bafang. I have an extra clutch from a spare GM motor core which will fit but I needed a sensorless controller with better start-up performance than the one I use now. A number of people on this forum have remarked how smooth the Shenzhen controller is so I ordered one from E-crazyman. The controller itself was $22 and the shipping was $23 or once again $45 delivered. Actual delivery took over two weeks though much of that time it appeared to sit in Hong Kong after initial acceptance on April 29th. Finally on May 11th it shipped and I received it in Wisconsin today, May 15th.

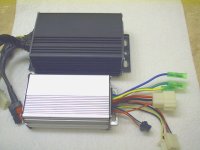
The E-crazyman controller while rated at 350W like the controller it is to replace is a little 6-FET model instead of 9-FETs. It measures roughly 4 ¼â€ x 2 ½â€x 1 ½â€ (not including flanges). Here it is compared to a 9-FET E-BikeKit/Infineon controller;


Ecrazyman_Controller 002a.jpg

Ecrazyman_Controller 007.jpg


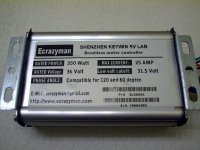
I wanted the flexibility to run either 36 or 48V so I ordered the 36V model hoping it would handle the higher voltage. The rating plate says 25A which is rather high for a 6-FET controller so I thought it might be sporting some nicer mosfets but that is not the case, they are rather typical for a budget controller P60NF06 60V units. I’m running a 15S LiFePO4 pack (I lost a cell group) charged to a maximum of 54.6V (which then quickly falls) therefore it’s not a problem and the main caps are 63V so that’s ok.


Ecrazyman_Controller 011a.jpg

As always I lopped off the bullets and power connector and replaced them with Anderson Powerpoles. I also rewired the throttle to match mine. The controller powered up and spun the wheel the correct direction the first try with the phase power colors all matching the motor. On the test stand start-up from a dead stop appeared to be better.

Out on the road the controller worked well though it does have one quirk and that is if I yank the throttle quickly there is some hammering. This did not happen with my previous controller which never hammered while moving at any speed no matter how I used the throttle. If this is the only trade-off for better off the line performance then that’s acceptable since I rarely pull the throttle that fast.

When I got home the Watts-Up meter said that peak current was only 17.32A, much less than the 25A rating, for a peak power of 807W. This is down from the 20.7A and typical 950W for the 9-FET ecitypower/bmsbattery controller. I was planning to de-tune the controller if it did actually allow 25A so again no biggie there but for someone expecting to get the full current be forewarned. I rarely find that any controller I use even gets slightly warm to the touch and neither did this little guy.

The real test of the E-Crazyman/Shenzhen sensorless controller will come next week when my new E-BikeKit freewheeling geared motor arrives. The new motor will replace the Bafang on this bike and if it runs well sensorless then great, if not it’s not a big deal I’ll run it sensored with one of my other controllers.

-R
 
I couldn’t wait; I had to know how well the sensorless Ecrazyman/Shenzhen controller worked with a freewheeling clutch. I removed the locked up clutch/gear assembly (on left) from the Bafang motor and installed a new clutch/gear assembly from a spare GM mini motor core (actually a Bafang).

Bafang gear clutch assembly 002.jpg

I have read conflicting comments about the controller’s performance with geared motors, some folks said they hammered but it seem recently that most people praised the controller’s sensorless performance. I was dubious that any controller could work well with a freewheeling geared motor but I was pleasantly surprised when I got out on the road and found the controller worked very well indeed. In fact the controller’s start-up performance is so good you might even forget it’s a sensorless controller!

All is not perfect however; there are reminders each time the throttle is engaged and the controller must quickly determine the rotational position of the motor. Sometimes like if I released the throttle for only a second or two and then re-engaged it the power flow appeared to be seamless, at other times if the motor had been freewheeling for a longer period there was either a short pause or a little “burp” before accelerating. A very quick pull of the throttle at any time could cause some hammering but the controller recovered quickly and synced up within no more than a second or two. I also noticed while climbing a couple of hills there was a little "burp" again at peak loading. And lastly there seemed to be less low speed torque available. This may be a function of intentionally programming a soft start or simply the lower current (17A) compared to my previous controller's 20A+ though I do also recall having more low-end even when I ran a 15A sensored controller. Other than those small isssues I found the robustness of this controller and its ability to start a freewheeling geared motor from a full stop to be remarkable!


-R
 
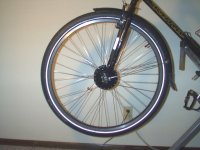
Yesterday the JB Cold Weld I used to lock-up the clutch on my Bafang gave out 33 miles into a 38 mile ride so I figured this was as good a time as any to replace my trusty QSWXB “Cheap But Good” Bafang motor. Mind you after 5,291 miles it still runs and I could either fix the clutch which I epoxied at 3,051 miles when a hall sensor failed or replace the clutch entirely with a spare I have but since I bought a front geared motor from E-BikeKit a little while ago I took this chance to try it out (see my first impressions here; http://endless-sphere.com/forums/viewtopic.php?f=4&t=18349#p270317 ). I was planning to lace the new motor into a new rim with new spokes in a 2X pattern however I never got around to ordering the items figuring I’d wait until the Bafang gave out. I could still do that but I wanted to get back on the road as quickly as possible therefore I re-used the existing Sun Rhyno Lite rim and DT Swiss 247mm spokes. The E-BikeKit Geared motor is about 11mm smaller in diameter than the motor it replaces but going from 12mm to 16mm nipples addressed that issue. The 1X pattern introduces more spoke twist than I’d like but what ya gonna do. The holes in the flanges are also rather large for 14G spoke heads but then so were the Bafang’s.

E-BikeKit Geared Motor 022.jpg

I got the new motor laced up and ready to go by late this afternoon. I only used the motor from the kit choosing to stick with a 21A Ecitypower controller and my trigger throttle. On the stand the no-load speed was 28.4 mph at 51.0V or just a hair faster than the 36V Bafang’s 27.5 mph at the same 51.0V (w/700C x 50mm tire). It’s a slow wind to be sure but I’m not complaining.

Out on the road the E-BikeKit geared motor (it needs a cool name) felt stronger than the Bafang and was a bit faster at a top speed of about 22.5mph. On this first ride over a familiar 18.2 mile course there’s only one significant hill but the motor did pull better up that grade with less protest. By the end of the ride I was quite satisfied with the performance. I finished the ride at an average speed of exactly 20.0 mph, which is quick for me, and consumed 11.63 Wh/mile in the process, which is low for that speed.

Overall I’m happy with the motor especially at the price I paid. I do believe however the kit will be better when Jason has the wheels built in-house and combines it with the tried and true 22A Infineon controller, though then it will be sold at full price.

-R
 
I just returned from my second ride with the E-BikeKit Mini Geared Motor and I must say I am impressed. One reason I waited to swap out my high-mileage Bafang for the new motor was I figured if you have seen one little motor you’ve seen ‘em all but I gotta say this 6.25 pound (2.8Kg) motor is a keeper. Right off the line powered by my 15S LiFePO4 battery with a 21Ap controller the motor doesn’t feel any “torquier” than the old 36V Bafang QSWXB but from then on it pulls stronger especially up steep grades. It’s not a “night and day” comparison but believe me after using the Bafang for more than 5,000 miles I can certainly detect the difference, if I had to put a number on it I’d say it feels 15% stronger. Also while today’s ride wasn’t a pure “economy” ride I did only use 287.3 Watt-hours over the 39.5 miles at 17.0 mph or 7.27Wh/mi. Furthermore having a freewheeling clutch again (the Bafang clutch was locked up for most of the last 2,000+ miles) allowed me to hit a new best top speed of 40.2 mph. The one caveat to this little package is it can get HOT so power is probably best kept to a reasonable level for the sake of longevity. For example after yesterday’s 20.0 mph /18.2 mile ride I couldn’t hold on to the axle for more than 15-20 seconds without pain. Oh and with the twist off side plate I don’t know how easy it will be to service this motor in the future unless somebody can find a ready-made spanner wrench.

-R
 
A 29er is an excellent choice for an electric bike build.
I'm building an electric bike based on the SE Stout 29er, $399 at Bikesdirect.
It comes with rim brakes but it is "disk ready" which means it has tabs on the frame and fork for the disk brake calipers AND disc brake hubs.
It is sold as a single speed BUT it is "gear ready" meaning it has a 8/9/10 speed rear hub, a removable derailleur hanger, and cable routing and stops for the shift cable.
There is no provision for front shifting but clamp-on cable stops are available.
Bikesdirect has another bike that is identical in concept called the Dawes Deadeye and it is only $319! Bikesdirect prices include shipping and there is no sales tax if you don't live in Texas.
Both bikes come with beautiful steel frames and forks, a super nice set of NUTTED 36 spoke wheels, and a super nice crankset with Isis splined bottom bracket.
I'm going with the Currie kit. I like that there is absolutely no drag when riding without electrical power.
This week I took the Currie wheel a bike store to have the 700c rim from the SE Stout installed on it.
The Currie wheel comes with a 20 tooth "southpaw" freewheel but I will be replacing it with a 16 tooth ACS freewheel. That, and the larger diameter wheel will give me a higher top speed but less pulling power. It's OK, I am an "actual cyclist" as another commenter put it.
I hated to use the Currie hub because it is a piece of junk but it is unique in that it is threaded for freewheels on both sides with the left side being left threaded.
I will work on a chainring adapter for the disk hub left over from the Stout and a freewheel adapter for the Currie motor shaft.
That will enable me to use a quality 8/9/10 speed CASSETTE hub rather than a cheesy FREEWHEEL hub.
But, there is another purpose. With the freewheel on the motor, it will enable me to drive the crank OR the wheel. It's a simple matter to put on a left side crank and run a longer chain to it.
There are no rack provisions on the Stout so I will make some brackets out of sheet metal to enable the Currie rack to be mounted on the wheel axle.
They will be triangular in shape. There will be a 10mm hole drilled for the wheel axle and then a hole drilled for the lower rack mount. This will have two benefits. It will compensate for the taller wheel and it will move the rack back to keep panniers away from the heels.
I will use L-shaped brackets mounted to the brake studs for the upper rack mounts.
The Currie rack is super strong and the battery slides into it very securely. A second battery can be slid into it if I don't mind carrying another 14lbs!
Yes, I'm going with the lead acid battery provided with the kit for the time being.
Currie says a range of 10-15 miles. If it gets half that it will be fine with me.
My bike will be very pedal-able without electric power unlike the one-size-fits-all piece of junk that turnkey electric bikes are, almost without exception.
I am going to be running 700x47 Michelin City tires that I got at Nashbar for $5.
I am already running these on another 29er and I like them much better than the 700x2.35 Big Apples that I ran before. The Citys are faster and for some reason they ride better.
I'm going to be running moustache handlebars. I use one on my other 29er and it would be hard for me to go back to a riser bar. I found a moustache bar that is 22.2mm in diameter so that the throttle will slide right on. I'm going to be running 1x7 for now but the crank that comes with the Stout can take another chainring so I have the option of going 2x7.
I got one of those Nashbar shifters for a buck and I will mount it on the end of the moustache bar, in the manner of a bar end shifter, to shift the front derailleur.
I will post pictures when I am done. Cheers.
 
Russell said:
Yesterday the JB Cold Weld I used to lock-up the clutch on my Bafang gave out 33 miles into a 38 mile ride so I figured this was as good a time as any to replace my trusty QSWXB “Cheap But Good” Bafang motor. Mind you after 5,291 miles it still runs and I could either fix the clutch which I epoxied at 3,051 miles when a hall sensor failed or replace the clutch entirely with a spare I have but since I bought a front geared motor from E-BikeKit a little while ago I took this chance to try it out (see my first impressions here; http://endless-sphere.com/forums/viewtopic.php?f=4&t=18349#p270317 ). I was planning to lace the new motor into a new rim with new spokes in a 2X pattern however I never got around to ordering the items figuring I’d wait until the Bafang gave out. I could still do that but I wanted to get back on the road as quickly as possible therefore I re-used the existing Sun Rhyno Lite rim and DT Swiss 247mm spokes. The E-BikeKit Geared motor is about 11mm smaller in diameter than the motor it replaces but going from 12mm to 16mm nipples addressed that issue. The 1X pattern introduces more spoke twist than I’d like but what ya gonna do. The holes in the flanges are also rather large for 14G spoke heads but then so were the Bafang’s.


I got the new motor laced up and ready to go by late this afternoon. I only used the motor from the kit choosing to stick with a 21A Ecitypower controller and my trigger throttle. On the stand the no-load speed was 28.4 mph at 51.0V or just a hair faster than the 36V Bafang’s 27.5 mph at the same 51.0V (w/700C x 50mm tire). It’s a slow wind to be sure but I’m not complaining.

Out on the road the E-BikeKit geared motor (it needs a cool name) felt stronger than the Bafang and was a bit faster at a top speed of about 22.5mph. On this first ride over a familiar 18.2 mile course there’s only one significant hill but the motor did pull better up that grade with less protest. By the end of the ride I was quite satisfied with the performance. I finished the ride at an average speed of exactly 20.0 mph, which is quick for me, and consumed 11.63 Wh/mile in the process, which is low for that speed.

Overall I’m happy with the motor especially at the price I paid. I do believe however the kit will be better when Jason has the wheels built in-house and combines it with the tried and true 22A Infineon controller, though then it will be sold at full price.

-R
Okay dumb question??? Can you use a sensorless controller with the ebikekit geared hub motor?

I fried my stock version today and was in contact with Lyen to get a new one.
 
wineboyrider said:
Okay dumb question??? Can you use a sensorless controller with the ebikekit geared hub motor?

I fried my stock version today and was in contact with Lyen to get a new one.


Sure but some sensorless controllers work better than others with freewheeling geared motors. I have an Ecrazyman/Shenzhen sensorless controller that works amazing well from a dead stop with a geared, freewheeling Bafang but overall performance still can't match a sensored controller. The controller I'm presently using with the E-BikeKit geared motor is a universal model I purchased from Ecitypower which can work with or without hall sensors. I'm using it sensored for the smoothest operation but if the halls ever fail it'll still provide power to help get me home. I can't speak to the Lyen sensorless controller performance but I'm sure you can find a review somewhere on this forum.

-R
 
Thanks for the reply. Now another question? Since it's a geared motor and it's geared ?:1 how would a headline type controller work on one? Isn't this a better way to get more speed?
 
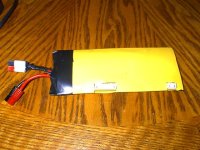
After a wait of a couple of months the Zippy 25C 6S LiPo batteries I had my eye on at Hobby King finally were in stock. I’m happy with my present 10Ah 15S LiFePO4 pack but I wanted to try LiPo for the fun of it. I ordered two of the 5000mah batteries and picked them up at the PO nine days later. Not enough packing material was used so the parts were rattling around in the box but everything appeared to be OK.

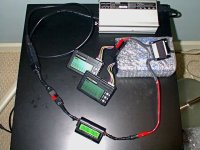
The batteries arrived with all of the cells between 3.85V and 3.87V according to the Battery Medics I also purchased from H-K to do the cell balancing. The two batteries are taped together and wired in series to make a 12S pack with Anderson 45A connectors on the output. I charged the batteries in series with an extra 4A charger I got from ecitypower a while back. I was able to dial the output voltage down to 50.48V which ends up working perfectly with the B-M's. I originally wanted to charge the batteries to right around 50.0V (4.167V/cell) for longer life however the Battery Medic balancing options are limited to 0.1V increments leaving 4.20V/cell (50.4V total) my only real option.

LiPo 005.jpg


I went on the first ride with the diminutive pack this afternoon (medium effort pedaling).

Trip results:

Distance: 19.4 miles (31.2km)
Average speed: 16.9 mph (27.2kph)

Amp-hours used: 3.638
Watt-hours used: 167.9
Peak Watts: 923

Average Voltage: 46.15
Min Volts: 43.15

Wh/mile: 8.65
Wh/km: 5.38

Top speed was down a bit (max ~22.4 mph) from the 15S LiFePO4 as expected given the no-load speed of the motor on a fully charged battery was 27.8 mph @ 50.3V for the LiPo pack compared to 28.4 mph @ 51.0V for the LiFePO4 pack. Of course the output voltage of LiPo also decreases faster when discharged which combined with the LiPo pack being half the size of my LiFePO4 pack means the speed at the end of the ride had fallen more than I’m used to.

I feel a bit disappointed with the performance of the battery though I probably don’t have a good reason to be, I am using a small 5Ah pack after all. The pack just finished charging/balancing and once again the cells in one battery are all sitting at 4.21V and the other at 4.20V. So far, so good...but now I need to find a good use for it. :?


-R
 
Back
Top