footloose
10 kW
samsavvas said:... some of the issues I would encounter in fitting a BBSxx to a 406 wheel bike.
Sam --
Moultons are great bikes, I'd love to have one.
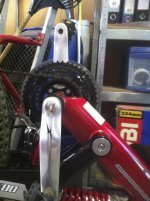
I installed a BBS02 on a Raleigh Twenty with 406 wheels.
No problem with installation, it was dead easy.
However, I found that the BBS02 was overkill on that bike.
Combination of BBS02 power with small wheel, short wheelbase, very short chain-stays
makes for a bike that wants to do wheelies at slightest provocation.
Fun, but a bit hazardous for a commute bike :wink:
I'm removing the BBS02 from the R20 now, fitting it to a longer wheelbase bike with 700c wheels.
The BBS01 might be ideal for your Moulton. (If I was doing the R20 project again, I'd go for the BBS01.)
")