New Bafang Crank-Drives

speedmd said:
I did read this before installing but knew better and did the opposite as I like my bike and would not care what their reason was. IMO you are fool to think this would not trash your shell. I will strap the motor up against the down tube if it moves down in use.

I suppose if I had an expensive frame, I might concur. My frame was a $100 craigslist find, so I could care less about trashing the BB.
 
If you remove the unit and re-install your old bottom bracket, any bike shop can run a bb tap in to clean up the threads. If you want to avoid dinging them in the first place, slip the unit in and tighten the lockring lightly to leave marks. Remove the unit and file V notches into the bb with the edge of a flat file. None of this is rocket science.
 
Kepler said:
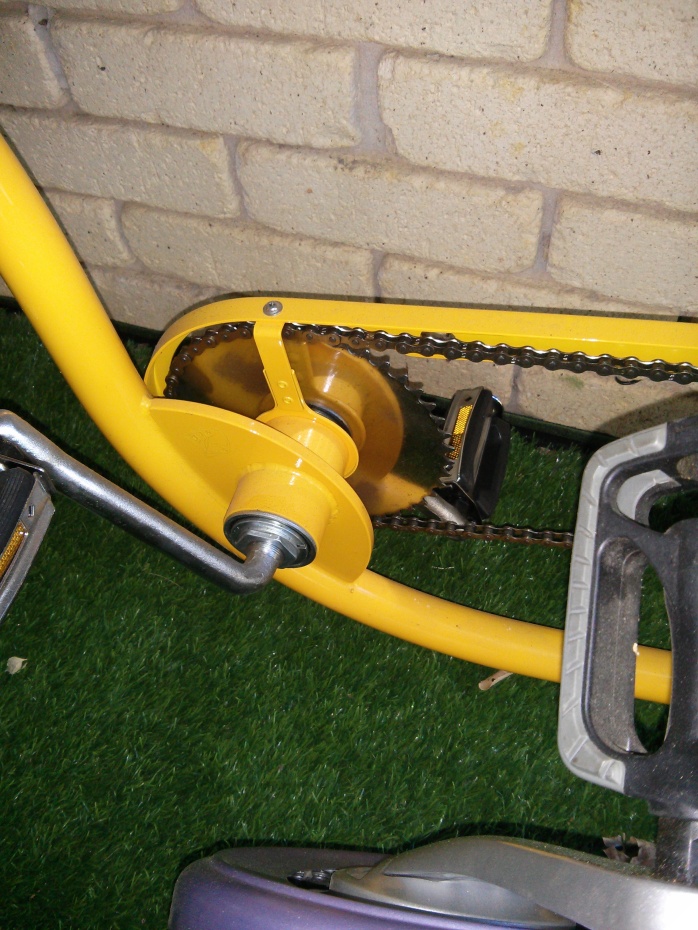
After clocking up around 500km on the test bike I am now at a stage whereby I want to install the drive into a more deserving frame. Need to make sure the drive fits into the selected frame so I have spent a bit of time modeling the drive in Solidworks to hopefully take out some of the guess work.

View attachment 6

View attachment 5

View attachment 4

Had this DH Comp frame on file drawn by another forum member to see how the drive would fit up. Cross that one off the list due to the 100mm bottom bracket and wide suspension components.

View attachment 3

View attachment 2

I am quite keen on a 2008 / 2009 Norco Atomick. Trying to track down some measurements on this bike at the moment but it looks like a good candidate providing the BB is suitable. If anyone has one of these, I would really appreciate getting some measurements.

View attachment 1

Hello Kepler,

Many thanks for the valuable information and feedback you have contributed with. I think I am sold on this drive, any chance you can send me the sw file so i can take a look at the measurements etc ??

Greetings from cold Norway with about 50cm snow so no biking for quite a while here, just planning for spring :)
 
I suppose if I had an expensive frame, I might concur. My frame was a $100 craigslist find, so I could care less about trashing the BB.

I hear you. I would still have it out board as the tall sharp small area bumps would work there way into the surface and loosen the fit with a bit of time. Some green loctite on both bb faces and it should hold it for life just on the solid smooth surfaces. Will see how it goes, but regardless I would never do that to my shell. It is a non starter in my book.
 
deffx said:
It may be worth fixing the motor to the down tube to prevent this then? Seems reasonable

Believe deffx is right. When I re-install on another frame... I'll try to find some way to fix the motor to the downtube.

The original install was done per Bafang's design recommendations.
Very possible that their design works perfectly with the lower-power versions of the kit, not so perfectly with higher power versions.
 
their design works perfectly

I would say they over simplified it and left out a part (front motor mount/ retaining strap). Attempting to hold a front heavy motor assembly with a few tits on a bracket that are partially pressed into a relatively sensitive surface, is just unfinished / over simplified work. They need to watch some of the vids of our members jumping their e-bikes like rabbits chased by a pack of foxes to appreciate what they are asking this to do in our ranks. It works as is on the flats with your average commuter. Let see how they hold up over the next few months when they start seeing some more challenging riding by a host of folks. I may be wrong and it does not make me like the kit any less and a easy fix if it becomes a issue. Time will tell.
 
Rusty123 said:
Nice work Kepler!

Could you please provide more detail about the thumb-button throttle? For example, what part(s) did you use, and how did you connect it to the Bafang wiring harness? And did it eliminate the "dead band" on the stock throttle (I wasn't sure if the dead band was a function of the throttle or the controller).

To connect the button throttle you need to sacrifice the thumb throttle and just use its connector and cable. The diagram below shows how to wire it so that the correct voltage returns to the controller. The push button gives you a delay free full throttle command. Of course this full throttle signal is scaled against the power setting you have selected unless you have a system that has been custom programed for 100% throttle on all power settings. IMO if using a button throttle, you are better off with full throttle being scaled against the selected power setting as a 100% throttle burst often just isn't needed. When you have you power setting at max, the push button will give you 100% throttle.

button throttle.jpg

I ended up using this horn button. http://www.bmsbattery.com/ebike-parts/380-ebike-speaker-button.html Nice and neat and comes with a mounting system.

 
speedmd said:
their design works perfectly

I would say they over simplified it and left out a part (front motor mount/ retaining strap). Attempting to hold a front heavy motor assembly with a few tits on a bracket that are partially pressed into a relatively sensitive surface, is just unfinished / over simplified work. They need to watch some of the vids of our members jumping their e-bikes like rabbits chased by a pack of foxes to appreciate what they are asking this to do in our ranks. It works as is on the flats with your average commuter. Let see how they hold up over the next few months when they start seeing some more challenging riding by a host of folks. I may be wrong and it does not make me like the kit any less and a easy fix if it becomes a issue. Time will tell.

You have me thinking on how to design a support bracket and strap that doesn't detract from the drive's stealth look. I plan to use this bike mainly for single track which means plenty of jumps will be encountered. Admittedly though, I did plenty of jumps of up to a metre high with the test bike and the motor never moved. Might be a different story once people start pushing really hard though.
 
I'm a fan of these 85MPa tensile rated 4.8mm UV resistant black cable ties used like a murder of crows to solve any problem =D
http://www.renonation.com.au/crescent-black-cable-ties-200mm-x-4-8mm-pack-of-100

I am imagining using a couple longer bolts with spacers off the housing either side with spacers to offer some grab points to tension the cable around the down tube to keep it firmly butted against it with a rubber spacer to protect the frame finish.
 
Maybe more concerning: there was some evidence that the torque of motor had in fact been rotating the entire assembly slightly within the BB shell. I expected to find a single, sharp, V-shaped indentation in the steel of BB shell from each of the mounting plate ‘protrusions’. In fact, I found that each of the indentations was a bit wider than expected. Instead of a perfect V shape… each indentation was shaped more like \_/ That is, each of the indentations was slightly wider than expected.

So installing this kit will damage your Bottom bracket ?

Also if the bottom bracket wears out or fails is is replaceable or is it part of the motor ?

Also how strong is this Bottom bracket compared to the ISIS type ? is it ok for jumps and landing on the peddles like the ISIS ?
 
The bottom bracket part of the frame (the BB shell) is being slightly damaged not the motor. I'm not fussed. Mine only sees street duty and I have no plans at all to remove the motor.

I suspect if you want to jump more than a gutter height you will have to reinforce the motor mount with some kind of strap as speedmd mentioned above.
 
Gab said:
...

Also if the bottom bracket wears out or fails is is replaceable or is it part of the motor ?

Also how strong is this Bottom bracket compared to the ISIS type ? is it ok for jumps and landing on the peddles like the ISIS ?

My guess is that it is not repairable, or at least uneconomical to repair.
The BB is not an issue with the old Yamaha and Panasonic crank drives, but they are not used much as all terrain bikes and for jumping, although mine do see a bit of gravel and forest roads.
 
Wow that is a really bad design with the BB .

So this bottom bracket is not strong like the ISIS bottom brackets so its likely to fail with any jumps ?? and even worse this BB is part of the motor and not repairable if it wears our or bends? At least with the GNG kits if the bottom bracket bends you can replace it or even better upgrade to the cyclone ISIS BB easily. And to make matters even worse, it can damage the bottom bracket shell rendering the frame useless to converting to a stronger ISIS bottom bracket later ?

This kit sounds like a very bad idea for anyone who will do any hard offroad work. Kits that use the heavy duty cyclone ISIS bottom bracket or upgraded GNG with the cyclone would be the only option now for heavy offroad users.
 
Kepler's teardown Earlier in thread anticipated a hardened axle and he reported some foot or metre drops in testing.
I would expect within their design XC would safely push the envelope, but freestyle and dirt jump will go further.
Get LightningRods Mike onboard and he will probably forge an axle from Excalibur for you ;)
 
Also the drive mounting system did zero damage to the bottom bracket threads on my test bike even after around 250km of single track work. It was even a little loose for some of that time.

More real world testing and less speculation would be nice.
 
That's a relief to hear Kepler. Is your BB Steel or Ally?
 
Its not going to render the frame useless.
worst case you have to face and chase the bb shell, no biggee.
should be done on most frames anyway as the bb shell faces are rarely parallel. Five minutes and your bb will last so much longer.
 
Gab said:
So this bottom bracket is not strong like the ISIS bottom brackets so its likely to fail with any jumps ??

Nonsense. I do plenty of jump with a standard square taper BB and they hold up fine.
 
AF, their reference is to the GNG thread the users have shown the cheap stock BB supplied failing in short time. One local rider commuting on paths with dual suspension had premature problems, and I'd consider that light use. That part is probably the cheapest available for fitment to BSO's.
 
Gab said:
Wow that is a really bad design with the BB .

So this bottom bracket is not strong like the ISIS bottom brackets so its likely to fail with any jumps ?? and even worse this BB is part of the motor and not repairable if it wears our or bends? At least with the GNG kits if the bottom bracket bends you can replace it or even better upgrade to the cyclone ISIS BB easily. And to make matters even worse, it can damage the bottom bracket shell rendering the frame useless to converting to a stronger ISIS bottom bracket later ?

This kit sounds like a very bad idea for anyone who will do any hard offroad work. Kits that use the heavy duty cyclone ISIS bottom bracket or upgraded GNG with the cyclone would be the only option now for heavy offroad users.

Hi Gab

This is not close to the gng bb. It looks to me so far as much better than the isis stuff also. It is much better supported and hardened than your average bb. Cyclone stuff is not close to the quality of this kit from what I have seen. This minor issue with omitting a front motor mount is not a error by commission as made with many the other kits. It may prove to be a non issue with even extreme duty, but as kepler stated, additional testing and time will tell.

The counter rotation of the kit (motor dropping) will only be a issue when hitting bumps /jumps while the power is off. This is a rare situation, but repeated hits like that will force the little motor downward with only the clamping of the m33 nuts holding it up. Not a tremendous amount of torque, but IMO not a suitable solution. This is just a over simplification of design and a minor omission for extreme use customers.

The tits on the bracket are a simple way to prevent the dropping. Problem is that it may work well for a while on softer aluminum as the nut torque will press it deep enough to bite well. On steel it was mentioned to file dents which will work also. I have issues with marking up the bb faces. Coming from a frame building background this surface is a reference surface for setting the center plane of the bike. Marking it up in any way is just plane crappy workmanship in my book. I would never even consider it on one of my classics or nice mtn bike. No issues with threads or on your junker.
 
Some are confusing the BB shell (part of the bike) with the BB axle (part of the motor assembly). It is possible/likely that the former may be marred be the installation of the latter. I don't think anyone is suggesting that the latter itself is overly susceptible to damage.

On my bike, I noticed that the BB locknuts were slightly loose after a few days, and I've seen others mention that as well. In light of this discussion, I wonder if that is a result of the teeth fully engaging with the Bb shell. It is probably a good idea to re-torque everything after a ride or two, to prevent excessive enlargement of the notches (good practice anyway).
 
Regarding fit onto larger shell diameter BB, and the protruding arc piece the BB is mounted in this pic, I am thinking it is two strikes out for this frame? (Basman Project 346)

img_20140119_080804.jpg
 
There are adapters that allow this style of BB-shell to accept a common threaded BB cartridge. However, the distance from the spindle to the edge of the motor may be too close to allow it to fit. Perhaps a GNG Gen-2 would be more adaptable to this frame, as it can be more easily modified with some simple aluminum sheet-metal additions/changes.

http://www.sickbikeparts.com/catalo...ucts_id=104&osCsid=8rsn9ejoujekcfi4j9a7jk4cn2
 
Regarding fit onto larger shell diameter BB, and the protruding arc piece the BB is mounted in this pic, I am thinking it is two strikes out for this frame? (Basman Project 346)

If you did not want to grind away enough material in the center rib to clear the motor you could add something like problem solver for low power apps. if you could find a suitable position.
cr8950-390x390.png
 
Back
Top