NEW FR-DH E-Bike project >3Kw

recumpence said:
Most of us do not use fuses or circuit breakers partly because if you pop a breaker under load, it can blow the controller.

Got it....and sure, the less the components the less the risk for fault. The battery fuse protection, as Gwhy, is the only thing I've right now....I'm just playing around ideas waiting for the remaining drive train components. I've just received the Gustav M brake set this morning. They fits perfectly, also in a 160mm rotor, without any interference with the chainring adapter, I only had to grind 1.5mm from the IS mount to fit the dropouts offset.
I will post pics once I've assembled the chain.
 
Hi folks...

These are some pictures of the Magura setup, as mentioned before, I had to grind out on a lathe some 2mm of the outer surface of the IS to IS 160 alloy adapter 'cause the decreased clearance between dropout and rotor due to the chainring adapter thickness.
I also had to manually file similar thickness in the disk slot of the adapter for the same reason, Also, the floating caliper, helps a lot to have a perfect alignment, it was maybe 7 years I did not use a Gustav M brake set, :shock: I had forgotten how powerful and modulable they are....
2012-10-24 12.18.46.jpg2012-10-24 12.20.52.jpg

I found also some of these bolts for cheep, they are made to fit an Oil sensor gauge on racing scooters, it's like my bolts a M16 male thread but hollow and with M10 female thread.2012-10-24 11.55.54.jpg
It could be perfect to fix the battery box to the toptube bolting point, also with a quick release.View attachment 3View attachment 2
However, it's a shame that the head is only 22mm Hex, if it had been at least 24mm or even bigger, it would be possible to create housings on there, for an external bearing setup to try a pivot drive, avoiding to order a pair of custom bolts from a shop, that could cost maybe 50 times more. Unfortunately It's made only in blue or red anodized alloy.... :(
 

Attachments

  • 2012-10-24 12.01.34.jpg
    2012-10-24 12.01.34.jpg
    37.1 KB · Views: 2,557
What you say, guys, about a bolt like this for a pivot drive setup using external bearings for a shaft?ScreenShot006.jpgScreenShot005.jpg
A sort of external bearing BB cup.....
With a 1/2 shaft and R8 bearings the wall thickness should be only 0.75mm (damn :twisted: ) to the deeper part of the threads, though....a 12mm shaft or even better (not for strength obviously) a 10mm-3/8" would work. Any idea is welcome.

More about the real bike soon :wink:
 
Having said that I would design a frame in a different way from scratch for this pourpose, I'm just imagining how to try something on this real one.
The suspension bearings are inside the seat-tube terminal billet that act also as spacer between the frame plates.
And yes the bearings for the jackshaft fitted in the head housing.
The bolts are a simple conjunction to make fixed the hollow axle and to sandwich the swingarm.
Maybe a sketch would help....
 
Thanks for your interest, Miles

Not sure to understand what you mean, but no, the pivot bearings are in the other side of the swingarm plate. In fact the swingarm the bolts and the hollow axle are all fixed together, the hollow axle go, thru a bearings setup and plates bores, inside the spacer/terminal billet of the seat-tube. The big part without threads under the head in the sketch should fit 90% of the space from the end of the hollow axle and the swingarm end, giving some more support for the head. you could see a picture without the bolt some post ago.
When I have a bit of time I will post some pics of the frame dismounted that I have somewhere.
 
faster than expected :wink:pivot-BB.JPG
You should also see the adjustable BB and the threads in the BB spacer for the derailleur tube where I actually clamp the Recumpence drive.
Also I have the ability to change the BB shell....
 
panurge said:
faster than expected :wink:
You should also see the adjustable BB and the threads in the BB spacer for the derailleur tube where I actually clamp the Recumpence drive.
Also I have the ability to change the BB shell....

This is ART... well done!
 
panurge said:
Thanks for your interest, Miles

Not sure to understand what you mean, but no, the pivot bearings are in the other side of the swingarm plate. In fact the swingarm the bolts and the hollow axle are all fixed together, the hollow axle go, thru a bearings setup and plates bores, inside the spacer/terminal billet of the seat-tube. The big part without threads under the head in the sketch should fit 90% of the space from the end of the hollow axle and the swingarm end, giving some more support for the head.
I can't see any problem with this Jules. Your thin walled section won't see much in the way of forces. Right?
 
Thanks guys

You are right, Miles, in theory the bolts are not subjected to strong forces, I can say that in these days I'm testing the bike without power but with all the components laced, to see how the bike is ride-able and mostly if the weight concentrated in the BB spacer could lead to structural problems or an excess of flex for the swingarm ('cause the BB area is in fact out from the frame triangle)....Well..In the process of mounting and dismounting the pivot bolts, I forgot one time to remount them and I went out with the bike for a ride :shock: I realized it only when I came back :shock: .....(OK, was only a short street ride with some stairs and sidewalk, far from the load of a 3220 drive and/or a true trail ride).

For an hypothetical soft use on paved roads I'll bet I could put bearings directly in the outer side of the swingarm (as I mentioned before in the thread) and simply use the end shaft bits (granes, nuts or whatever) to sandwich everything.

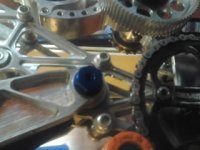
An hollow bolt (for 1/2 shaft) with only 0.75mm wall thickness (0.72 to be correct as the bolt is an M16x1.5) seems not realistic to me, though, and this is providing only 0.3mm of room between the 1/2 shaft and the Bolt ID.....that's not enough.....
With a 12mm axle I should get a 0.65 millimeter of room and 1mm of wall thickness or play in another way with the 0.7mm gained....but that's maybe still not enough....
A 10mm shaft could lead to a perfect mechanical setup, but I suspect that's not good to sustain 1/3 of the human torque and 18x the torque of the Astro, even if made by the best hardened steel or Ti.

What do you think guys?
 
The original bolt is 7075 alloy but I was thinking about Ti for this try, I have the miller that eventually could do the job and a scrap of Ti 6-4 that could be enough :wink: .
Also It's to be considered that the threads are .920mm deep in a male M16x1.5. This means near 1mm average thickness for the wall on the 1/2" shaft hypothesis.
What should be critical is the minimum needed space between the axle surface and the ID of the hollow bolt, I've never had to deal with such a tight situation. (should be a complex process to calculate it for a setup really near to the limit, depending on deformation of the material, the bearing's spacing, the tolerances of bearings, the kind and amount of loads at the shaft ends and much more.....) Maybe someone has a background to say something about....
 
Ok, I got your precious opinion, and I concur with you Miles, I will (slowly) work on It...the 1/2" was better only for the easy-to-find setup parts (shaft/FW adapters ecc.) from Matt for instance :wink:

Now I will concentrate the efforts to get a working chain seeker/tensioner setup for the actual separated drive configuration, and to find or fabricate a good slim box for the cells, something like 460x110x55 mm that could accommodate 6x6s 5Ah lipo bricks plus wires and connections, or maybe a 4x8Ah pack.....
I see also that there are these interesting cylindrical nanotech 1s cells, they could be good to create a custom 12s pack with the desired shape....But have not idea if they are really good or not....I will search feedback for them.
 
Yes that's the plan....As you can see in the pics that I've posted before, the best configuration I've found in term of clearances/chainlines, is with the pedal stage on the left and motor imput+common output on the right.....The arrangement of input/outputs should be a critical decision, though..... depends if pedaling will be intended as an almost constant action (with or without motor power).....or if they acts alternatively for most of the time....
 
Is this a question or a statement, Miles? I think having the preeminent input at the same side of the common output (maybe in the same adapter?) could minimize the opposites forces since there's less shaft length among them.
I'm thinking right now :idea: I also could add a needle bearing in the center of the shaft among the bolt's ends, there is room for, something similar to the bolt section itself :idea:......I will investigate, a 16x12mm one could fit perfectly....

However, the LS pedal stage setup, lead to some other issues, for instance inverts pedal threads direction (I know only some tandem cranks having inverted threads) and also inverts trial crank threads impeding a FWcrank, so a lefty (or inverted) FW on the left (pedal) driven sprocket should be considered...that add complexity to the jackshaft design...

That's why your solution to put a light gearbox on the swingarm and use the jackshaft only for the pedal line, could sound as a withdraw at first, but is instead a brillant option, where geometry and purpose allow it.
 
panurge said:
I also could add a needle bearing in the center of the shaft among the bolt's ends, there is room for, something similar to the bolt section itself :idea:......I will investigate, a 16x12mm one could fit perfectly....
In addition to the two in the "bolts"? I think that will just create alignment problems and I'm not sure what the gain is?
 
Miles said:
panurge said:
I also could add a needle bearing in the center of the shaft among the bolt's ends, there is room for, something similar to the bolt section itself :idea:......I will investigate, a 16x12mm one could fit perfectly....
In addition to the two in the "bolts"? I think that will just create alignment problems and I'm not sure what the gain is?
Yes, I think you are right, was only a thought that goes in my head while I was writing. :)
 
I just want to show how I've made the parallel harness for the lipo bricks.

Item used are symply 3 standard HK plug sets to 10AWG wires, a thin copper wire to envelop the 3 terminals than welded to and 8mm CC bullet connectors (they fit near perfectly), some retractile shrinks.
The 12s3p pack outputs, plugs into 8AWG bulletted wires extensions for the ESC, or directly to the 8AWG CC160 bulletted wires, if placed close to it.
I'm typically a disaster in EEwelds and boards, so I'm pretty satisfied with the result :) ......but maybe you, guys, could point me to eventual issues or any kind of mistake or miscalculation I've made with these harnesses, I think it's pretty oversized, so I've confidence it would works, but again, your opinion would be precious.3pParallel-Harness.jpg3pParallel-Harness2.jpg
 
Building the chain and playing with chain tension/guide.
Any advice is really welcome, I'm deeply reading the Lostrack Beast buildlog 'cause he went from similar setup about tensioning even if the output position on my frame is drastically different.
GebhardtGP 61t chainring.jpg
full-compressed.jpg
Chain touch the swingarm plate at full comp..jpg
full extended.jpg
chainline.jpg

Ah.....It is very important for me to have some comment about the harnesses.....For what I'm in Electrics It could be easily a mistake..... :? :D
 
Back
Top