Ninja 250 "Clone" Made in China

Had to open the motor again , now that I have an easy method to open and close the motor I kinda enjoy doing it. :lol:

This time I wanted to do the following things:
-install fresh bearings
-replace the seals
-install different temperature sensors

Getting the new seals wasn't an easy task and it ended up to be disappointing. My motor has been produced about 10 years ago and it seems like at that time QS was using MUCH better quality seals than the ones thay are using now....
I couldn't find the old seals anywhere so I had to go for the new ones, unfortunately.

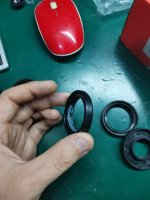
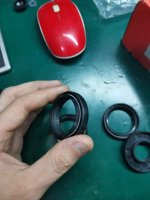
The outside thickness of the seals is 7mm and that never changed, but the inside part of the seals, which is in contact with the axle and is the actual part that prevents water from getting in went from 12.5mm thick to only 7mm. The old seals were custom made for QS apparently, the new ones are standard that can be found anywhere.
Sure it is nice to be able to find seals anywhere, but I fear it will come at the price of long term reliability. The old seals obviously worked really, really well, as the pictures from the openend motor showed up. Well, anyway, nothing I can do but to use the new seals, the old ones were damaged and had to be replaced.

Old seal:
IMG_20220913_193507.jpg

New seals:
IMG_20220913_193510.jpg

Hopefully you can see the difference on the pics

Next was to install new bearings. No particular difficulty, went smoothly. I went for hopefully good quality bearings made in France:
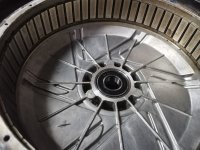
IMG_20220911_192721.jpg

Last but not least was to install new temp sensors. I installed one last time, but it wasn't working properly. It gave me some weirdly high readings, I suppose it wasn't compatible with the Fardriver controller, I don't know.
This time I decided to use not ony one, not only two, but 3 different temperature sensors! Because why not?
This way I could make sure to get consistent results and also have redundancy.

Two of those 3 sensors are intended to be used with the controller. I can only plug one at a time of course, but this way I can compare and use the one that works best for me.
I installed a KTY84-130 and a NTC 230.

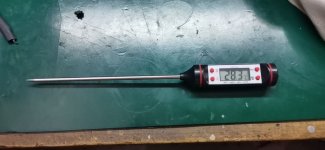
The last sensor is a lot more interesting perhaps: I bought a super cheap barbecue thermometer for a dollar:
mmexport1663220950176.jpg

The idea was to dismantle it, install the sensor inside the motor and the display on the dash.

It has a range of -50 to 300 degee C (hopefully it will never see these temps anytime soon!!! :lol: ), a digital display and it also has a very interesting feature because it can record the lowest and highest temperatures it sees over a time period. That means I can ride for a while, then press a button and see what was the maximum temperature, no need to watch it all the time. Pretty cool!

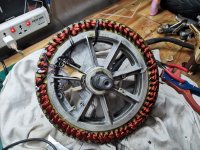
Anyay, I had to pass two new wires for it through the motor axle, then I sticked the 3 sensors inside the coils:
IMG_20220911_202327.jpg

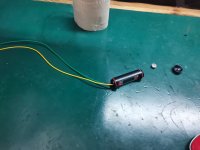
Then I had to extend the wires in order to go from the display to the rear wheel:
IMG_20220911_230746.jpg

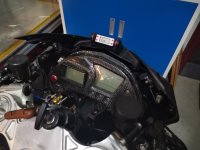
Last but not least, I had to design and print a little bracket system to hold the screen:
IMG_20220912_181359.jpg

Finally painted it black so it wouldn't be too visible:
IMG_20220912_191749.jpg
IMG_20220912_193310.jpg
And voila, Just had to re assemble the motor and reinstall in back in place on the bike. Done.

So far from my tests everything works really well! The temperatures in the Fardriver app are very consistent to the ones I get on the dash, so that's very good news, the dash screen works well and it is indeed very practical.
I haven't got the opportunity to push the motor too much these days but after my daily trip to work it did reach a maximum of about 95 degree C. The good thing is that this goes back down very quickly once releasing the throttle, the statorade seems to work pretty well. The casing gets hot to the touch pretty much instantly, it used to be remain cold for a few minutes before.

I'm very happy with these little mods, it has been interesting to make and so far it works great!
Now I finally have a good way to monitor what's happening inside my motor and it will be possible to effectively protect it against high temperatures!

Not sure I can put a lot more amps through the phases though, it seems to get pretty hot already. I'll wait for the rain to stop to see how hot it gets during more spirited rides. :wink:
 
Great thread! I love all your professionalism and small details.

Forgive me if you answered it earlier, but I'd like to know, were you ever able to find a spec sheet for your battery? And I'd like to know which ANT BMS you got. Im asking because I see you post several times about what battery amps (not phase amps) you are able to pull: 300, 500, 800, ect. I'm curious about the ability of both your BMS and your battery itself to handle that. If you're talking about pulsed surges for just a few seconds, that would make sense, but even so, the highest rated ANT BMS I could find on a short search was only for 450A short-term peak current. Do you worry about your BMS frying or battery damaging?

Though if you are, I appreciate that you used LiFePO4 for it's lack of pyrotechnic events (same here). I also love, love that you worked hard to safely mount your BMS external to the battery, so that if there is damage to the BMS that requires replacement or repair, you won't have to remove the entire battery to do so. I'm kicking myself for not incorporating that into my current build; i put my BMS unit within the battery case. Oh well, next time.

Looking forward to seeing more progress!
 
harrisonpatm said:
Great thread! I love all your professionalism and small details.

Thanks for the kind words, much appreciated!

harrisonpatm said:
Forgive me if you answered it earlier, but I'd like to know, were you ever able to find a spec sheet for your battery?

A spec sheet of the battery itself, no, but a spec sheet of the individual cells yes! I wouldn't have choosen these cells otherwise, I decided to use them after finding out how great they were on paper :wink:
I remember reading this awesome document with tons of very good info about the AMP20 cells:
http://www.jobike.it/Public/data/kenuser/201929141914_A123%20Amp20.pdf

I also remember reading this thread which was very interesting:
https://www.endless-sphere.com/forums/viewtopic.php?t=44494


harrisonpatm said:
And I'd like to know which ANT BMS you got.

ANT BMS 300A, but I bought it a long time ago and now they changed a bit their product lineup. I also suspect there are a lot of copies from different manufacturers.

harrisonpatm said:
Im asking because I see you post several times about what battery amps (not phase amps) you are able to pull: 300, 500, 800, ect. I'm curious about the ability of both your BMS and your battery itself to handle that. If you're talking about pulsed surges for just a few seconds, that would make sense, but even so, the highest rated ANT BMS I could find on a short search was only for 450A short-term peak current.

It is possible that I haven't been clear indeed so I'll try my best to clarify:
-On my own motorcyle, the maximum battery current Ive seen being pulled so far was a little bit under 400 amps. The reason is that I am still limited by my motor, I will try to slowly ramp it up in the coming days/weeks, but I feel like the motor is close to its maximum already. It is also to be noted that I'm using the BMS screen to see the amp draw, but its refresh rate is a bit slow (every 500ms or so) so it is possible that I can't see some very short peaks.
-On my friend's motorcycle, which I ve helped build from time to time, which has the same battery, same BMS but a much more powerful 8000W motor, we did pull around 600 amps. On his bike the limit is the BMS right now. The battery voltage does sag a bit at these power levels, but I'm sure it can take a lot more abuse.

I am indeed talking about power surges for a few seconds, but a few seconds is what it takes to bring you from zero to... well, some scary speed :lol:
It is possible to set up the time delay for which you want the BMS to trigger in the BMS app, . So you can tell the BMS "don't trigger if the power rises to 600 amp for x seconds, in which case it usually won't trigger (but sometimes it still does, it is not working all the time, we don't know why).

One very important thing to be noted, is that the new ANT BMS seem to be a little bit different than the old ones. We just replaced the one on my buddy's bike a few weeks ago (the bluetooth didn't work anymore but the BMS was still working fine) and we found out that the new ANT BMS app it came with kinda sucked. Also it seemed to cutoff a lot earlier than before.
Still investigating why, it might be some parameters in the app, I don't know yet. Maybe my friend will come to my garage this weekend since he has to open his motor too, so we'll discuss it a bit more and I'll give you more details then, hopefully good updates.

harrisonpatm said:
Do you worry about your BMS frying or battery damaging?

Not really. It sure can happen, just like any electronics, but I never saw the BMS heating during rides, only during balancing. I've added some active cooling just in case, because I have a more powerful controller now, but to be honest I don't think BMS heat will ever be an issue.

Only little worry I have is that the typical failure mode of mosfets is to stay closed, so if at some point the BMS mosfets fail then the BMS will act just like a piece of wire, unable to disconnect the battery. This doesn't worry me too much while discharging because if this happens I still have fuses in the battery, but that does worry me when charging, because I rely on the BMS to stop the charge when the battery is full.
I did select a charger with a total voltage low enough to stay safe in case of such event, but a charger cannot know if one cell is a lot higher than the other ones, and usually battery packs get out of balance at the very end of the charge. I'd prefer if the BMS wasn't relying on mosfets but had a mechanical contactor instead, problem is contactors are huge, heavy and expensive.


harrisonpatm said:
Though if you are, I appreciate that you used LiFePO4 for it's lack of pyrotechnic events (same here). I also love, love that you worked hard to safely mount your BMS external to the battery, so that if there is damage to the BMS that requires replacement or repair, you won't have to remove the entire battery to do so. I'm kicking myself for not incorporating that into my current build; i put my BMS unit within the battery case. Oh well, next time.

Thanks mate!
I kinda had to put the BMS outside because of space constraints, but yeah it turned out to be for the best. Sure was a lot more work to build but it should be easier to maintain, gives a little bit more protection from disasters and it is easier to cool.
 
Dui said:
I am indeed talking about power surges for a few seconds, but a few seconds is what it takes to bring you from zero to... well, some scary speed :lol:
It is possible to set up the time delay for which you want the BMS to trigger in the BMS app, . So you can tell the BMS "don't trigger if the power rises to 600 amp for x seconds, in which case it usually won't trigger (but sometimes it still does, it is not working all the time, we don't know why).
This is my strategy as well. I am not using ANT, but JKBMS, and I did not build mine for speed but rather longevity, so I spec'ed components larger than what I needed. My 200amp BMS does see spikes up to 300 amps, but I did set the maximum amperage cutoff delay to 10 seconds, so fingers crossed that sub-10-second peaks don't fry my BMS or cutoff while I'm going 60mph. Thanks for your documentation!
 
The updates of this week:

I cleaned the wiring and crimped some beefier, higher quality lugs:

IMG_20220914_165647.jpg

I think the wiring routing is quite optimal now, the wires could hardly be any shorter and it looks pretty clean, I'm very happy with it.

Then I finally closed the battery lid, hopefully for a long time. The lid is insulated with aerogel sheets as well and I've used automotive silicon sealant to prevent any water from going in. Hopefully everything will stay dry this time. :wink:

IMG_20220914_232404.jpg

Last but not least, I tested the bike quite a lot these few days, to see if the temperature sensors were working.
So far everything works great! the little barbecue sensor is very stable, which is a very good surprise. I was expecting the values to jump around because of phase wires interferences since the sensors wires are running along with them on a relatively loong distance. But actually the values stay perfectly stable and coherent no matter what, this is really unexpected.

So, now for the actual interesting part: the values. The maximum I've seen so far was 110 degree C. This is quite higher than I hoped, and this means that I'm already pushing the motor a bit too much. It only gets to these kind of temps after a few long accelerations at full throttle, but the good thing is that it cools down very fast, it just takes a few seconds to get back under 100.

At these temps I'm not worried too much about the coils, but I worry a bit for the magnets, especially because the use of statorade means that the coils temps and magnet temps should be pretty close. I've red that QS magnets are good for 120 degreeC so they should not get damaged at my current temperatures, but it's a bit closer than I'd like it to be.

Anyway, I think I'll try to increase the phase current 50A at a time and see how it goes, if the temps rise too fast then I'll just set it back to 700A permanently and leave it like that, that's already quite fast and plenty fun TBH.

Also, a small problem: After a run at 130kmh I noticed that some statorade was being forced out the motor by centrifugal forces. I'll keep monitoring this over the next days, if it keep on leaking I'll add a bit of sealant.
IMG_20220920_092151.jpg

IMG_20220920_092201.jpg

Aside from this little detail, I can finally say that this bike is 100% finished! Hurray!!! 8)
It's been a looooong journey working on it and I'm happy to say that every goal I set up for this build have been reached, the bike is pretty much what I had in mind from the begining. Feels great to have a completely finished project, finally!

Thanks to everyone who followed my build, for your comments, your suggestions and your good advices!
Cheers!
 
Great job the bike looks great. Can't wait till mine is done but it is fun building mine cause I'm learning alot
 
Dui said:
The updates of this week:

I cleaned the wiring and crimped some beefier, higher quality lugs:

Congrats Dui! Love the idea of a BBQ Temp sensor.

I gotta ask- can you describe what riding it is like? Like how does the QS205 compare to a typical bike engine, and how much power it's making? It seems like it would be a completely different exprience.
 
Very nice work on bbq sensor,
do you ground the fardriver controller to bike frame,
and do you use precharge resistor with fardriver
have a ninja build on the way
thanks
 
CONSIDERABLE SHOUTING said:
I gotta ask- can you describe what riding it is like? Like how does the QS205 compare to a typical bike engine, and how much power it's making? It seems like it would be a completely different exprience.

Sure, it is actually an interesting discussion topic , so I'll be happy to oblige.
Up until very recently I had no direct point of comparision. I haven't had the chance to ride a lot of gas bikes and didn't have much experience with geared bikes at all. So whenever I was racing a gas bike with my electric bikes, I didn't really know if I was winning because my bike was more powerful or just because the other dude didn't fully twist the throttle.
But this changed two months ago when I decided to rebuild the Honda Hawk 400 that was sitting in my garage alley collecting rust for the past ten years.

I won't post too much pictures of it here since it is a gas bike, but basically I've rebuilt it from scratch, took apart the whole engine, rebuilt everything I could. It still looks a bit like crap because the tank, the seat and the plastic covers are in bad shape, but all the other stuff has been completely rebuilt.
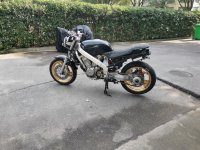
Here's a pic and here's my rebuild thread with many, many pics, if anyone's interested to see the process: https://www.hawkgtforum.com/forum/honda-hawk-gt-bros-discussions/mechanical-and-technical/member-build-threads/966604-chinese-bros-400

IMG_20221217_115521.jpg

Anyway, point is now I have a decent 400cc gas bike I can compare it to.

So how does it compare?

Power: The electric bike has way, way more torque on almost all the power band. The only time when the gas bike seems to have more power is at the very startup because you can rev the engine, drop the clutch and then the rotating assembly's inertia will give you a kick, but that's about all. Well also top speed, the electric bike doesn't go above 135km/h with my current settings, the Honda is supposed to be able to reach 160. From 10km/h up to 110-120km/h the electric is untouchable. You can just feel that there is a lot more power than the Honda, there's really no debate. The instant torque of the electric motor makes it feel snappy anytime you twist the throttle, it jumps forward.
With the gas bike the engine needs to rev relatively high to get to the torque/power band, so that takes time and you don't ever get quite the same torque anyway. So power wise there's no question, the electric is a lot more powerful than the 400cc. I'd say it is equivalent to a 600cc from 10kmh up to 120km/h, but here again it is not directly comparable since the 600cc engine will take time to rev up to its power band. At higher speeds the gas bike crushes the electric, obviously, but when riding in the city you rarely go over that kind of speeds so it doesn't really matter, at least for me.

Frame: The Honda's frame is far superior. It is more comfortable, more stable while cornering, handles potholes a lot better, seems well put together and well balanced. Leaning in corners is easy and predictible. It is heavier but it still feels very easy to toss around, eager to change directions. Honda sure knows how to build a chassis. In comparison, the electric bike feels more like a toy. Don't get me wrong, it is still a really nice and fun bike to ride, but it feels a bit more sketchy, especially when cornering on bad roads. Maybe that's the high mass of the hub, maybe that's due to the fact that the QS rims are too narrow and deform the tires, I'm not sure.
The front suspension does feel better on the electric bike though, feels stiffer and more precise.

Brakes: The brakes on my electric bikes are insane, the Honda cannot compete at all. And if that wasn't enough, the simple fact that you don't have to deal with a clutch lever makes the riding experience a lot easier. So you can fully concentrate on applying as much braking power as you need without having to deal with gearshifts, rear brake on the foot and whatnot. I'ts a simple two hands process instead of two hands and two feets, less brain power required. Now I understand why I was always crushing the gas bike so much on spirited rides, they just can't brake nearly as much nor nearly as late without a lot of involvment and skill from the rider.

Fun factor: I love engine sounds, I love switching gears on the fly and downshifting instead of braking. Always did, always will. In my opinion this is a huge part of the fun. Obviously the electric doesn't provide that so that always have been a bummer for me. I've had a lot of fun riding the Honda for those past weeks and this was probably responsible for 90% of it! I really wish someone would make a controller that would allow the user to replicate/simulate that feeling, but so far none does. So what I mean is that the Honda is fun at pretty much any speed. The electric bikes are fun while accelerating/braking/cornering ad much higher speeds. This is a very different kind of fun. I tend to like the kind of fun offered by gas bike a little bit better, because you can take less risks while still getting most of the reward. But there is one thing that makes the electric bikes a lot more fun in practice: you can twist the throttle without waking up the entire neighborhood. It means that you can ride like an absolute maniac and no one will really notice it. So for those of us who like to actually ride fast all the time, this is a huge plus on the fun factor. Also, as explained above, you just need two hands to fully control the bike so that makes you focus almost entirely on the road, on your trajectories, on braking as late as possible, stuff like that.

Maintenance: So far the electric maintenance is a lot easier and a lot cleaner. The Honda is carburated so that clearly doesn't help. Rebuilding this bike has made a mess on my floor, and my clothes: various kind of oils, grease, fuel... Right now it is very cold in China and the gas bike has troubles to start. Meanwhile the electrics work perfectly fine. Also, no need to wait 10 minutes for the engine to heat up, you jump on it, you twist the throttle and gooooooooo.

Range: My bikes dont have a lot of range since that's never been a focus on any of my builds, so the Honda is a clear winner here. But it is a lot more annoying to go to the gas station refill the tank than just plugging the bike on your home's wall outlet so there's that.

So here you go, I think I covered most of the important stuff but let me know if I missed anything important :)

Overall I'd say that both styles of bikes are not really competing against each other, there are more completing each other and it worth having both in your collection if you can. Anyone who loves riding bikes should love riding both of these, it just depends on your mood: want to focus on your trajectories, ride very fast and stealth from point A to point B without waiting for the bike itself to be ready/hot? Then the electric is perfect. Want to go for a longer ride or just have some more laid back fun? Then the gas one will be the best choice.
 
peadar said:
Very nice work on bbq sensor,
do you ground the fardriver controller to bike frame,
and do you use precharge resistor with fardriver
have a ninja build on the way
thanks

Thanks mate :)

No you don't ground anything to the frame on an electric bike, ground should have it's own wiring going directly to the battery/bms, the frame is supposed to be free floating with nothing connected to it. This is very important for safety, never connect anything to the frame directly. If you really want to ground the frame then I suggest using a tiny wire, this way it just gets vaporized like a fuse in case of short circuit.

I don't use a precharge resistor because my BMS has a precharge function built in. Meaning that it will slowly ramp up the current/voltage when I switch it on. This is a standard feature present on the ANT BMS. I actually never used a precharge resistor on any of my builds, so far it didn't cause me any problem.
But if you have one then it doesn't hurt to use it :)

Good luck on your ninja build!
 
Thanks for the info, my motor has a braided outside cover for the hall wires, do I ground it? am I ok with 12v battery and 96v battery grounds connected?
Great article on ride experience,
:bigthumb:
 
peadar said:
Thanks for the info, my motor has a braided outside cover for the hall wires, do I ground it?

I wouldn't bother, because every motor I've seen so far was working well enough without shielding, but if you want to do it I see no problem with that. Just make sure only one end is grounded, not both.

peadar said:
am I ok with 12v battery and 96v battery grounds connected?

Usually yes, should be no problem, but why would you need to have two batteries? Having several batteries will add weight, complexity and failure points, I don't recommend you to do that, Just drop a small 96V-12V converter and call it a day :wink:
 
Dui said:
Sure, it is actually an interesting discussion topic , so I'll be happy to oblige.

Overall I'd say that both styles of bikes are not really competing against each other, there are more completing each other and it worth having both in your collection if you can. Anyone who loves riding bikes should love riding both of these, it just depends on your mood: want to focus on your trajectories, ride very fast and stealth from point A to point B without waiting for the bike itself to be ready/hot? Then the electric is perfect. Want to go for a longer ride or just have some more laid back fun? Then the gas one will be the best choice.

Thank you for the great comparison, much appreciated!
And great work on the Honda Hawk. I had one (bored out 700cc, 65bhp) many years ago and loved it. Going to read your build thread on the Hawk forum later :thumb:
 
In Europe the Hawk was sold with 650ccm.
 
Just drop a small 96V-12V converter and call it a day.
Hope to do later, had the battery ups 12v type, what do you recommend a type I look at?
Thanks
 
SlowCo said:
Thank you for the great comparison, much appreciated!
And great work on the Honda Hawk. I had one (bored out 700cc, 65bhp) many years ago and loved it. Going to read your build thread on the Hawk forum later :thumb:

Thanks mate. I bet with 700cc the bike would be a lot closer in terms of performance. Must be fun!

dominik h said:
In Europe the Hawk was sold with 650ccm.

Yes indeed, but it was sold only as 400cc in japan and in China, unfortunately. It's the same engine as far a I know, the internals are pretty much the same, just a smaller cylinder bore (at least I think so, I'm no expert).

peadar said:
Hope to do later, had the battery ups 12v type, what do you recommend a type I look at?

I'm not sure to understand the question. Do you have a build thread? It would be better if you could create one and I'll try to answer the questions there. :wink:
 
Dui said:
Power: The electric bike has way, way more torque on almost all the power band.
Frame: The Honda's frame is far superior.
Brakes: The brakes on my electric bikes are insane, the Honda cannot compete at all. And if that wasn't enough, the simple fact that you don't have to deal with a clutch lever makes the riding experience a lot easier. So you can fully concentrate on applying as much braking power as you need without having to deal with gearshifts, rear brake on the foot and whatnot. I'ts a simple two hands process instead of two hands and two feets, less brain power required. Now I understand why I was always crushing the gas bike so much on spirited rides, they just can't brake nearly as much nor nearly as late without a lot of involvment and skill from the rider.

Overall I'd say that both styles of bikes are not really competing against each other, there are more completing each other and it worth having both in your collection if you can. Anyone who loves riding bikes should love riding both of these, it just depends on your mood: want to focus on your trajectories, ride very fast and stealth from point A to point B without waiting for the bike itself to be ready/hot? Then the electric is perfect. Want to go for a longer ride or just have some more laid back fun? Then the gas one will be the best choice.

Thanks! I kind of cut your comment down to focus on what matters- not too shocking Honda makes such a nice bike at even such a low price range, but I am impressed that the QS205 can be taken up to 600cc power levels.

I also didn't ever realize that the loss of the clutch pedal would change bike riding so massively; I don't have a motorcycle so it's not surprising I didn't know, but loosing that would make one far easier to ride and especially, ride on the edge. I wonder if the future for electric motorcycles is going to be as commuters and "trainer" bikes first, since you no longer have to worry about climbing onto the cam or rev-matching?
 
Can you post scrrenshots from your Fardriver settings?
I have melted my AWG6 13.3mm² phase wires from my QS60V5000W 260 motor after installing a Fardriver ND72680 and doing a few short uphill rides.
Now I replaced them with AWG5 16mm² 205C wires, aded a temperature sensor and everything works fine again.
But for me the limit iseems to be 220A battery current and 600A phase current. If I set DC to 250A the motor heats very fast to 130C
I can do only three runs vom 0-100 .
Also I have to lower the max speed to 104kph otherwise the controler pushes with the use of flux weakening18kW at 115kph into the motor, which is to much for my guess.
Perhaps I messed something up in the settings.
 
Hi guys, it's been a while!

The bike is still going strong, no problem whatsoever. I haven't changed anything since last time, everything works pretty well.
But something always bothered me a little bit while riding during the night: lighting was really, really weak.

So I decided to try and improve it.
First I experimented with off the shelf led lights for automobiles. But there were a few problems:
-The mounting brackets were different, so it wasn't plug and play at all
-The LED cooling systems were too big and I couldn't make them fit without having to do some serious surgery on my dashboard.
-The power wasn't really worth it. Sure it was better than the originals, but not as bright as I expected

So I decided to try something a little bit more original: making my own.

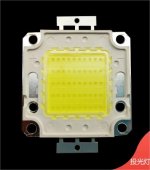
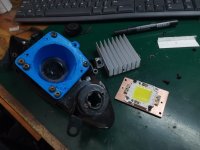
For that, my idea was to use a big 100W LED chip. The kind of stuff they use to light up stadiums or warehouses:
LED floodlight integrated light source lamp bead high power chip 100W wick lamp repair accesso...jpg

So I bought one and started working on fitting it in the original housing .
Cooling is extremely important since these things tend to output a lot of heat. But my thinking here is that I will not use the LED at full power all of the time. Most of the time the power will be limited to 30-40% which should be plenty. Shanghai isn't really the darkest place on earth, so I rarely need to ride in complete darkness. So basically the lights will be at full power on relatively small portions of my daily commutes, meaning I don't need the cooling system to be ablle to bear continuous full power. Only a few bursts of a few minutes and an idle at 30-40%

Anyway, for this, my plan was to first cut a thick plate of pure copper, which can absorb the heat very fast and act like a cold thermal mass (cold compared to the LED itself at least). Then attach an aluminum heatsink to it. The heat should be quickly absorbed by the copper, then it gets spread over a much larger area towards the aluminum, giving it the ability to absorb high burts of energy it can release slowly afterwards.

So I ended up making these few parts. The 3D printed blue parts hold the lens. The LED is bolted to its copper heatsink and then to the 3D printed part:

IMG_20231013_232324.jpg

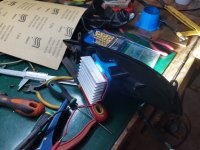
I put all this back into the headlight and made a test with a lab bench power supply at low power: everything works great!


IMG_20231014_002034.jpg

IMG_20231014_002038.jpg
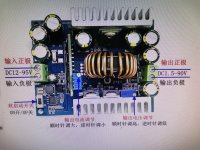
So next I bought a constant current/constant voltage power supply. These LEDs need about 30-36V to run, so I got a buck converter capable of converting the battery 72V into the appropriate voltage of the LED. The converter can deliver up to 400W so it should not heat at all, this way I can install it anywhere I want.

IMG_20231017_194856.jpg

Then I got the idea of making the brighness adjustable while riding. I've got the starter lever on my handlebars and it is obviously not used. So the idea is to fit a throttle cable to it so I can use its potentiometer to adjust the current going to the LED.
So far I haven't implemented this feature but I'm working on it :)

Anyway, I finished preparing the headlight. As you can see, it fits perfectly in the original casing, I just had to drill a few holes to improve cooling. I added a little fan of course, to help with heat dissipation.

IMG_20231018_224048.jpg
Then it was time to reinstall the ligh in the bike and test it.

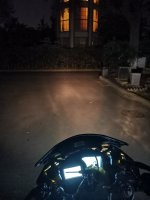
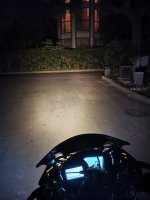
Before, with both lamps at high beam and 100% power: Super lame.

IMG_20231018_220940.jpg

Now, with only one LED at 30% power: Much better!
IMG_20231018_220942.jpg

I think the picture speaks for itself, it is already much brighter at 1/3rd of the power than it was using two halogen bulbs at full blast...
Also, it seems like it uses the same power as one bulb.

I also had to work a bit on making sure I wouldn't blind people coming my way. This was a bit tricky and it was actually the real hard part of this whole project, I had to make several designs for the 3D printed part holding the lens, but I finally got it right by angling the lens downwards more than what I thought was reasonable.
Somehow it worked great.

So anyway, it works and I'm really happy with this first prototype.
Now is the time to make the final version, because obviously I cannot use a simple 3D printed PLA plastic part for very long, it will melt.

The plan is to do the following things:
-Print a new bracket and then copper plate + nickel plate it. This will basically make the plastic part resistant to any kind of heat. It will also make it act like a heat dissipator, improving cooling.
-Make the current control feature, so I can dim the light using the starter lever.
-Possibly make a second light to fit at the right side, but I'm not sure yet since one light seem to be plenty enough. We'll see.

That was an interesting little project so far, I haven't seen any people doing DIY headlights on the internet so I was completely shooting in the dark at first (hehe), but it seems like I ended up seing the light at the end of the tunnel affter all (hehe again)
 
I'm surprised none of the DIY headlight projects I've seen showed up in your searches. I don't know that any are as powerful (and compact) as what youv'e built, but there have been quite a few over the years--here on the forum Methods did some using Cree LEDs and such; can't recall how his turned out but he sent me one set of LED, lens, and heatsink (and a driver board but it failed so I never completed my version; I don't know if the parts made it past the post-fire cleanup a decade ago; I can't remember if I've seen them since (but these days I'd need something more powerful anyway, and am using a standard car headlight (from a Kia that left it laying in the parking lot wiht some other front-end plastics) with a bright halogen bulb from Sylvania. (tried various LED replacements, but they sucked).

I did consider something like what you're doing, using a lens and housing I had from an HID headlight, but never got to trying it; no suitable small but powerful LED existed at the time. If I run across those things in my stuff I'll experiment with the AC-powered LEDs I've got in that size and see what they're like, and if it works I might see if I can find one like you've got there to use with the lens.

The hard part will be the "lid" that goes between light and lens to provide the cutoff horizon to put all the light on the road and not in oncoming traffic's eyes.
 
The hard part will be the "lid" that goes between light and lens to provide the cutoff horizon to put all the light on the road and not in oncoming traffic's eyes.
It seems like there's no need for a lid in my case. I considered it at first, I tried several designs but then I noticed that simply reorienting the lens basically had the same effect.
So I just changed the orientation of the lens to face a bit towards the floor. It looks a little weird when looking up close, but it worked very well so I couldn't argue with the result :)
That was indeed the hard part.

You mentioned other similar projects, I'd be interested to read them if you have a link or two to share, would be interesting :)
 
No links ATM, it was years ago, but I would guess that terms like "DIY LED Headlight" would probably find some of them. I don't recall all the term sets I used back then. I probably saved some of the project pages but that was on an older computer....
 
Back
Top