RC reduction Simplified

Nice work Thud. Very similar to the idea I had when I set up my one off drive. I really like the size of yours. Having kept up with the RC drive info, I would say a slipper is a necessity. Especially if you don't want to run halls and sensored controller.

You're getting quit a little list of fantastic goodies. Looking forward to seeing the Thud shop live and selling.

Clay
 
A couple arguements in agreement with Thud's logic;

#1 Torque limiting electronics are not a replacement for slippers. Electronics limit throttle which causes ripple spikes in the controller. Slippers allow the unit to slip at high throttle and are easier on the controller. Of course, you are adding another component which adds complexity, cost, and another item to adjust and/or maintain. I would say any drawbacks are well worth the benefits, especially for a sensorless system.

#2 Cost. There will always be a market for both high cost and low cost systems in a given market. No arguement there. I researched both the cost saving end and the high end and went with the high end for a variety of reasons. This thread is not about me, however, it is about Thud's new idea. I just wanted to chime in to agree that there is a hole in the market for this kind of drive.

#3 Motors. Thud is correct, low cost motors are vanishing quickly. However, cost is relative. If a $185 motor is twice as good (long lasting?) as a $95 motor, then it is fine. Of course, that drives up the cost of innitially buying in.

#4 Casting. Casting is a great idea. It is a unique skill, however, that most people do not have (along with equipment to pull it off properly). Casting can drastically reduce the cost of complicated parts especially. It is not too difficult to pretty it up, either. So, making it look cool shouldn't be a problem.

I would view this drive as the Mustang LX of the RC drive arena. Maybe not as pretty as a Ferrari, but good performance at a price point for the masses.

Thud,

You are beyond me in the casting department. But, if I can help in any way regarding info on slippers or anything else, let me know.

Matt

Oh, lastly, as for taxes, yes it is important. For me, I am self employed already. So, my drive unit business is run through my appliance business as an unofficial subsidiary. It works great that way. It is awesome being able to write off bike stuff. :wink:
 
Nice simple well thought out design mate, I'd consider buying one at that price for sure :)

Thud said:
(i am also building some motorcycle sized 2-speeds for testing in the next week....bring on the Perm132!)
I guess i just opend the door for a wish list.

Now this is starting to sound interesting! :twisted:


Simon.
 
Hi Todd,

Nice work! Casting is a method more ES members should consider IMO. I did a couple of simple projects in High School and it isn't that difficult. A friend who did ceramic pottery easily built his own inexpensive kiln so I don't think a set-up to melt aluminum be hard or expensive to put together.

For making producing more than one item how hard/expensive would it it be to use something more permanent than sand for the mold?

Really like the clamping to the seat-tube (not all down-tubes are round). Don't like the idea of drilling a hole in the ST (which shouldn't be necessary). If it is necessary I'd prefer a spar or a brace.

Maybe these motors would be a good choice?:
http://endless-sphere.com/forums/viewtopic.php?f=28&t=34753
Matt said:
a small outrunner based on a standard Maxx Products outrunner. This motor will retail for under $200. The normal motor is $180. However, my motor will use a longer shaft and a few other minor changes. Also, this motor is readily available and I can pick them up 15 minutes from my house! And if someone manages to smoke the motor, the stator/windings retail for $50 and are easy to replace! This motor uses high-end bearings and is, overall, a very high quality motor! I am thrilled to find this option so close to my house. Also, these motors have been tested in very dirty environments. So, I am confident it will run well in this application. It is also a very quiet motor.

+1 on the slipper clutch.

I'd offer a belt primary drive as an option. This should only require slots for motor mounting and offering pulley's and belts.

IMO kits that are as complete and universal as possible will generate the most sales. Maybe approach Justin to see if he's interested in selling your kits?

Good Luck!
 
Hi Thud,
looks rather like my bikes ;^). A few points
1) primary drive - make it toothed belt - chains throw all their oil onto your pants then go stiff because they're running dry. They just last a couple of weeks in this position. Secondary drive - chain is perfect.
2) don't worry about the clamp spinning round the seat post
3) contact me if you want design files for laser cut big rear wheel sprockets
I've been using this sort of transmission for a year now & it really is cheap, simple, reliable, effective etc.
 
Thud great work, great design. I watched your casting video and it looked so ... easy! The sand looked perfect, do you have your own muller? Also congrats on the LLC, that is what I did and never looked back. It is what America is supposed to be about. Men developing their ideas and creating opportunity around them. Best wishes with the endeavor!
 
Hi Bob,
Thanks for the input. I must be a maintanance junkie, I have no issue running #25 in the primary position. A proper cover & the correct lube practices keeps eveything where its supposed to be& working. My experince's with 5mm Gt2 left me rather disapointed on my smaller motors, belt wrap & the tension required to keep it from skipping were fail points for me. & the upfront costs were daunting. I will revisit it with an open mind though, as there are more than a few comments regarding that point. I do like the low maintance of a proper drive belt....Would need to lengthen the casting to allow proper belt wrap on the drive pully & include an idler pully.....lets see what the beta man says.

I mentioned earlier the clamp is the least of my concerns...I have yet to have one slip.
The 1st unit is shipping this weeked for a run down & suggestions for possible design tweeks. I will definatly give the people what they want....but currently the price point is the driving factor.

Thanks for the cad offer. Don't know if you saw the "monster sprockets" from Polycarbonate (I drew & cnc'd those on my wood routers here at work). I have a couple laser cutters I use for work, but set up price is a bit daunting at the low volumes for something like this.

Cutting the friction discs for the tourque limiter today. Its intragal to the jack shaft to save weight & width.
should have photo's of the final kit come friday night.

Hello BM! (posted as i replied)
Thanks, I mull by hand....thats why i am allways winded as I am casting LOL! I have a shell built for a proper mulling unit, its just a low priority for the few odd castings I need. This bicycle stuff is pure self indulgance in addition to the model making services I provide the furniture designers...I am looking to expand on that in the comeing year. Either build a catolog of my own projects for sale....or ramp up my services list for product development.
I re-watched that video & am amazed the casting worked as I was pouring way to slowly LOL!

look for an update saturday morning if your interested & thanks agin.
T
 
"I have no issue running #25 in the primary position." Neither did my nephew for 1.5 months.......... ;^)
toothed belt costs are high it's true and 5mm pitch htd marginal in this application. I think an idler/tension wheel is pretty much mandatory to set tension and ensure sufficient wrap on the motor pulley.
laser cutters setup charge - try elsewhere - the place near me just runs the dxf files I give them - I've made one or two sprockets for others on here now, dearest was a monster stainless one with keeper plates either side for £35. 8mm 80tooth steel sprockets like the one on my bike are less than a tenner. It would be highly unusual for goods or services to be more expensive in USA compared to UK!!!
My bike is up around 500miles now & regularly commutes 14miles.
 
Oh, how awesome! :shock:

Thud did mention he would do this and make a thread soon in an email, but I didn't know it was already here. :oops:

I like it T! That is just perfect having wrap AROUND the seat tube! Very good idea!

I can't wait to see your custom slipper! I was thinking when looking at mine that someone should make one of these specific to what we do here, that it could be made smaller and lighter, and that that person would probably have a hit on their hands!

I like exclamation points I guess! :mrgreen:

Saturday couldn't come soon enough!

Thanks for all,
Jay
 
I mentioned earlier the clamp is the least of my concerns...I have yet to have one slip.

I dunno how you're able to clamp it effectively - I've seen lots of rear racks that twist around, which is why I brought it up. Good that it doesn't seem to be an issue though. 8)

Since it's aluminum it'd be easy enough for the end user to drill a hole if they wanted, anyway. I'd probably do it as a "just in case" thing....but, um...yeah. Awesome. :D
 
Hi,

REdiculous said:
I mentioned earlier the clamp is the least of my concerns...I have yet to have one slip.

I dunno how you're able to clamp it effectively - I've seen lots of rear racks that twist around, which is why I brought it up.
1. Exact fit.
2. Large surface area.

Matt also uses clamps, without problems.
 
Like I said earlier I have had one slip but this was very easy to sort out and It happened under very extreme circumstances :twisted:
 
Alrity then,
progress on prototype unit:
need to thermal form the chain gaurd & add it but for all practical purpous, its done & will be shipped to the beta tester monday.

(he will remain un-named in this thread for the reason I don't want to increase any pressure on him to complete his build for review. I will let him unveil it in his own time, It is being sent to him at no-charge with the instruction to be honest & forth comeing with any opinions & faults the design may show. I personaly hate hype building & "secrets" threads from vendors, I hope this doesn't fall into that catogory)

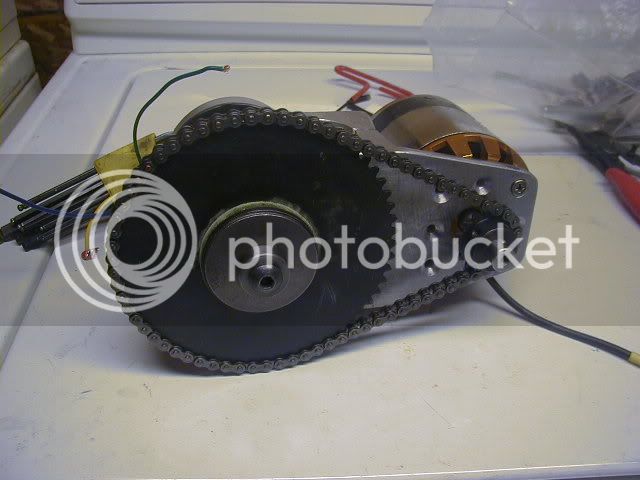
Here are some photos of the completed unit sans chain cover:
P4070017.jpg

P4070019.jpg

(wow thats a shity casting for a prototype LOL!)

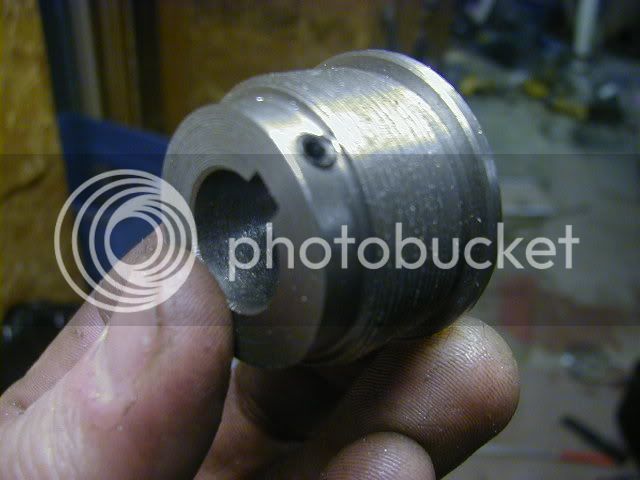
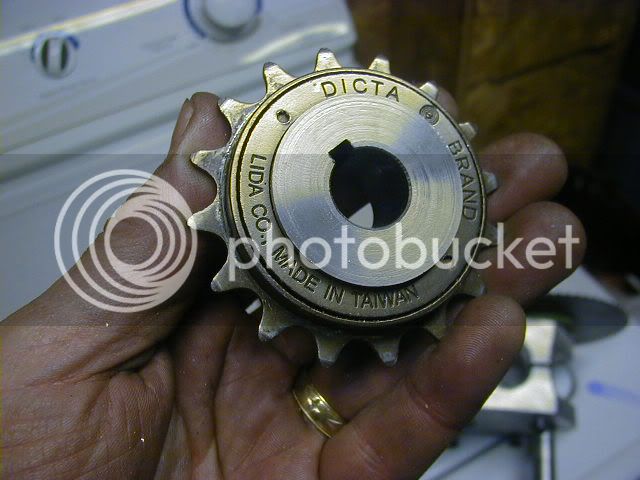
here is a photo of the unubtainium #35 freewheeling drive sprocket:
1st the adapter
P4070003.jpg

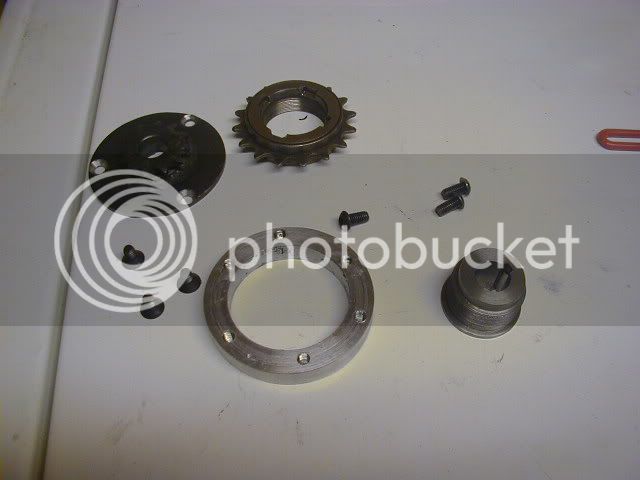
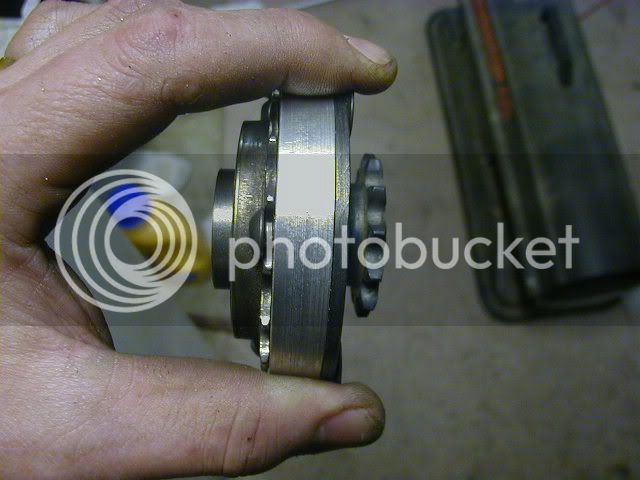
all the parts in lay-out-
P4070005.jpg

& assembled:
P4070006.jpg

P4070009.jpg


Here is a realization regarding that freewheeling drive sprocket-
It takes Way too much time to fabricate all those parts into a price reasonable packadge for this project....It totaly elliminates the advantage of low cost kart sprockets. In a bicycle application a freewheel is critical to the drive system (a motorcycle not so much) I see that BMX chain on standard sprockets with a simlpe freewheel adaptor are prolly totaly acceptable & far more cost effective for this drive set up.
Not to say I won't build one for you.....but I crindge when I total up fair cost for making these as 1-offs. (but then again my cringe factor is much lower than the average "bicycle" builder)
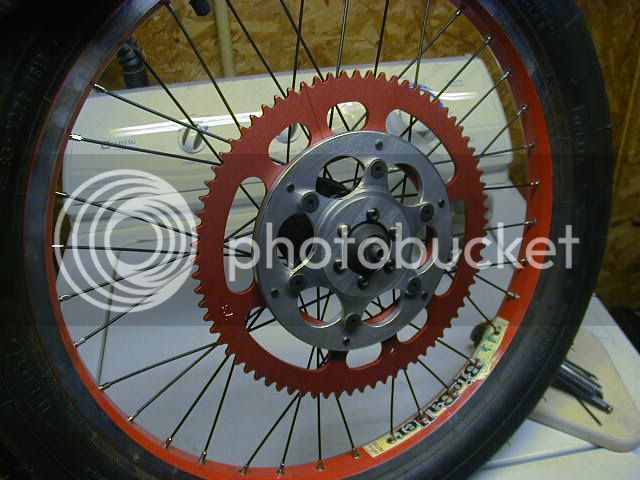
the rear wheel adapter in progress:
P4070024.jpg


I invested in some new (real) lineal ways for my tiny cnc machine that hopefully will make these a viable product also. But there are options already out for this product & i am not looking to undercut anyone's current offerings.

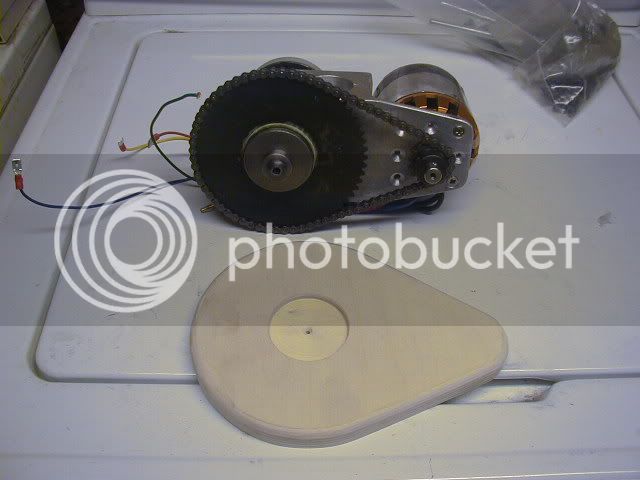
& here is a shot of the forming pattern for the chain gaurd:
P4070021.jpg


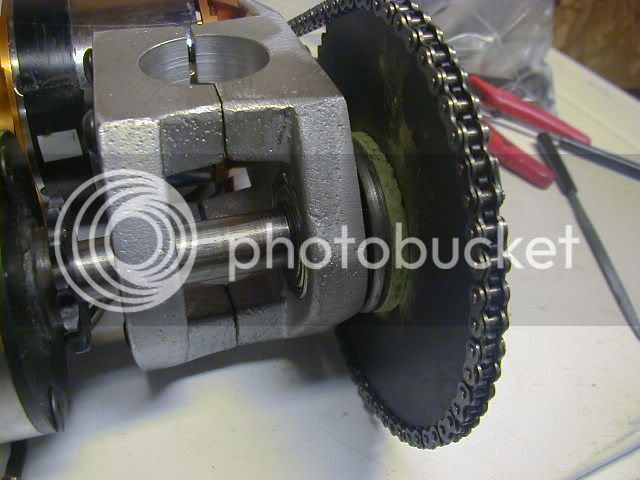
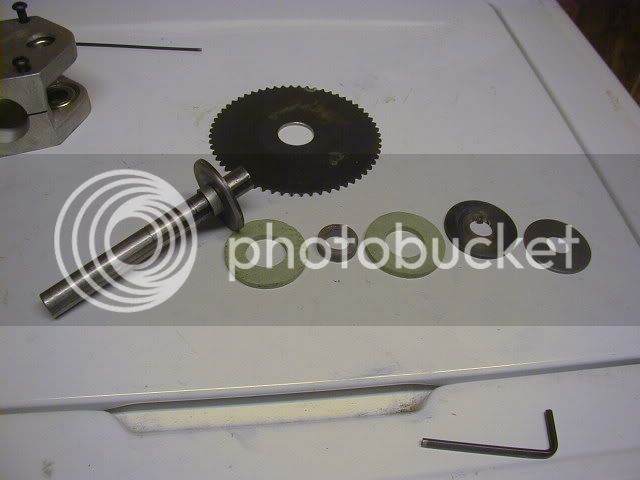
oh & details of the tourque limiter assembly:
Parts lay-out left to right: Mainshaft assembly, friction disc, bushing for sproket centering, friction disc, keyed thrust washer, belevile spring, tensioning collor & tensioning bolt. Its a ton lighter than by adding a dalton unit on the shaft & saves a full inch of width.
P4070016.jpg

a close up of the high temp clutch material for the friction disc:
P4070013.jpg


I will update a photo or 2 & follow up with the beta man on monday.
any more questions or input?
thanks & happy easter.
T

(edit for puncuation & gramatical errors....shop major-not english)
 
Dude sweet! Happy Easter 2u2 :D

Nice little torque limiter (slipper) there! If I had come along at a latter time I'm sure I would have had one of your slippers instead of the dawlton you've fixed up for me now! I do think the current slipper offerings are big and heavy. As you know I got mine for free though along with a rebuild kit of extra parts so I just ~had~ to use it! :mrgreen:

Hey, so your vacuum thermal forming the chain guard/dust cover? That's awesome man. I had no idea you had the facilities to do that too. Did you make your own oven and vacuum box?

That offset 6-bolt disk brake to kart sprocket adapter... :shock: I want me one of those! Question though; what is the purpose or reason for it being 2 pieces? An Inner and an outer piece bolted together? No, seriously, how much??? :twisted:

Great job,
Jay
 
Hey GI, (your stuttering this morning LOL!)
The "almost top hat adapter" is made from a single pc of plate stock. The smaller cut out rests on the face of the big one & gives us the offset without wasting a big pc of material. (or eating up time whittling away a large billet on the cnc I don't have operational) the cool spoke pattern is a side bonus & makes it look more complicated than it really is. just bling factor & minimising material costs.

I'll show you how to lay it out & cut it for free! (but a drill, some bits, a coping saw & router would be the bare minum tools required to make one..the geometry is simple) but the going rate is $45 i think....& it only currently allows for 1/2" of offset.....still not compatible with a disc brake.
Still want one?
I can get a full 5/8" offset by going to .312"t plate stock.....the rub is, with my 2.5" wide tires on 40mm rims, I need to dish the wheel to get chain clearnce on the left with the wider #35 or make a funky spread of the dropouts to get clearance for the brake widths....this is not in line with "bolt-on" product this is supposed to be. Normal width tires & bike chain is the answer to these issues.

I been thermal forming little odds & ends for years as I need them. I make the vacume boxes to the size I need & a standard oven for relaxing the polymers (or a heat gun sometimes) you can say its home made, but its the exact same process Ive used in industry. I guess its all simple if you've done it before :D
 
This is beautiful...if I ever want to mororize another bike, this looks like a great option!
 
St-st-st-studdering? Oh yeah I hit "quote" instead of "edit" to fix the ":twisted:" Doh!

I could make it myself but it would just be flat plates only and be quite plane. I like the rounded bump of the tophat part and the cutouts design you have there! I think you should hold on to my stuff that you have for now...I'm not done with you yet! :mrgreen: I want pretty Thud stuff on my ebike! How much for one of these and an ACS Crossfire to kart procket adaptor Thud style..? }o_o{

Remember, I added 12mm to the left side of my swingarm (now 147mm total) to make room for the kart sprocket and brake rotor/caliper, so you'll have a bit more liberty when doing the 6-bolt adaptor for this app. I'll send you my wheel so you can make them just right?

I know my thread is slow/dead but just wait... :| I am prepping still. Once my swingarm is done and I get some thin alu for the batt enclosures I will begin a build log that will include quite a bit of pics and all the wiring schematics, including those for the FULL custom lighting, lipo wiring and cell monitoring, and an electric shifter setup, all covered with a hand laid fiberglass shell. I'm going to be making it as legal as possible, even if it doesn't "need" to be, so the bike will be safe and will (hopefully) be able to talk for itself if it ever comes to a court trying to give me a hard time about it. ;)

Thud is da-man!

Later,
Jay

Edit: Change wording and subscribe! 8)
 
Can I subscribe this?

It's very cool.
 
Just a picture of an alternative DIY build strategy - I found the pic on my old bike build blog - for those who have a lathe & not a foundry ;^)
It's the system I've succesfully used in the past - the groove flycut in the plate stops the seatstay squashing & keeps things lined up. I guess a gorilla weilding a spanner could still squash it if they tried hard enough.....
http://i543.photobucket.com/albums/gg471/bobc0/bikebits/Img_0025.jpg
 
I vote for 3 identical 24" cruisers and one Barbie bike for the fattest guy in the bunch. :lol:

Another undervalued product from the Thudmiester! This looks very cool, and you should have em lined up to snag one, make sure you have a few for the race in October!

Thud is the guy you want to live next door to when the shit goes down, the dude thrives on adversity and makes McGuyver look like a hack IMO.

On the subject of #25 chain... Has anybody actually broken a #25 chain? It's a pretty solid chain and there is even a heavy duty version called 25H which is used as a cam chain for motorcycles.

Now Thud, break out the anodizing setup and lets see some in black or blue! :mrgreen:
 
Now Thud, break out the anodizing setup and lets see some in black or blue!

I am thinking a film diped finish in Camo or maybe skulz..... :wink:
I need to re-read Bobc's thread & maby make up a bunch of them taper lock drive sprockets....dimpling shafts has become tiresome.
 
Just a picture of an alternative DIY build strategy - I found the pic on my old bike build blog - for those who have a lathe & not a foundry ;^)

Nice! 8)

I don't have a lathe but that looks pretty easy to make. I'd probably modify an old steel neck instead of making my own clamp....cutting and welding is really fast and easy if you aren't worried about looks. :wink:
 
Back
Top