The first and BEST Qulbix Raptor mid-drive build!

robocam said:
That's why I get wider ones. Thankfully, I haven't had any trouble with my 29s yet. How do they reduce space for mounting drive components? Do you mean under the downtube?
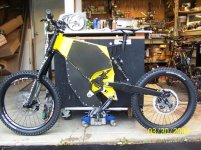
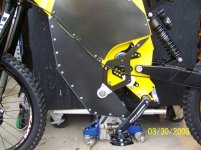
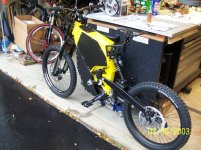
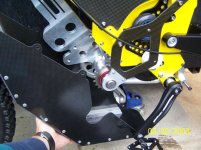
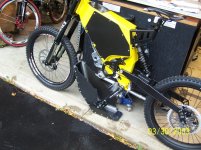
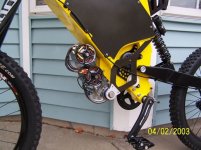
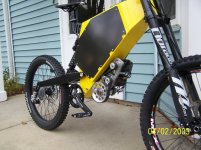
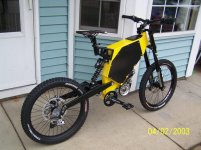
recumpence said:
...Big wheels are weaker and reduce space for mounting drive components.

Matt

Yes, under the down tube. Also, wider wheels does not changes the large lever affect that 29s have on the hubs, axles, swingarm, and forks.

Matt
 
It would be really interesting to do a side by side ride with the standard length Qulbix swingarm and your extended version. As wheelie obsessed as many people seem to be it becomes a real problem on a powerful bike. Having to put your belly on the handlebars every time to want to hit the gas hard gets old. The longer arm should provide a bit more wheel travel as well. Your version should be easier to go fast on or climb hills with. I'd order your mod from Qulbix if it were available. Unless you want to go into the swingarm lengthening business. :D

I'm excited to see the motors in place and your drive all hooked up. My favorite thing about your builds is tracking all of the various bits and figuring out what they do.

My drives are nearly done too. We had high winds in Oregon over the last few days. I got sidetracked by a big oak tree that came down through our roof.
 
LightningRods said:
It would be really interesting to do a side by side ride with the standard length Qulbix swingarm and your extended version. As wheelie obsessed as many people seem to be it becomes a real problem on a powerful bike. Having to put your belly on the handlebars every time to want to hit the gas hard gets old. The longer arm should provide a bit more wheel travel as well. Your version should be easier to go fast on or climb hills with. I'd order your mod from Qulbix if it were available. Unless you want to go into the swingarm lengthening business. :D

I'm excited to see the motors in place and your drive all hooked up. My favorite thing about your builds is tracking all of the various bits and figuring out what they do.

My drives are nearly done too. We had high winds in Oregon over the last few days. I got sidetracked by a big oak tree that came down through our roof.

It looks like the motor bracket got changed and now it takes a single 3220.

Sorry about the Oak tree. I had that happen to me too.
 
ElectricGod said:
LightningRods said:
It would be really interesting to do a side by side ride with the standard length Qulbix swingarm and your extended version. As wheelie obsessed as many people seem to be it becomes a real problem on a powerful bike. Having to put your belly on the handlebars every time to want to hit the gas hard gets old. The longer arm should provide a bit more wheel travel as well. Your version should be easier to go fast on or climb hills with. I'd order your mod from Qulbix if it were available. Unless you want to go into the swingarm lengthening business. :D

I'm excited to see the motors in place and your drive all hooked up. My favorite thing about your builds is tracking all of the various bits and figuring out what they do.

My drives are nearly done too. We had high winds in Oregon over the last few days. I got sidetracked by a big oak tree that came down through our roof.

It looks like the motor bracket got changed and now it takes a single 3220.

Sorry about the Oak tree. I had that happen to me too.

Nope twin Motors.
 
recumpence said:
ElectricGod said:
LightningRods said:
It would be really interesting to do a side by side ride with the standard length Qulbix swingarm and your extended version. As wheelie obsessed as many people seem to be it becomes a real problem on a powerful bike. Having to put your belly on the handlebars every time to want to hit the gas hard gets old. The longer arm should provide a bit more wheel travel as well. Your version should be easier to go fast on or climb hills with. I'd order your mod from Qulbix if it were available. Unless you want to go into the swingarm lengthening business. :D

I'm excited to see the motors in place and your drive all hooked up. My favorite thing about your builds is tracking all of the various bits and figuring out what they do.

My drives are nearly done too. We had high winds in Oregon over the last few days. I got sidetracked by a big oak tree that came down through our roof.

It looks like the motor bracket got changed and now it takes a single 3220.

Sorry about the Oak tree. I had that happen to me too.

Nope twin Motors.

Well color me confused, but that bracket has been cut off and there's a place for only one fixed mounted motor unless the second motor goes in those elongated slots. This bracket used to have a second larger hole with 4 smaller holes around it which was obviously intended for the two 3220s.

Dual%20motor%20bracket_zpsfas3le9t.png
 
recumpence said:
Yup, you are confused. That is a triple motor plate trimmed down for two motors.

Ah! So the center hole never got finished with the 4 bolt holes around it? I asumed the center hole was for a small sprocket/bearings to get the chain or belt around the two drivers more completely.

This must be the triple motor plate...

Dual%20motor%20bracket%202_zpsynione7d.png
 
That center hole that has no bolt holes around it has always been for the bearings for a flat roller in my mind for the chain or belt to ride around so that both drivers had plenty of teeth to sink into. In this cut down configuration. It's obviously going to still be used for some kind of flat roller so the fixed motor can get lots of belt around it's driver. The elongated slots are now the only viable location for the second motor. They will obviously be used to take up the slack in the belt. My only question is how will you keep the motor from slowly migrating down the slots? Tension on those bolts in the slots will be significant and they wont possibly hold the belt tight long term by themselves. The whole motor will slowly move towards the other motor until the belt slips. My only thought was you intend to have some kind of spring loaded mechanism in the large slot that constantly pushes that motor towards the ends of the slots. If that's what you had in mind, then wouldn't a spring loaded tensioner that works laterally to direction of torque be better? A large spring in that slot is going to compress considering the power these motors have and allow the belt to slip under heavy load since iti's inline with the direction of torque. It would seem that it would be a better design to fix mount the motors at the correct locations where a belt would be close to being tight, but still have enough slack to get it over all the sprockets easily and then use a tensioner to soak up the remaining slack.
 
ElectricGod said:
That center hole that has no bolt holes around it has always been for the bearings for a flat roller in my mind for the chain or belt to ride around so that both drivers had plenty of teeth to sink into. In this cut down configuration. It's obviously going to still be used for some kind of flat roller so the fixed motor can get lots of belt around it's driver. The elongated slots are now the only viable location for the second motor. They will obviously be used to take up the slack in the belt. My only question is how will you keep the motor from slowly migrating down the slots? Tension on those bolts in the slots will be significant and they wont possibly hold the belt tight long term by themselves. The whole motor will slowly move towards the other motor until the belt slips. My only thought was you intend to have some kind of spring loaded mechanism in the large slot that constantly pushes that motor towards the ends of the slots. If that's what you had in mind, then wouldn't a spring loaded tensioner that works laterally to direction of torque be better? A large spring in that slot is going to compress considering the power these motors have and allow the belt to slip under heavy load since iti's inline with the direction of torque. It would seem that it would be a better design to fix mount the motors at the correct locations where a belt would be close to being tight, but still have enough slack to get it over all the sprockets easily and then use a tensioner to soak up the remaining slack.

You are very close Daniel San very close! :mrgreen:

You shall see. Oh yes, you shall see!
 
Sorry I have not posted anything in a while. I have been working on it, honest! Tiny details take a lot of time but do not show well in photos.

Right now I am just finishing up the motor/drive unit lower cover. This is a protective cover that goes under the drive unit to protect it from the elements. It is mainly for snow riding (it would work well for mud too). That cover is carbon fiber with an aluminum sub structure. This cover is easily removed to allow air flow around the motors and increase ground clearance, while being easy to reinstall for inclement weather protection. It looks fantastic! I will show pictures of it when it is done [soon].

Oh, this bike will be offered up for sale when it is finished. The client who had dibs on it wants me to build him a bike to his spec (similar to this bike with a few personal touches). So, this bike will be for sale once finished. I am guessing it will be $12,500.

Anyway, I cannot wait to ride it!

Matt
 
Dang! 12.5K...ouch! But I suppose since you are building this for sale, then yeah...that's probably not far fetched. I have no idea how much time or money you have into it, but looking at my kick scooter, if I duplicated what I have now which is probably something like $4000 all total in parts and batteries and has the capability of doing 60mph and accelerating faster than most cars. That's just the hard costs for parts and the original scooter. I have no idea how much time I've spent in making it what it is today. My soft costs are difficult to measure since I redid several things and upgraded parts as the need arose.
 
For people who want something unique and built to the highest standards this price range is not going to be a problem. It's taken Matt years to build a reputation that allows him to charge a decent rate for his time.
 
Some hard numbers;

My out of pocket cost for this bike is $8,000. Much of that is discounted because I get dealer cost on certain things. Then there is labor on around 100 hours of time.

Basically, this bike is way better than a Stealth Bomber and priced the same. I have built enough bikes to have a reputation that they all perform well and are built well. That makes my personal builds a bit sought after beyond the average home built bike. :D

My bikes typically sell for $8,000 to $15,000.

Matt
 
No need to defend your target price Matt. If my pockets where deeper I would have both a trike and a mid drive with your name on it. We'll see in the future if I managed to be a good boy and save those nickels and dimes, if I do I know I will be getting some toys from you.
 
Ok, progress pics......

I have been busy fabricating the drive unit housing. It is more than a cover. This thing is freaking strong. It is 3mm thick carbon panels rivetted to box section aluminum sub frame rails with 3/16 rivets. The entire weight of the bike can more than be supported by this housing. Once mounted, it is rigid and very stout!

The housing is held on with 7 brake rotor screws. It takes about 2 minutes to mount or remove it--- Super simple!

The bike is coming along. I am working on the drive unit over the next week. I hope to have the drive finished by the end of next week (10 days or so).

Matt
 

Attachments

  • c1.jpg
    c1.jpg
    98.5 KB · Views: 2,227
  • c3.jpg
    c3.jpg
    85.5 KB · Views: 2,227
  • c4.jpg
    c4.jpg
    94.1 KB · Views: 2,227
  • c5.jpg
    c5.jpg
    82.5 KB · Views: 2,227
  • c6.jpg
    c6.jpg
    90.4 KB · Views: 2,227
  • c7.jpg
    c7.jpg
    100.3 KB · Views: 2,227
  • c8.jpg
    c8.jpg
    93.6 KB · Views: 2,227
  • c9.jpg
    c9.jpg
    67.7 KB · Views: 2,227
bionicon said:
Hey Matt nice work, only thing maybe is adding a fan to extract the heat?
These Astro Motors run nice and cool. However, I do have some ideas to make sure that under the most extreme conditions the motors don't get hot. You will see as the build continues. One aspect of this housing is the fact that it will probably only get used in the winter as snow protection. However, I may find that I like the look and I like the protection it provides. If that's the case, even though the motors don't generate very much heat, it would still be a good idea to have some fan cooling. I have a few ideas. :)
 
I spent some time on the shop today. I roughed out the drive for test fitting. I decided against the modified triple motor plate (modified for two motors). Instead I modified a single motor mount plate to hold two motors in a slightly offset position. This offset allows the drive to be far more compact. This saves weight, better centralizes mass in the frame, and frees up precious space under the frame. You can see the top and bottom sides of the belt nearly contact each other at one point. Do not worry about that, I am adding a second ball bearing idler to provide more belt clearance in that area.

The bike is coming along.

Matt
 

Attachments

  • m1.jpg
    m1.jpg
    71 KB · Views: 2,026
  • m3.jpg
    m3.jpg
    74.4 KB · Views: 2,026
  • m4.jpg
    m4.jpg
    70.4 KB · Views: 2,026
  • m5.jpg
    m5.jpg
    79.3 KB · Views: 2,026
  • m6.jpg
    m6.jpg
    70.5 KB · Views: 2,026
  • m8.jpg
    m8.jpg
    70.3 KB · Views: 2,026
  • m9.jpg
    m9.jpg
    72.7 KB · Views: 2,026
Back
Top