Hacking Controller LVC

markz

100 TW
Joined
Jan 9, 2014
Messages
12,179
Location
Canada and the USA
ebay seller HKSUNWIN
48V 1500W
Wanting to change the LVC to 33V for 10S battery.
HKSUNWIN does not sell 36V controllers and I dont want to buy yet another controller.


Locating LVC solder tabs, I needed a magnifying glass :oops:
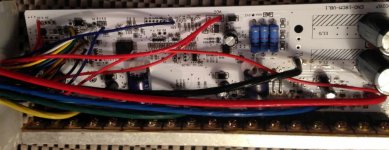

HKSUNWIN 48V 1500W PCB.jpg
Caps 63V
FETS are EZ95N13 K733


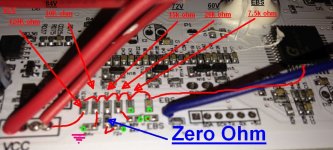
84V - 72V - 60V are labelled and 48V LVC is when non of the pcb solder tabs are jumpered.
View attachment 4


Changing to a LOWER LVC
methods - https://endless-sphere.com/forums/viewtopic.php?f=6&t=94790&p=1399473#p1388267
To adjust lvc one needs to measure the actual cut out voltage
Then measure the resultant voltage divider voltage
Then swap 1 resistor such that the output of the divider is equal for a new input voltage

I = V/(R1 + Rbottom)
I * Rbottom = resultant trip voltage

As pack V drops so does trip V

A larger resistor Rbottom will raise LVC
Proof, at a fixed voltage the ratio of voltage between R1 and Rbottom swings, as they must divide 100%.

The math is very easy on paper
Harder in prose
Properly done in a spreadsheet with formula

Draw the divider
Enter your desired pack LVC voltage
Enter your fixed trip voltage
Calculate your Rbottom resistance

Vtrip = 1V (made up)

3V*12=36V

36V/Rt = I
1V/I = Rbottom
36V/Rt = 1V/Rbottom
36 = Rt/Rbottom

R1 was fixed therefore we now have Rbottom
https://endless-sphere.com/forums/viewtopic.php?f=2&t=94946&p=1390623&hilit=voltage+divider+lvc#p1390623
Or you can hack many of them to change the LVC (finding the voltage divider that lets the MCU know what that is) or the current limit (altering the shunt or the sense circuitry between shunt and MCU).

https://endless-sphere.com/forums/viewtopic.php?f=14&t=85824&p=1255840&hilit=voltage+divider+lvc#p1255840
in a voltage divider somewhere on the battery-input side of things near the MCU chip, but each controller is designed differnetly so you'd have to trace things out and measure voltages to find this. Probably it will have one end of the divider at battery positive (probably from the keyswitch wire) and the other at ground.


Posting this before I accidentally lose it.
OK Back again

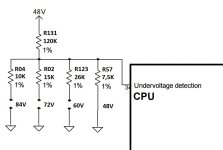
84V = 10K ohms
72V = 15K ohms
60V = 26K ohms

Cant find no 48V pcb tabs that are labelled, I am assuming if no tabs are jumpered then its 48V, as mentioned earlier.
Once lvc tabs are shorted, it goes straight to ground.
Havent been able to follow VCC, so must be another input once connectors (Anti-Theft 4 pin connector, 3 are used and large blade single in harness are connected.

View attachment 3

View attachment 2


Extra Info
https://endless-sphere.com/forums/viewtopic.php?f=2&t=71128&hilit=lvc+resistors&start=225#p1194721
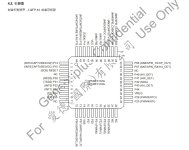
http://www.datasheet39.com/PDF/925066/GPM8F3116A-datasheet.html
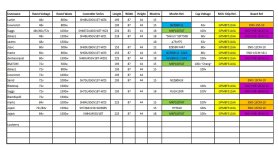
HKSUNWIN.jpg
MCU pinout.jpg
 
Perhaps this post will help?

https://endless-sphere.com/forums/viewtopic.php?f=2&t=85964&p=1399161#p1399161
 
Thanks

I need to increase the total resistance in order to decrease the LVC.
Easiest I figure is I will unsolder R03 (zero ohm at 72V lvc) and install a 100K 28 turn pot.
Then connect the 72V lvc pads.

If I parallel the 120K ohm VCC it will lower resistance, increasing LVC. I need to lower the lvc from 40V to ~30V by increasing resistance. I still dont know how the 48V lvc is set, where its located if its located anywhere.

I do it tomorrow and see how it goes.

zero ohm.jpg


This is what I did to calculate mine - https://endless-sphere.com/forums/viewtopic.php?f=2&t=26306&hilit=hua+tong+auraslip#p378773

Helfpul - https://endless-sphere.com/forums/viewtopic.php?f=2&t=31946&hilit=LVC&start=25#p600225
- https://endless-sphere.com/forums/viewtopic.php?f=2&t=29469#p425201

Nice - https://endless-sphere.com/forums/viewtopic.php?f=2&t=26306&start=60#p433317
https://endless-sphere.com/forums/viewtopic.php?f=2&t=26306&start=60#p433487

Same controller pcb as mine
Pictures from $14.99 Sunwin thread
https://endless-sphere.com/forums/viewtopic.php?f=2&t=71128&p=1147747&hilit=lvc#p1147747
and
https://endless-sphere.com/forums/viewtopic.php?f=2&t=71128&hilit=lvc&start=50#p1149167
and
https://endless-sphere.com/forums/viewtopic.php?f=2&t=71128&hilit=lvc&start=50#p1149546
and
mine but diff cont - https://endless-sphere.com/forums/viewtopic.php?f=2&t=71128&hilit=lvc&start=75#p1160192
I remember on one of my 3 or 4 sunwin's there was a 48V tab, maybe I am mistaken.

more of the same - https://endless-sphere.com/forums/viewtopic.php?f=2&t=71128&hilit=lvc&start=100#p1160447
See the pot, was it something sunwin did or the poster?????? Very Interesting!!!!!!!


Yup another - https://endless-sphere.com/forums/viewtopic.php?f=2&t=71128&hilit=lvc&start=125#p1166601
https://endless-sphere.com/forums/viewtopic.php?f=2&t=71128&hilit=lvc&start=200#p1186916
https://endless-sphere.com/forums/viewtopic.php?f=2&t=71128&hilit=lvc&start=250#p1194929
https://endless-sphere.com/forums/viewtopic.php?f=2&t=71128&hilit=lvc&start=275#p1200027
24fet - https://endless-sphere.com/forums/viewtopic.php?f=2&t=71128&hilit=lvc&start=275#p1204988
https://endless-sphere.com/forums/viewtopic.php?f=2&t=71128&hilit=lvc&start=300#p1216776
48V 18fet - https://endless-sphere.com/forums/viewtopic.php?f=2&t=71128&hilit=lvc&start=300#p1218398
12fets different pcb - https://endless-sphere.com/forums/viewtopic.php?f=2&t=71128&hilit=lvc&start=325#p1232051
same pcb - https://endless-sphere.com/forums/viewtopic.php?f=2&t=71128&hilit=lvc&start=400#p1390009

BINGO
https://endless-sphere.com/forums/viewtopic.php?f=2&t=71128&hilit=lvc&start=400#p1390018

lvc 1.jpg
View attachment 1

Well me's wonder's if you take out R67 (or is it really R57, my eyes are going on me) if there will be no LVC at all.

Anyway its been fun, this is just a spare controller I had laying around, brand spanking new. The one on my bike should be the same, we can hope. My first attempt will be to grab my DMM hook it up to battery, and remove R57 so I have no LVC.

What doesnt make sense is that I would assume the resistance for 48V lvc would be much higher then 7.5kohms.
Makes me think that when I jumper any other 84V/72V/60V tabs that the 7.5kohm is always in play. So jumper 60V then R132 (26kohm) is in parallel with 7.5kohms making it (R1*R2)/(R1+R2) = 5820ohms from MCU to gnd. Jumper 72V (15kohms) = 5000 ohms and 84V (10kohms) = 4285ohms. This is my second angle, take out 7.5K and install a 50k 28 turn pot.


LVC voltages
Without connected bridge = 42.5V
With 60V bridge = 54V
With 72V bridge = 62.5V
With 84V bridge = 72.5V

LVC of 30V is somewhere between 9200ohms to 25K ohms

delta voltage 12.5V

7500ohms 42.5V LVC

delta 1680ohms 11.5V

5820ohms 54V

delta 820ohms 8.5V

5000ohms 62.5V

delta 715ohms 10V

4285ohms 72.5V
 
Removed the 7.5K ohm surface mount resistor
Installed a 20Kohm Pot (middle pin and outter pin, dmm reads properly)
http://www.be-electronics.com/product_p/500e0202.htm

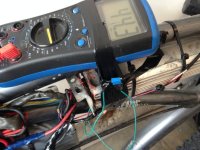
Connected it up, but its acting like there is no LVC, whether the pot is turned all the way to max ohms (20k) or min. ohms (zero) while pack was at 35V. Good for a 12V or 24V setup if you so wish. Opened it up and the gnd wire came off the 7.5k resistor pcb pad, so I soldered it to a nearby through-hole gnd (next to the blue wire in pic). Routed the pot wires through the case rubber the correct way.

Played with the pot, turning it up and down a few turns and testing it out.
Working like a charm. Now I can build up my 10S 36V battery pack, will solder in a regular resistor and set it to like 32.5V lvc and have a bypass for like 2.80V for those times when I run outta juice.

I will get the lvc with corresponding resistor values later, as I broke my probe. Figure out the equation too.


View attachment 2


View attachment 1


hack setting 1.jpg
 
Today, rode with a 48V pack and a 36V
48V (13 Series) went its usual 19-22km down to 42'ish volts
The newly built 36V (10S) went 13km.

42.5V @ 7.5Kohms - This is 100% right
5 Turns left with screw on top brings the resistance higher hence lvc lower.
These measurements were moving around alot, even with battery pack disconnected.
36.5V @ 9.58Kohms
5 more turns left
30.5V @ 11.9Kohms

LVC
Without connected bridge = 42.5V
With 60V bridge = 54V (26kohms parallel with 7.5kohms = 5,820ohms)
With 72V bridge = 62.5V (15kohms parallel with 7.5kohms = 5,000ohms)
With 84V bridge = 72.5V (10kohms parallel with 7.5kohms = 4,285ohms)

Infinite ohms (open) - no lvc at all - Batteries could drain to zero volts.
11,900ohms 30.5V LVC - measured
7,500ohms 42.5V LVC - given
5,820ohms 54V - calculated
5,000ohms 62.5V - calculated
4,285ohms 72.5V - calculated
Zero ohms (shorted) - LVC would always be engaged no matter what the battery voltage is.

http://www.sengpielaudio.com/calculator-paralresist.htm

--------------------------------------------

Installing a 4 switch dip meant for pcb's, have a 7500ohm for 42.5V then one for 40V for the "get me to the nearest power outlet" and 32V and 30V. 4 switch dip is cheaper then 3 SPDT rockers.
 
What about the EBS 7.5 k Ohm resistor? I found mine, but I don't know what happens if I change the value of it. My regen's highest voltage is 90V and I want to change it to 120V, because it does nothing when I connect my high voltage battery, but it works well with 72V, when no battery connected, and rolling, the regen voltage is only 90V. Has anyone changed the EBS resistance value?
 
Back
Top