(1st Build) GNG Gen2 - GIANT Cypress DX (Update:Finished)

Neiler106

100 W
Joined
Apr 16, 2013
Messages
109
Location
Central Florida, USA
(1st Build) GNG Gen2 Mid Drive - GIANT Cypress DX Commuter

Hey guys,

Been lurking for a while (Hi! :D ) and I think I've gleened enough info for a build.

GNG Gen 2 Mid Drive (48v 450w planatary gear)
GIANT Cypress DX Commuter Hybrid (700c tires, 8 gears)
Third party battery (not yet purchased)
Misc GNG Controller (NO CLUE on controller specs, waiting to hear back from Mr Chan on that...)

*****PLEASE, any tips you guys have for a first build, or common trouble, etc, please let me know what to look out for, and word it like I'm am 5 years old getting ready to stick a fork in a wall socket :? (will update with any electrocutions).

I'm going to be commuting to town on the weekends from my post with the National Forest Service in Foresthill to Auborn, CA. Groceries are down the street (<=2mi) but all the cool/fun stuff is 18-20mi away in Auborn. There is an approximate 1000ft elevation difference according to google topo.

I want to replace my car (currently for sale), while making as much of the added bicycle componentry as anti-theft as possible, while using the bike frame as an anchor and a New York Legend Bike Chain.

-Replace motor bolts with anti-theft bolts
-Secure battery/controller within a frame mounted ammo box (like this but more secure http://neptronix.org/forumpics/ammobox2.jpg)
-Secure Fix-It Kit to bicycle frame and padlock it shut
-------------------------
THE BUILD

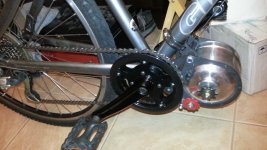
I sprayed on some high-heat Rustoleum on all of the steel pieces. The mounting bracket arrived bent , was easily straightened with a cresent wrench, and trued using an angle level. 2013-04-25 02-03-40-412.jpg
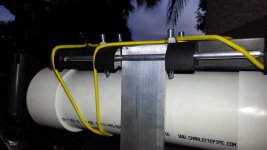
I have made a PVC Tool Canister that can be weather proofed and secured with a padlock (drill two holes & add padlock through holes), but I need to find a better way to attach it than to my rear rack. I'll have to do a separate post on my build details if people are interested.
View attachment 2
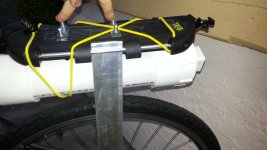
2013-04-24 08-06-38-732.jpg
2013-04-24 08-06-52-501.jpg

-------------------------
I plan on buying a 48v 13ah-or greater NCM battery pack, but I need more details from Mr Chan about his controller specs.

My worries are getting the electronics wrong since the GNG doesnt come with a battery or even a reccomendation. I'm still learning about c rates, s rate/value, all that jazz and Im super concerned that this might turn into an expensive electronics lesson.

Ne
 
I have the 36v version, and the controller's 22 amps if that helps. Don't go any higher than that otherwise you risk breaking the 9 tooth drive sprocket with the torque.
 
i like that you wen with gen2
and have a diy tool holder. shouldnt a padlock be enough and say 4 hose clamps with the screwdriver grove ground out/filed with glue/putty..?

anyway
i sugest using 10s batteries from hobby king and a 10s charge, not as high voltage (42) but for price and power to weight they are prety good, go tunigy where you can, hobby king is/owns turnigy. so here are my sugestions. (note radio control lipo batteries can be more suseptable to failure, but if your just running a few in parralel like on a power board it's alot safer) anyway;
2,3,or 4 of theese would be ideal
http://www.hobbyking.com/hobbyking/store/__35488__Turnigy_nano_tech_4500mah_10S_25_50C_Lipo_Pack_AUS_Warehouse_.html
and 300w charger you can run from a computer power suply;
http://www.hobbyking.com/hobbyking/store/__6609__iCharger_1010Bplus_300W_10s_Balance_Charger.html
or if you want to buy a "proper" supply;
http://www.hobbyking.com/hobbyking/store/__17424__HobbyKing_350w_25A_Power_Supply_220v_240v_.html
also if you go with RC lipo get cell monitors:
http://www.hobbyking.com/hobbyking/store/__18588__Hobbyking_2_8S_Cell_Checker_with_Low_Voltage_Alarm.html(2 of these) and balance parallel cables, ah the more i say the less i think it is apropriate for someone with little electrical experiance.. good luck, PM me if you want more help.
otherwise you can get life baterry packs that are heavyer and bigger and easyer to deal with.
 
pendragon8000 said:
i like that you wen with gen2
and have a diy tool holder. shouldnt a padlock be enough and say 4 hose clamps with the screwdriver grove ground out/filed with glue/putty..?

anyway
i sugest using 10s batteries from hobby king and a 10s charge, not as high voltage (42) but for price and power to weight they are prety good, go tunigy where you can, hobby king is/owns turnigy. so here are my sugestions. (note radio control lipo batteries can be more suseptable to failure, but if your just running a few in parralel like on a power board it's alot safer) anyway;
2,3,or 4 of theese would be ideal
http://www.hobbyking.com/hobbyking/store/__35488__Turnigy_nano_tech_4500mah_10S_25_50C_Lipo_Pack_AUS_Warehouse_.html
and 300w charger you can run from a computer power suply;
http://www.hobbyking.com/hobbyking/store/__6609__iCharger_1010Bplus_300W_10s_Balance_Charger.html
or if you want to buy a "proper" supply;
http://www.hobbyking.com/hobbyking/store/__17424__HobbyKing_350w_25A_Power_Supply_220v_240v_.html
also if you go with RC lipo get cell monitors:
http://www.hobbyking.com/hobbyking/store/__18588__Hobbyking_2_8S_Cell_Checker_with_Low_Voltage_Alarm.html(2 of these) and balance parallel cables, ah the more i say the less i think it is apropriate for someone with little electrical experiance.. good luck, PM me if you want more help.
otherwise you can get life baterry packs that are heavyer and bigger and easyer to deal with.

Yeah... Can u maybe say that as if i was 5 and getting ready to fork a wall socket? I think ill have to pm you
 
EVERYTHING that I had to Fix/Adjust on the GNG Gen 2

#) problem
letter) fix
roman numeral.) comment


1)The engine bracket arrived bent
a)Fixed it using some brute force, crescent wrench, and a square (see carpentry tools)
i.)could have been avoided using a combination of better steel, better packing. I could bend the steel and torque it with my bare hands, it really is of cheap quality.

2)The pedal sprockets wobble or are untrue
b) Haven't fixed it yet, but I'd imagine the bike store could true the sprockets
ii.)Pedals fine at the moment but I imagine it will be a problem @ high RPMs
[UPDATE: Finished - sprokect wobble doesn't seem to be a problem for now, but still represents the product quality.

3)The pedal assembly stuck out too far to line the drive chain up from pedal sprocket to drive sprocket.
c)Tapped the square peg in a bit, tightened the opposite bottom bracket on the opposite bearing, thus moving the pedal assembly sprockets in a bit and lining them up.
iii.)Initially noticed drive sprocket catching during normal pedaling, lube fixed this issue. Could file sharp corners on drive teeth (they have a flat head). This could have been avoided by using a combination of a better engine mount, and a 1-2mm shorter drive side setup.

4)The bottom brackets were complete [exploitative deleted]
d)Fixed by throwing them out and using the manufactures bottom brackets (they happened to be the same), knocking both off of the bearings and replacing them with stock bottom brackets.
iv.)The steel and threading was horrible, I must have spent hours on end trying to thread them without getting them cross-threaded. No amount of lube helped the situation. This replacement didn't have anything to do with the pedal assembly sprockets not lining up with the drive sprocket (See previous - 3), I had the same problem with either pair.

5)The pedal crank arms were very difficult to remove using a crank arm remover, the remover wouldn't thread right.
e)Fixed using some lube and lost some initial threading on the inside of the pedal crank. It came off in a nice string of cheap steel at which point the threads caught and had no further trouble.
v.)There was nothing wrong with the tool, it threaded my stock arms just fine, but again, cheap steel was the culprit.

-----
My recommendations so far:

-Buy a higher quality mid-drive kit if you have the money and don't have tools or time.

-Stick with the GNG if you have no money, but do have time and tools.


Final thoughts:
That is some cheap ass steel. My lord. Bend it with your thumb, threading comes off in steel string, CHEAP!
 
Ran into some trouble. Got my Ping Battery today, and on first connection there was a spark.

I posted a call for help @ http://endless-sphere.com/forums/viewtopic.php?f=2&t=50288 and I'm hoping, short of redoing every connection myself, that someone can help me with what I should troubleshoot.

I can only hope to be able to fix this by the weeks end. I need to break this project down and ship it to my new job out west (FL to CA).
 
Was it a spark like connecting jumper leads on a car battery, or like arc welding? If it was a little spark you can use a pre charge resistor but its a bit of circuitry with a switch and resistor and maby a light. Otherwise just ignore it as many do and if the bike lives longer than the plug (being worn by 1000s of hot connect) you can get a new plug.
 
pendragon8000 said:
Was it a spark like connecting jumper leads on a car battery, or like arc welding? If it was a little spark you can use a pre charge resistor but its a bit of circuitry with a switch and resistor and maby a light. Otherwise just ignore it as many do and if the bike lives longer than the plug (being worn by 1000s of hot connect) you can get a new plug.

Was a jumper lead spark. I've found out this is normal but still nothing works and I don't know where to troubleshoot. Ping (the Battery) has promptly replied, but Mr Chan (the GNG KIT) has not.

I'm not sure whats wrong, or how to check for myself.

I sent you a message regarding something else that I'm hoping you can help me with, since you gave me so much help with my battery selection.
 
Its hard to say with minimal info. Can you take a bunch of photos and show us what you've got? Others might jump in if they have something to look at. I'm not to familiar with bms systems.
I would either
-rip open the pack and check the voltages and try charging it if all OK
Or
just charge it and see what happens. If its frocked get s different/new battery.

I guess it depends on your ratio of time to money.
 
Most people forget to connect the ignition wire, which needs to be connected to a battery +ve. Without it connected, you won't have power to the throttle. You can check this: Should be 5v between the red and black throttle wires.
 
Are there any example photos that you could link me?

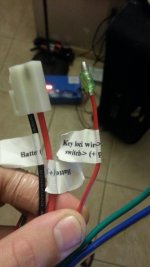
Ive got. 3 wires from the controller (+/-/key on) and 2 from the battery (+/-).

Does key on need to touch/soder to controller+ or battery+? Im having a hard time visualizing this setup.

Thanks in advance.
 
we have no idea what you keep asking about because you never show a picture of what the problem is.

did you test the BMS to see if it is working? are the mosfets turned on? is there 14.75V on the gate of the output mosfets and the charging mosfet?
 
dnmun said:
we have no idea what you keep asking about because you never show a picture of what the problem is.

did you test the BMS to see if it is working? are the mosfets turned on? is there 14.75V on the gate of the output mosfets and the charging mosfet?


Do I connect controller side KeyOn(+) to Controller side Red(+)?
Do I create a 3rd prong on my controller side connector for KeyOn, and modify my battery connection to match the 3rd prong?
2013-05-21 01-27-43-905.jpg

Attached a picture of my controller setup.

ELECTROCUTION: We had a weld/melt when my dad, using the multi-meter accidentally connected a meter lead to both the red and black connector prongs. The meter lead is shorter, the connector prong is gone, his hands were black, and for that entire evening our hearts were sunk. The connector has since been cut off and made into a gag-keychain that I stuck on his keys. Thank goodness for BMS or I'd be out a few hundred $$$
 
You could put a switch between the 2 red wires in the photo and still have the red wire going to the big plug connected as it is. That should let you connect battery, then use switch to turn on. If you wanna test it then get a bit of solder or paper clip and hang it out of the big plug and touch the other red wire on it.
 
It doesn't matter how you do it but you have to have battery voltage on the thin red key-switch/ignition wire for the controller to give power. If you put a switch on it, only use the switch as a temporary on/off because, with it off, the controller still takes a small amount of current from the battery, which will drain it down.
 
file.php

Nice one. That seat is massive, can you pedal OK? And is that a scooter/motor helmet?
 
The seat is a comfort seat that you can buy @ walmart. Its a 80psi 700c tire bike so I figured a bit of comfort was in order. But yeah I can pedal just fine, its mounded a bit further back and has a downard tilt that doesnt impede pedaling.

Its a scooter helmet yes
the bag in the center is an up-side-down rear rack bag by some companty with a logo that is basically a lowercase b. Held in place on the bottom and seat post bars with some velcro looping.
The bag is where i put my 15ah Ping Battery pack. I've taken steps to make sure the wires wont contact the frame or get pinched. Basically made a wooden end cap with a cavity for the tiny bms wires to come out.

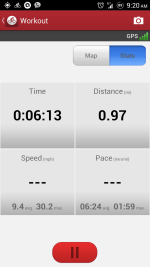
GPS clocked me @ 30mph flat-landScreenshot_2013-05-26-09-20-21.png
 
Another Update:

1 month after the build and everything has been broken in and works great!


As of today I hit the 40mph club. Don't have a picture but I was the only thing on the road and and the LED Speedometer by the construction zone was flashing 40.

Update on my Issues:
The pedal wobble is still there but is a non-issue.
I had to bend the red chain tensioner and its mount back after a light crash (that was the only damage), just used an adjustable crescent wrench. I guess cheap steel has its merits.
The bracket/plate that contacts my bottom bar has bent to conform to the bottom of my bar contours. To specify this is the piece that is held on by a hose-clamp (aka metal tie wraps).

I can easily shift under power but prefer to shift at half or no throttle as a preventative maintenance. And she takes me home over a 18 mile stretch with a 1000ft elevation change, and could probably do so on a full charge without my light pedaling.

So again, cheap steel, and don't assemble this under any sort of timeline.
 
Do I connect controller side KeyOn(+) to Controller side Red(+)?
Do I create a 3rd prong on my controller side connector for KeyOn, and modify my battery connection to match the 3rd prong?


Hi Neiler106

I am putting together my bike and came across your thread, what did you do with the KeyOn(+) wire in the end?
 
It needs positive battery power to operate.
 
ScottStorm said:
Do I connect controller side KeyOn(+) to Controller side Red(+)?
Do I create a 3rd prong on my controller side connector for KeyOn, and modify my battery connection to match the 3rd prong?


Hi Neiler106

I am putting together my bike and came across your thread, what did you do with the KeyOn(+) wire in the end?

This is a bit late but I figure future readers can get some benefit of a late reply.

What I did with the keyon wire was this....

1) I cut the keyon wire in half
2) the keyon wire coming from the controller end got an anderson connector
3) the loose/floating keyon wire got an anderson connector on one end
4) now I took the red power wire coming from the controller end and did the following:
4a) I twisted the loose end (did not have the anderson connector on it) of the keyon wire to the loose end of the red power wire (forming a parallel V with both wires pointing back toward the controller)
4b) placed an anderson connector on the end of the newly twisted wires

Now, I plug in my battery to the power wires, and once they are plugged in, then i connect my keyon wires together to turn it 'on'
 
Back
Top