The Build
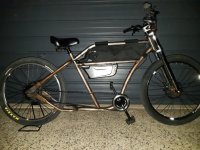
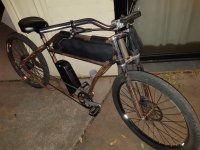
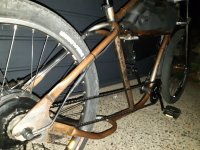
First up, you can see my first build here to compare notes when I refer to it in this post.
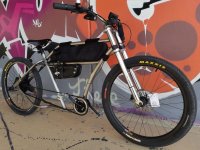
This is my second build, and being totally convinced by the first that this is the best way to get around especially here in Canberra, I put together a plan. At first the plan was for me and my son to ride e-bike #1 a couple of days a week each to our respective, opposite direction commutes. Second was a plan to make this bike the e-bike:

This is a great bike, but forum member byebyepetrol said he’d go for suspension forks for a more comfortable ride and put up with the weight penalty. I had bought the bike above because I had sold this bike previously:

Next thing I know the dude who bought that off me rang me and said he’d bought a new MTB and was happy to return mine. We negotiated a price, and the bike I’d spent well over 2 grand on was returned to me for $200. I think I sold it to him for $300 some 6 years earlier, it was pretty much how I handed it to the guy with very little use. You can tell when the guy leaves the useless hardened dirt tyres on with not much wear, it that it had an easy life for that time . I digress, but you may know what I mean when I say this bike is special to me, I owned it from 1996 to 2008.
But what to do? I was looking at the Bafang mid drive kits, but I decided that my rear wheel was less worthy than my cranks. I got in touch with eMax bikes and sorted out a spec, they had freewheel stock, but I am not a fan of freewheels especially when it is an 8 speed so I ordered in the Bafang CST 350w. It was laced up to an Alex DM18 with Sapim spokes, built in Sydney by one of eMax’ builders, as per the recommendation. It was ordered in the Chinese new year period which caused a massive delay but finally it arrived.
I went for the Bafang C961 display and compatible controller, all the bits arrived minus the battery and I started to plan the build. Unfortunately the battery was lost by Aus Post and it turned out that Ewan from eMax was coming down to Canberra and could bring a replacement, and claim the lost one through the post. We had a great pub lunch and chat, and the battery was in my hands, along with some Tektro V-Brake e-bike levers with cutoff switches, I was ready to go.
But first I had to turn the MTB into a commuter, I ordered some Rain Dog mudguards, moved the pannier from e-bke 1 as my son uses a back pack. I then moved the clipless pedals, Specialized Nimbus tyres and the saddle from the rigid bike shown above.
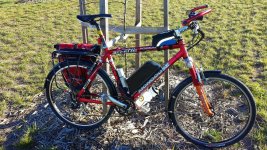
I started building. I actually had no idea that the controller would be a separate unit from the battery. But of course the basic kit and small battery I’d dealt with before is quite different from the larger battery and Bafang setup. I had to figure out where to put the controller and at first I was thinking of mounting it on the pannier rack. I would have needed a battery extension to do it so I looked at another solution. It turned out that I could fit a bottle cage cut down to the size of the controller to securely mount it to the frame. I covered the tips of the bottle cage in heatshrink. As with the other bike I used sections of inner tube to cover up all the connectors to keep dirt and water out.

As usual everything just plugged in, I had to get some spiral binding from Jaycar to keep the cables tidy and used some inner tube as previously to cover the connectors.
As is typical on these kits I struggled to find room on the handlebars to set up the cockpit properly. The display allows you to offset it which is shown below, it would have made the light very difficult to mount if it was stuck in the middle. I also had to put the throttle on the left, which means pushing it up instead of down, and it can get stuck on because it’s not totally on a flat piece of handlebar. It would be great to see some left mounted, high quality thumb throttles on the market. The other bike has the grip twist throttle which is OK but gets uncomfortable on a long ride as the twist throttle part is a larger diameter than the grip and I typically only use the PAS anyway.

The Tektro brake levers come without connectors, I could have soldered them but I wanted to be able to disconnect the controller without cutting or de-soldering cables. I found some crappy circuit board style connectors which were the smallest thing I could find at Jaycar, they worked but needed to be taped as they didn’t hold together well. I’ll see if I can find some better connectors for that.
The PAS was a massive drama to install due to my cranks being a very tight fit. It didn’t want to work on the left crank either, face the magnet either way and the wheel only turned pedalling backwards. On the drive side I couldn't get the bottom bracket lock ring undone, and aside it would not have had room with the tight fitting cranks, the bottom bracket shell overlapped the inner part of the crank arm. I removed the sensor from the metal ring, I used a piece of twisted thin galvanised wire to hold the pas, inserted into a block of foam I stuck on the back, with a few globs of silicone. I did the same thing as I’d done on the other bike, with a holesaw to make a larger hole in the middle of the PAS magnet ring to fit it on the crank where the granny chainring used to be.

All good to go! Tested the bike and took these pics of the finished product on it's first commute to work.


Riding
I expected about a 30% better speed than the 250w and basically that’s what I got. About 32km/h @100% charge compared to the limited 250w 25km/h unit. The first thing I noticed though was how much grunt it had going up hills, it really pulls very hard. It translated immediately to about 4km/h higher average speed over the 18km commute. As I’ve become fitter this has crept up to 5km/h The battery life is great, the 11.6Ah unit will get me 2 round trips easily, and it charges in about 4 hours from dead (battery cut out, which I measured at 43.4 volts) to full charge (54.6 volts). I generally only have to put about an hour and a half charge in after an hour and a half riding to keep it topped up but not 100% full.
I’m in the process of fitting a Cycle Analyst and Grinfineon controller to the unit now, I was hoping to get a higher speed out of this but as far as I can tell it won’t change the top speed, it will just improve the speeds going up hills which generally are under 27 km/h compared to the . I will be able to run more watts to the motor, so it will give it more pulling power, but the top speed would only be affected by having more voltage in the battery pack. Being a bit of a n00b I wasn’t aware of that when I started the project, but now I know that a motors top RPM limit is governed by voltage and not watts. I will look in the future at putting a higher voltage pack in, because it would be nice for the motor to keep pulling up to ~36km/h on the flat, and this could easily be achieved with a 54 volt pack. Theoretically a 60 volt pack would pull 41km/h which I think would be a bit fast for the v-brakes, and possibly a problem for the phase wires and motor itself. If I did get a higher voltage pack I’d get LiFePO4 as the voltage drop on the LiMn pack is noticeable, and by around 60km on a single charge it will only pull 27km/h top speed.
Overall it’s a fantastic kit, It hasn’t missed a beat with 1900km on the clock. I had the wheel trued and tensioned after the initial break in period of about 100km and otherwise have just kept charging and riding it. I also upgraded the V-brakes to Shimano XT, as the cruddy Truvativ ones from the 90’s were not performing well at all and downright scary in the wet. The old forks were a tad sticky so I had them serviced too, and they are running smoothly, and I’m really glad I went with front suspension for the build, it makes the 36km round trip nice and comfy on the hands.
There was also a problem with the chain coming off because I was running only the one chainring now, I picked up a Paul Components Chain Keeper for that and it has worked very well. The chain is also a tiny bit short but it is still working well for now so I haven’t changed it.
I will update the thread once I have the CA3 and Grinfineon up and running and have done some miles to report back on.
First up, you can see my first build here to compare notes when I refer to it in this post.
This is my second build, and being totally convinced by the first that this is the best way to get around especially here in Canberra, I put together a plan. At first the plan was for me and my son to ride e-bike #1 a couple of days a week each to our respective, opposite direction commutes. Second was a plan to make this bike the e-bike:

This is a great bike, but forum member byebyepetrol said he’d go for suspension forks for a more comfortable ride and put up with the weight penalty. I had bought the bike above because I had sold this bike previously:

Next thing I know the dude who bought that off me rang me and said he’d bought a new MTB and was happy to return mine. We negotiated a price, and the bike I’d spent well over 2 grand on was returned to me for $200. I think I sold it to him for $300 some 6 years earlier, it was pretty much how I handed it to the guy with very little use. You can tell when the guy leaves the useless hardened dirt tyres on with not much wear, it that it had an easy life for that time . I digress, but you may know what I mean when I say this bike is special to me, I owned it from 1996 to 2008.
But what to do? I was looking at the Bafang mid drive kits, but I decided that my rear wheel was less worthy than my cranks. I got in touch with eMax bikes and sorted out a spec, they had freewheel stock, but I am not a fan of freewheels especially when it is an 8 speed so I ordered in the Bafang CST 350w. It was laced up to an Alex DM18 with Sapim spokes, built in Sydney by one of eMax’ builders, as per the recommendation. It was ordered in the Chinese new year period which caused a massive delay but finally it arrived.
I went for the Bafang C961 display and compatible controller, all the bits arrived minus the battery and I started to plan the build. Unfortunately the battery was lost by Aus Post and it turned out that Ewan from eMax was coming down to Canberra and could bring a replacement, and claim the lost one through the post. We had a great pub lunch and chat, and the battery was in my hands, along with some Tektro V-Brake e-bike levers with cutoff switches, I was ready to go.
But first I had to turn the MTB into a commuter, I ordered some Rain Dog mudguards, moved the pannier from e-bke 1 as my son uses a back pack. I then moved the clipless pedals, Specialized Nimbus tyres and the saddle from the rigid bike shown above.
I started building. I actually had no idea that the controller would be a separate unit from the battery. But of course the basic kit and small battery I’d dealt with before is quite different from the larger battery and Bafang setup. I had to figure out where to put the controller and at first I was thinking of mounting it on the pannier rack. I would have needed a battery extension to do it so I looked at another solution. It turned out that I could fit a bottle cage cut down to the size of the controller to securely mount it to the frame. I covered the tips of the bottle cage in heatshrink. As with the other bike I used sections of inner tube to cover up all the connectors to keep dirt and water out.

As usual everything just plugged in, I had to get some spiral binding from Jaycar to keep the cables tidy and used some inner tube as previously to cover the connectors.
As is typical on these kits I struggled to find room on the handlebars to set up the cockpit properly. The display allows you to offset it which is shown below, it would have made the light very difficult to mount if it was stuck in the middle. I also had to put the throttle on the left, which means pushing it up instead of down, and it can get stuck on because it’s not totally on a flat piece of handlebar. It would be great to see some left mounted, high quality thumb throttles on the market. The other bike has the grip twist throttle which is OK but gets uncomfortable on a long ride as the twist throttle part is a larger diameter than the grip and I typically only use the PAS anyway.

The Tektro brake levers come without connectors, I could have soldered them but I wanted to be able to disconnect the controller without cutting or de-soldering cables. I found some crappy circuit board style connectors which were the smallest thing I could find at Jaycar, they worked but needed to be taped as they didn’t hold together well. I’ll see if I can find some better connectors for that.
The PAS was a massive drama to install due to my cranks being a very tight fit. It didn’t want to work on the left crank either, face the magnet either way and the wheel only turned pedalling backwards. On the drive side I couldn't get the bottom bracket lock ring undone, and aside it would not have had room with the tight fitting cranks, the bottom bracket shell overlapped the inner part of the crank arm. I removed the sensor from the metal ring, I used a piece of twisted thin galvanised wire to hold the pas, inserted into a block of foam I stuck on the back, with a few globs of silicone. I did the same thing as I’d done on the other bike, with a holesaw to make a larger hole in the middle of the PAS magnet ring to fit it on the crank where the granny chainring used to be.

All good to go! Tested the bike and took these pics of the finished product on it's first commute to work.


Riding
I expected about a 30% better speed than the 250w and basically that’s what I got. About 32km/h @100% charge compared to the limited 250w 25km/h unit. The first thing I noticed though was how much grunt it had going up hills, it really pulls very hard. It translated immediately to about 4km/h higher average speed over the 18km commute. As I’ve become fitter this has crept up to 5km/h The battery life is great, the 11.6Ah unit will get me 2 round trips easily, and it charges in about 4 hours from dead (battery cut out, which I measured at 43.4 volts) to full charge (54.6 volts). I generally only have to put about an hour and a half charge in after an hour and a half riding to keep it topped up but not 100% full.
I’m in the process of fitting a Cycle Analyst and Grinfineon controller to the unit now, I was hoping to get a higher speed out of this but as far as I can tell it won’t change the top speed, it will just improve the speeds going up hills which generally are under 27 km/h compared to the . I will be able to run more watts to the motor, so it will give it more pulling power, but the top speed would only be affected by having more voltage in the battery pack. Being a bit of a n00b I wasn’t aware of that when I started the project, but now I know that a motors top RPM limit is governed by voltage and not watts. I will look in the future at putting a higher voltage pack in, because it would be nice for the motor to keep pulling up to ~36km/h on the flat, and this could easily be achieved with a 54 volt pack. Theoretically a 60 volt pack would pull 41km/h which I think would be a bit fast for the v-brakes, and possibly a problem for the phase wires and motor itself. If I did get a higher voltage pack I’d get LiFePO4 as the voltage drop on the LiMn pack is noticeable, and by around 60km on a single charge it will only pull 27km/h top speed.
Overall it’s a fantastic kit, It hasn’t missed a beat with 1900km on the clock. I had the wheel trued and tensioned after the initial break in period of about 100km and otherwise have just kept charging and riding it. I also upgraded the V-brakes to Shimano XT, as the cruddy Truvativ ones from the 90’s were not performing well at all and downright scary in the wet. The old forks were a tad sticky so I had them serviced too, and they are running smoothly, and I’m really glad I went with front suspension for the build, it makes the 36km round trip nice and comfy on the hands.
There was also a problem with the chain coming off because I was running only the one chainring now, I picked up a Paul Components Chain Keeper for that and it has worked very well. The chain is also a tiny bit short but it is still working well for now so I haven’t changed it.
I will update the thread once I have the CA3 and Grinfineon up and running and have done some miles to report back on.


