Bartimaeus
10 W
- Joined
- May 31, 2012
- Messages
- 94
This hack will allow you to interface with the cheap Harbor Freight pocket infared (IR) thermometers (specifically Item#93983 and Item#93984). This may or may not work with other IR temp guns (I read that the more expensive ones use proprietary methods), but it will definitely not work for the Harbor Freight #96451 pistol grip style gun. There is a way to do that, but the protocol (rs-232) is different from the one discussed here. For details about the other temp gun see the following link: http://www.exisle.net/mb/index.php?/topic/66532-fun-with-cen-tech-ir-thermometers/
This will allow you to use your cheap IR thermometer as a sensor for a microcontroller or to add a datalogging functionality that you don't normally see except for in high end models.
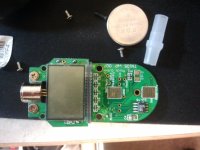
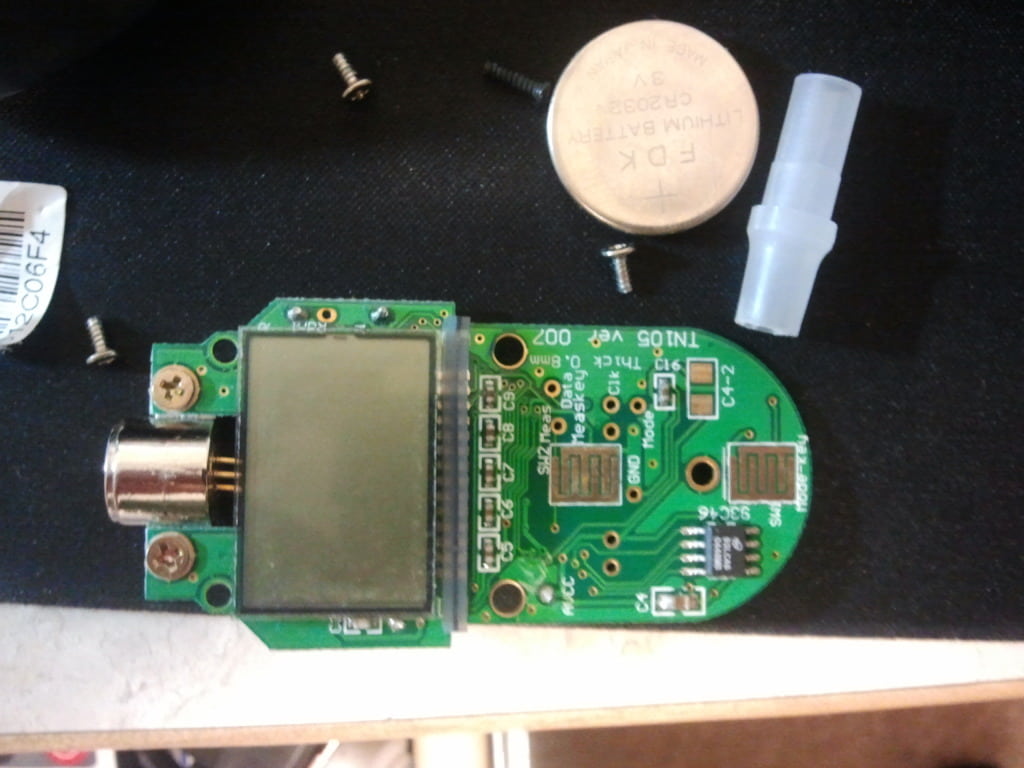
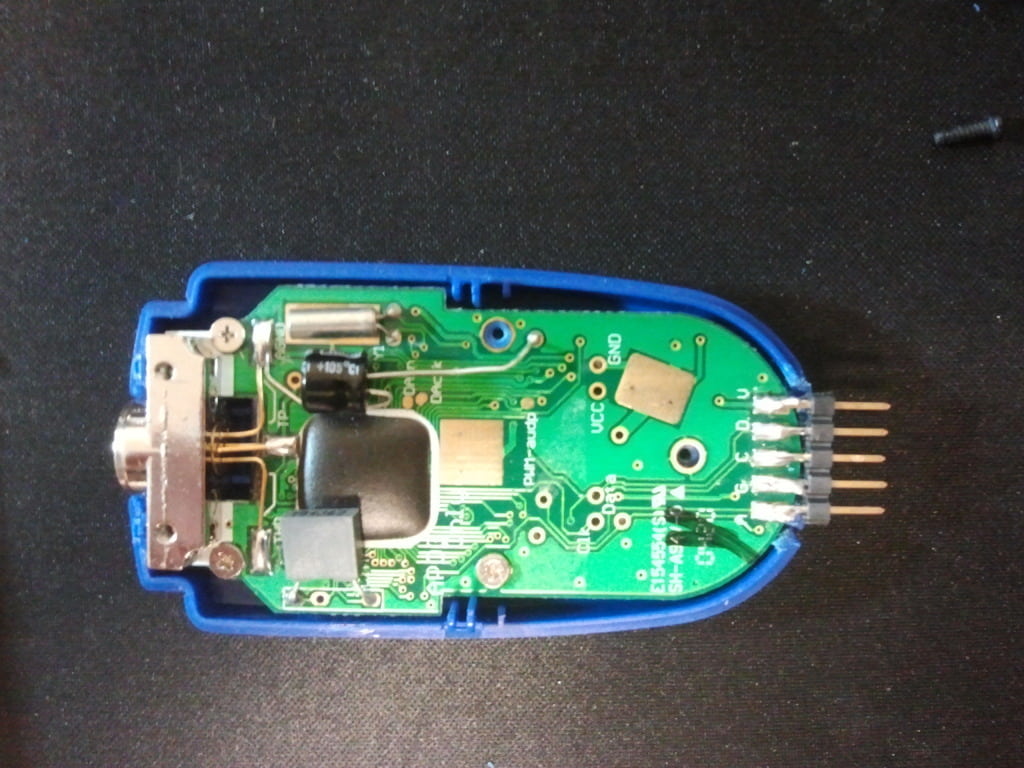
Lately I've been working with the Melexis MLX90614ESF-BAA infared temperature sensor to monitor the temperature of outrunner motors and to control a liquid cooling system. I had one of the Harbor Freight thermometers and decided to pop it open. I was pleased to find that there were clear tabs for interfacing with the device:

Front side for reference:
On the front you can see "TN105 ver 007", which led to this product page for ZyTemp, who appears to relabel these for other brands and sell them: http://www.zytemp.com/products/tn105c.asp
More digging led me to this blog of a teardown for another harbor freight model with the same pinout: http://dbearsblog.blogspot.com/2011/04/harbor-freight-infrared-thermometer.html
From there I learned that the pin assignments were:
V= Vdd
G = GND
D = Data (serial)
C = Clock (for data)
A = Action Pin (pull to GND to take a measurement. Shorting to ground will make it do continuous measurements)
Interfacing with the pads is convenient because the spacing is perfect for standard 0.1" header pins, and it only takes a little filing on the plastic case to make room for the pins to stick out. Alternately there are four holes in the case under the battery that were used for testing that you could run wires through if you didn't want to hack the case.
Unfortunately the blog post ends before it gets too useful, but while researching that model I came across some instructables that use them with an Arduino: http://www.instructables.com/id/Build-an-Arduino-based-thermal-scanner/
http://www.instructables.com/id/Closing-the-Loop-on-Surface-Mount-Soldering/
I downloaded the code from the first instructable and modified it to spit out the temperature in degrees Celcius and Fahrenheit
You can copy and paste into a blank Arduino sketch or download the file here: View attachment HarborFreightIRTempGun.zip
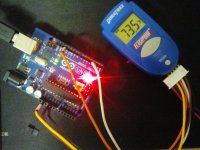
Wiring:
[Note: You should remove the battery from the thermometer before you power it from the Arduino]
To wire the IR thermometer to the Arduino, attach the pins as follows:
V to 3.3v on the Arduino
G to GND on the Arduino
A to GND on the Arduino
D to digital input 12 on the Arduino (or other digital input pin. Make sure to modify code to match if you do)
C to digital input 2 on the Arduino (or other interrupt pin. Make sure to modify code to match if you do)

Final Setup:
If you don't have the Arduino program installed you should be able to get it here: http://arduino.cc/en/main/software
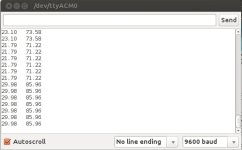
Upload the sketch to the Arduino and open up a serial terminal (if you've never used one before you can find a basic one in the Arduino program under Tools->Serial Monitor)
The output will look something like this:
You can use this to take log temperature data and enter it into Microsoft Excel to make a graph, or parse the data in the Arduino to use for your microcontroller project. If you want to change the formatting of the output(make is comma seperated values, show only celcius, etc.) you should modify the temp_output() function. Any Arduino should work, although if you are new to Arduino I would highly recommend getting the Arduino Uno r3. The IR temp sensor I mentioned at the beginning costs ~$10-12 from Digikey by itself, so depending on your needs a ~$13 Ir thermometer with a built in display might be a lot more economical.
I hope you found this educational and interesting, and I am more than willing to help with any problems that you post below and I'd love to hear any success stories as well!
This will allow you to use your cheap IR thermometer as a sensor for a microcontroller or to add a datalogging functionality that you don't normally see except for in high end models.
Lately I've been working with the Melexis MLX90614ESF-BAA infared temperature sensor to monitor the temperature of outrunner motors and to control a liquid cooling system. I had one of the Harbor Freight thermometers and decided to pop it open. I was pleased to find that there were clear tabs for interfacing with the device:
Front side for reference:
On the front you can see "TN105 ver 007", which led to this product page for ZyTemp, who appears to relabel these for other brands and sell them: http://www.zytemp.com/products/tn105c.asp
More digging led me to this blog of a teardown for another harbor freight model with the same pinout: http://dbearsblog.blogspot.com/2011/04/harbor-freight-infrared-thermometer.html
From there I learned that the pin assignments were:
V= Vdd
G = GND
D = Data (serial)
C = Clock (for data)
A = Action Pin (pull to GND to take a measurement. Shorting to ground will make it do continuous measurements)
Interfacing with the pads is convenient because the spacing is perfect for standard 0.1" header pins, and it only takes a little filing on the plastic case to make room for the pins to stick out. Alternately there are four holes in the case under the battery that were used for testing that you could run wires through if you didn't want to hack the case.
Unfortunately the blog post ends before it gets too useful, but while researching that model I came across some instructables that use them with an Arduino: http://www.instructables.com/id/Build-an-Arduino-based-thermal-scanner/
http://www.instructables.com/id/Closing-the-Loop-on-Surface-Mount-Soldering/
I downloaded the code from the first instructable and modified it to spit out the temperature in degrees Celcius and Fahrenheit
Code:
//baseline of this code was from http://dorkbotpdx.org/blog/scott_d/inexpensive_ir_based_temperature_sensor_for_microprocessors
//Modified by David_G and Bartimaeus

#define IR_CLK 2 //this is interrupt driven, pin 2 or 3
#define IR_DATA 12 //data pin

volatile int nbits = 0;
volatile byte hexbyte = 0;

volatile unsigned char message[4];
volatile int nbytes = 0;
volatile int message_waiting = 0;

unsigned long last_time = 0;

float temp= 99.00;
float ambient;
boolean light = false;

int irSetup = 1;

float latestReading = 0.0;


void setupTempSensor() {
  pinMode(IR_CLK, INPUT);
  pinMode(IR_DATA, INPUT);
  pinMode(13, OUTPUT);
  attachInterrupt(0, readBit, FALLING); //0 -> pin2, 1 -> pin3
}

/*
//attempt to filter out beginning false readings. Works fairly well but still has a bug or two
int isStartup(){
  if(irSetup){
    if((int)temp != 99){
      irSetup = 0;
    }
  }
  return irSetup;
}
*/

void temp_output() {
   //updateTempSensor();
   float tmp = getFreshTemp(); //gets the temperature reading
   //float tmp = getFeshAmb(); //gets the ambient temperature
   //if(!(isStartup())){    //filters out the bad data at the beginning
     float fahrenheit = (tmp*1.8) + 32;
     Serial.print(tmp);
     Serial.print(" C");
     Serial.print('\t');
     Serial.print(fahrenheit);
     Serial.println(" F");
   //}

   /*
      //debug information for cmdline
       Serial.print("DD: ");
       Serial.print(message[0]);
       Serial.print(message[1]);
       Serial.print(message[2]);
       Serial.print(" H:");
       Serial.print(hexbyte);
       Serial.println(';');
   */

}

void updateTempSensor() {
  if (message_waiting == 1) {
    last_time = millis();
    if (message[0] == 0x4c) { //from zytemp
      int t = message[1]<<8 | message[2];
      temp = t/16.0 -273.15;
    }
    else if (message[0] == 0x66) {
      int t = message[1]<<8 | message[2];
      ambient = t/16.0 -273.15;
    }
    message_waiting = 0;
  }

  //update evry second
  if (millis() - last_time > 1000) {
    nbits = 0;
    nbytes = 0;
    hexbyte = 0;
    message_waiting = 0;
    last_time = millis();
  }

}

// Interupt routine for handling IR sensor clock trailing edge
void readBit() {
  int val = digitalRead(IR_DATA);  //read the data from the IR module
  if(!light) digitalWrite(13, HIGH);   // set the LED on
  else digitalWrite(13, LOW);
  light = !light;  //change light state when a bit was read in
  nbits++;
  int bit = (val == HIGH) ? 1 : 0;
  hexbyte = (hexbyte << 1) | bit; //compound bytes so that we creat a 8-bit key
  if (nbits == 8) {
    if (hexbyte == 0xd) {
      nbytes = 0;
      message_waiting = 1;
    }
    else if (message_waiting == 0) {
      if (nbytes < 4) {
        message[nbytes] = hexbyte;
      }
      nbytes++;
    }
    hexbyte = 0;
    nbits = 0;
  }
}

float getFreshTemp() {
  return temp;
}

float getFeshAmb() {
   return ambient;
}

void setup() {
   Serial.begin(9600);
   setupTempSensor(); //start temperature
}

void loop() {
  updateTempSensor();  //allwas update the temp sensor each cycle
  temp_output();
  delay(100);

}Wiring:
[Note: You should remove the battery from the thermometer before you power it from the Arduino]
To wire the IR thermometer to the Arduino, attach the pins as follows:
V to 3.3v on the Arduino
G to GND on the Arduino
A to GND on the Arduino
D to digital input 12 on the Arduino (or other digital input pin. Make sure to modify code to match if you do)
C to digital input 2 on the Arduino (or other interrupt pin. Make sure to modify code to match if you do)
Final Setup:
If you don't have the Arduino program installed you should be able to get it here: http://arduino.cc/en/main/software
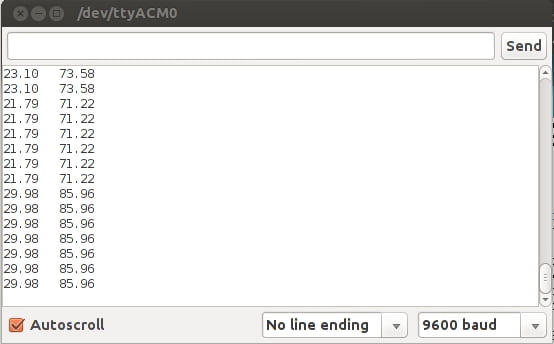
Upload the sketch to the Arduino and open up a serial terminal (if you've never used one before you can find a basic one in the Arduino program under Tools->Serial Monitor)
The output will look something like this:
You can use this to take log temperature data and enter it into Microsoft Excel to make a graph, or parse the data in the Arduino to use for your microcontroller project. If you want to change the formatting of the output(make is comma seperated values, show only celcius, etc.) you should modify the temp_output() function. Any Arduino should work, although if you are new to Arduino I would highly recommend getting the Arduino Uno r3. The IR temp sensor I mentioned at the beginning costs ~$10-12 from Digikey by itself, so depending on your needs a ~$13 Ir thermometer with a built in display might be a lot more economical.
I hope you found this educational and interesting, and I am more than willing to help with any problems that you post below and I'd love to hear any success stories as well!