
You are using an out of date browser. It may not display this or other websites correctly.
You should upgrade or use an alternative browser.
You should upgrade or use an alternative browser.
Bafang SW102 Bluetooth LCD - OpenSource firmware and mobile app
- Thread starter casainho
- Start date
geeksville
10 W
- Joined
- Aug 2, 2019
- Messages
- 89
Btw: I just got back from a longish test ride with the SW102. There are a few bugs (and a few missing features) but I think an alpha release will come soon. Then based on feedback from brave alpha users the beta will include a more final GUI and the bluetooth linking (for getting power data into Strava etc).
casainho
10 GW
- Joined
- Feb 14, 2011
- Messages
- 6,058
I think a version where main screen and configuration works would bring good value already as seem there are users waiting for it and not mention anything about Bluetooth/mobille. The Bluetooth/Straga/mobile could be another step after.geeksville said:Btw: I just got back from a longish test ride with the SW102. There are a few bugs (and a few missing features) but I think an alpha release will come soon. Then based on feedback from brave alpha users the beta will include a more final GUI and the bluetooth linking (for getting power data into Strava etc).
Seems some users don't like either the LCD3 or 850C because it is big and they are looking for the smaller SW102.
geeksville
10 W
- Joined
- Aug 2, 2019
- Messages
- 89
okay - I'll wait on doing the bluetooth stuff until the beta. The alpha is already approximately usable, I want to fix a few things before the first release though. Probably by Sunday.
Here's a short video I made for casainho: [youtube]aFR3zBxaMrc[/youtube]
Here's a short video I made for casainho: [youtube]aFR3zBxaMrc[/youtube]
Tsdz2Canyon
100 µW
- Joined
- Jun 30, 2019
- Messages
- 9
geeksville said:okay - I'll wait on doing the bluetooth stuff until the beta. The alpha is already approximately usable, I want to fix a few things before the first release though. Probably by Sunday.
Here's a short video I made for casainho:
Wery nice!
geeksville
10 W
- Joined
- Aug 2, 2019
- Messages
- 89
An update: the first alpha release is basically ready, but I want Casainho and Nick to try it before we inflict it on you good souls. They are out of pocket this weekend, so we won't be doing the release until Tuesdayish...
Hello SW102 dev group!
I am new to the project, but an experienced nordic developer.
I would like to mill a hole in the side of the display instead of cutting out the buttons. Can anyone provide info on where to locate the hole/pocket on the right side of the display to access the SWD pads?
Thanks!
I am new to the project, but an experienced nordic developer.
I would like to mill a hole in the side of the display instead of cutting out the buttons. Can anyone provide info on where to locate the hole/pocket on the right side of the display to access the SWD pads?
Thanks!
casainho
10 GW
- Joined
- Feb 14, 2011
- Messages
- 6,058
Hi!!gatorsean said:Hello SW102 dev group!
I am new to the project, but an experienced nordic developer.
I would like to mill a hole in the side of the display instead of cutting out the buttons. Can anyone provide info on where to locate the hole/pocket on the right side of the display to access the SWD pads?
Thanks!
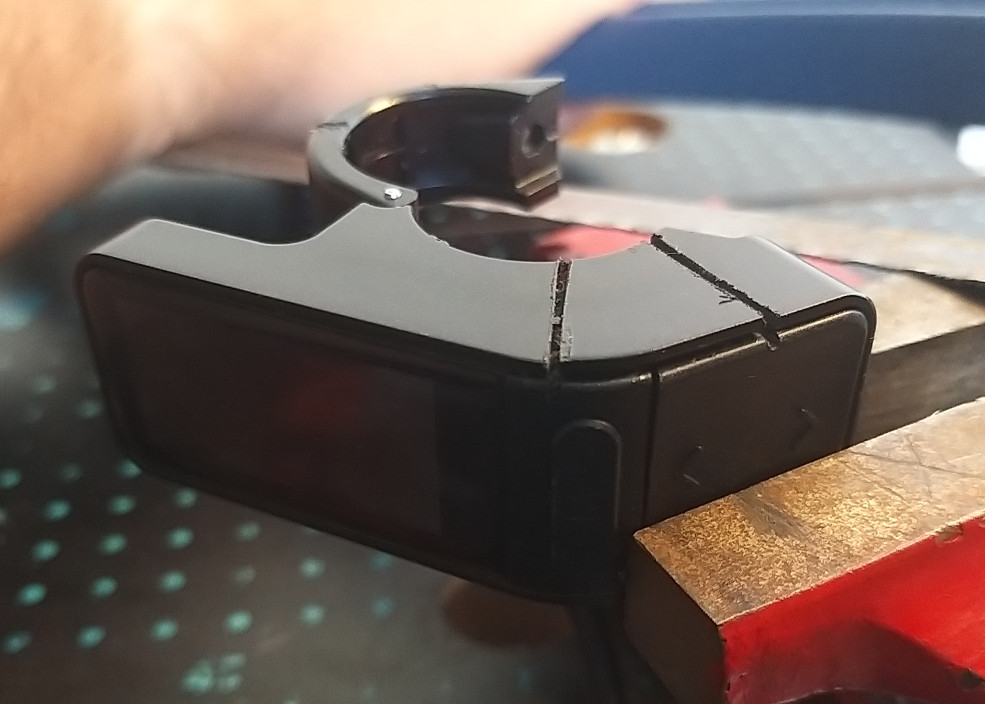
I am also thinking on this as a best option, but like cutting a hole/piece on the side where the pads are. I just damage the keypad and not it is hard to click, not good to use this display because is to hard to change assist levels :-(
I think there is low risk to do this and damage the board, as seems the board has only the pins on that place/side of the board.
I think you can cut a hole between 14mm and 25mm as seens on this picture:

casainho
10 GW
- Joined
- Feb 14, 2011
- Messages
- 6,058
Here is my way that I think is safe and most easy (yes, I already break 2 units of SW102 before having this idea). If this works for others, maybe we should put on wiki:
I just went to cut a lateral from SW102 so I could solder the 3 wires for STLinkV2. I am not using the 3V3 as I am powering the SW102 from battery -- I think this is better as it is one less wire to solder and it is a bit hard to solder them on SW102.
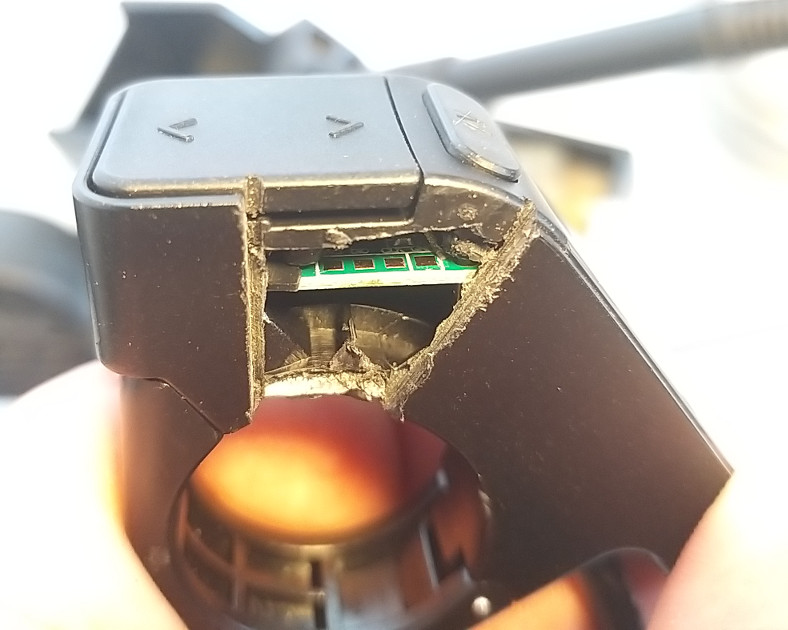
I started to use a hand saw for metal and did cut the lateral part:

Then I simpled break it when I pulled with pliers.
Here the pads exposed. I had to I pull with pliers a small rubber sheet and had to cut a bit a plastic with a cuter knife:
Finally I soldered the 3 wires carefully and made sure there was no short circuits on them:
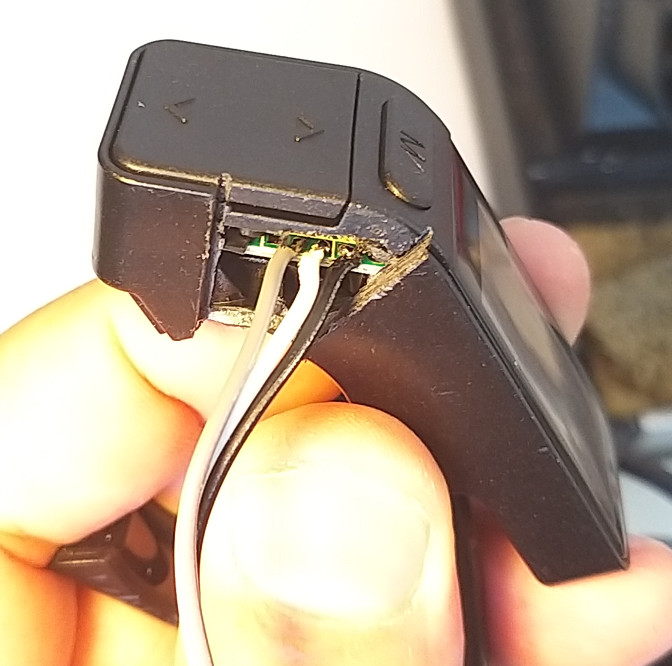
After flashing the bootloader and the firmware, it runs!!
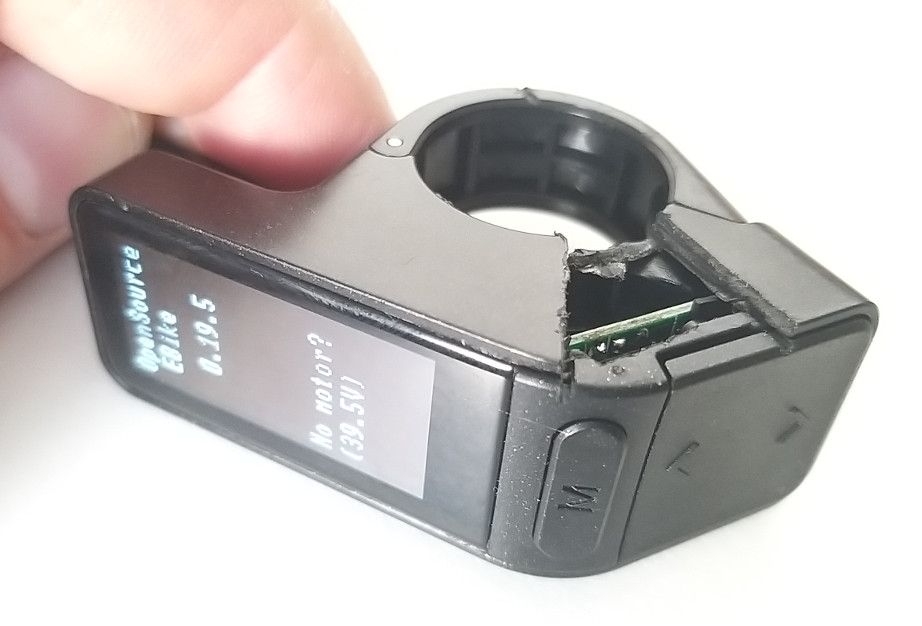
Finally I can use the parts I removed and glue it. After all this, the key pad is working perfectly as original:

I just went to cut a lateral from SW102 so I could solder the 3 wires for STLinkV2. I am not using the 3V3 as I am powering the SW102 from battery -- I think this is better as it is one less wire to solder and it is a bit hard to solder them on SW102.
I started to use a hand saw for metal and did cut the lateral part:
Then I simpled break it when I pulled with pliers.
Here the pads exposed. I had to I pull with pliers a small rubber sheet and had to cut a bit a plastic with a cuter knife:
Finally I soldered the 3 wires carefully and made sure there was no short circuits on them:
After flashing the bootloader and the firmware, it runs!!
Finally I can use the parts I removed and glue it. After all this, the key pad is working perfectly as original:
perryscope
100 W
- Joined
- Jan 6, 2019
- Messages
- 122
Hi Guys, just wanted to give some feedback on flashing the SW102 under windows and a small issue i had.
I downloaded openocd 20190715 as per the guide here https://github.com/OpenSource-EBike-firmware/Color_LCD/wiki/Initial-SW102-firmware-install#install-the-openocd-software
and ran the test and got...
C:\TSDZ2\openocd-20190715\OpenOCD-20190715-0.10.0\bin>openocd -f ..\share\openocd\scripts\interface\stlink.cfg -f ..\share\openocd\scripts\target\nrf51.cfg
Open On-Chip Debugger 0.10.0 (2019-07-15) [https://github.com/sysprogs/openocd]
Licensed under GNU GPL v2
For bug reports, read
http://openocd.org/doc/doxygen/bugs.html
Info : auto-selecting first available session transport "hla_swd". To override use 'transport select <transport>'.
Info : The selected transport took over low-level target control. The results might differ compared to plain JTAG/SWD
Info : Listening on port 6666 for tcl connections
Info : Listening on port 4444 for telnet connections
Info : clock speed 1000 kHz
Error: open failed: jtag_libusb_open() returned error -4
I also ran the Firmware upgrade command and got..
C:\TSDZ2\openocd-20190715\OpenOCD-20190715-0.10.0\bin>openocd -f ..\share\openocd\scripts\interface\stlink.cfg -f ..\share\openocd\scripts\target\nrf51.cfg -c "init; reset init; nrf51 mass_erase; flash write_image sw102-full-0.19.8.hex; verify_image sw102-full-0.19.8.hex; echo FLASHED; reset halt; resume; shutdown"
Open On-Chip Debugger 0.10.0 (2019-07-15) [https://github.com/sysprogs/openocd]
Licensed under GNU GPL v2
For bug reports, read
http://openocd.org/doc/doxygen/bugs.html
Info : auto-selecting first available session transport "hla_swd". To override use 'transport select <transport>'.
Info : The selected transport took over low-level target control. The results might differ compared to plain JTAG/SWD
Info : clock speed 1000 kHz
Info : STLINK V2J17S4 (API v2) VID ID 0483:3748
Info : Target voltage: 3.243973
Info : nrf51.cpu: hardware has 4 breakpoints, 2 watchpoints
Info : Listening on port 3333 for gdb connections
target halted due to debug-request, current mode: Thread
xPSR: 0xc1000000 pc: 0x000006d0 msp: 0x000007c0
Info : nRF51822-QFAC(build code: A1) 256kB Flash
Info : Flash write discontinued at 0x000007c0, next section at 0x00001000
Warn : using fast async flash loader. This is currently supported
Warn : only with ST-Link and CMSIS-DAP. If you have issues, add
Warn : "set WORKAREASIZE 0" before sourcing nrf51.cfg/nrf52.cfg to disable it
Error: flash write algorithm aborted by target
Error: timed out while waiting for target halted
Error: error waiting for target flash write algorithm
Error: Failed to write to nrf5 flash
Error: error writing to flash at address 0x00000000 at offset 0x00000000
I noticed on the screenshot it showed an earlier version of Open OCD 'openocd-20190210' so I downloaded that and tried again and it worked fine..
C:\TSDZ2\openocd-20190210\OpenOCD-20190210-0.10.0\bin>openocd -f ..\share\openocd\scripts\interface\stlink.cfg -f ..\share\openocd\scripts\target\nrf51.cfg
Open On-Chip Debugger 0.10.0 (2019-02-10) [https://github.com/sysprogs/openocd]
Licensed under GNU GPL v2
For bug reports, read
http://openocd.org/doc/doxygen/bugs.html
Info : auto-selecting first available session transport "hla_swd". To override use 'transport select <transport>'.
Info : The selected transport took over low-level target control. The results might differ compared to plain JTAG/SWD
adapter speed: 1000 kHz
Info : Listening on port 6666 for tcl connections
Info : Listening on port 4444 for telnet connections
Info : clock speed 1000 kHz
Info : STLINK V2J17S4 (API v2) VIDID 0483:3748
Info : Target voltage: 3.243973
Info : nrf51.cpu: hardware has 4 breakpoints, 2 watchpoints
Info : Listening on port 3333 for gdb connections
shutdown command invoked
C:\TSDZ2\openocd-20190210\OpenOCD-20190210-0.10.0\bin>openocd -f ..\share\openocd\scripts\interface\stlink.cfg -f ..\share\openocd\scripts\target\nrf51.cfg -c "init; reset init; nrf51 mass_erase; flash write_image sw102-full-0.19.8.hex; verify_image sw102-full-0.19.8.hex; echo FLASHED; reset halt; resume; shutdown"
Open On-Chip Debugger 0.10.0 (2019-02-10) [https://github.com/sysprogs/openocd]
Licensed under GNU GPL v2
For bug reports, read
http://openocd.org/doc/doxygen/bugs.html
Info : auto-selecting first available session transport "hla_swd". To override use 'transport select <transport>'.
Info : The selected transport took over low-level target control. The results might differ compared to plain JTAG/SWD
adapter speed: 1000 kHz
Info : clock speed 1000 kHz
Info : STLINK V2J17S4 (API v2) VIDID 0483:3748
Info : Target voltage: 3.242384
Info : nrf51.cpu: hardware has 4 breakpoints, 2 watchpoints
Info : Listening on port 3333 for gdb connections
target halted due to debug-request, current mode: Thread
xPSR: 0xc1000000 pc: 0xfffffffe msp: 0xfffffffc
Info : nRF51822-QFAC(build code: A1) 256kB Flash
Info : Flash write discontinued at 0x000007c0, next section at 0x00001000
Warn : using fast async flash loader. This is currently supported
Warn : only with ST-Link and CMSIS-DAP. If you have issues, add
Warn : "set WORKAREASIZE 0" before sourcing nrf51.cfg/nrf52.cfg to disable it
Info : Padding image section 1 at 0x0001afe0 with 32 bytes
Info : Flash write discontinued at 0x00038330, next section at 0x0003ac00
Warn : using fast async flash loader. This is currently supported
Warn : only with ST-Link and CMSIS-DAP. If you have issues, add
Warn : "set WORKAREASIZE 0" before sourcing nrf51.cfg/nrf52.cfg to disable it
Info : Padding image section 3 at 0x0003fa54 with 428 bytes
Warn : using fast async flash loader. This is currently supported
Warn : only with ST-Link and CMSIS-DAP. If you have issues, add
Warn : "set WORKAREASIZE 0" before sourcing nrf51.cfg/nrf52.cfg to disable it
Warn : using fast async flash loader. This is currently supported
Warn : only with ST-Link and CMSIS-DAP. If you have issues, add
Warn : "set WORKAREASIZE 0" before sourcing nrf51.cfg/nrf52.cfg to disable it
wrote 248656 bytes from file sw102-full-0.19.8.hex in 8.864602s (27.393 KiB/s)
verified 248196 bytes in 2.044464s (118.554 KiB/s)
FLASHED
target halted due to debug-request, current mode: Thread
xPSR: 0xc1000000 pc: 0x000006d0 msp: 0x000007c0
shutdown command invoked
C:\TSDZ2\openocd-20190210\OpenOCD-20190210-0.10.0\bin>
I hope that helps anyone with the same issue.
I also disconected the screen cable when flashing as it was easier to solder the programming cable and not put stress on the small screen ribbon cable that way.

I downloaded openocd 20190715 as per the guide here https://github.com/OpenSource-EBike-firmware/Color_LCD/wiki/Initial-SW102-firmware-install#install-the-openocd-software
and ran the test and got...
C:\TSDZ2\openocd-20190715\OpenOCD-20190715-0.10.0\bin>openocd -f ..\share\openocd\scripts\interface\stlink.cfg -f ..\share\openocd\scripts\target\nrf51.cfg
Open On-Chip Debugger 0.10.0 (2019-07-15) [https://github.com/sysprogs/openocd]
Licensed under GNU GPL v2
For bug reports, read
http://openocd.org/doc/doxygen/bugs.html
Info : auto-selecting first available session transport "hla_swd". To override use 'transport select <transport>'.
Info : The selected transport took over low-level target control. The results might differ compared to plain JTAG/SWD
Info : Listening on port 6666 for tcl connections
Info : Listening on port 4444 for telnet connections
Info : clock speed 1000 kHz
Error: open failed: jtag_libusb_open() returned error -4
I also ran the Firmware upgrade command and got..
C:\TSDZ2\openocd-20190715\OpenOCD-20190715-0.10.0\bin>openocd -f ..\share\openocd\scripts\interface\stlink.cfg -f ..\share\openocd\scripts\target\nrf51.cfg -c "init; reset init; nrf51 mass_erase; flash write_image sw102-full-0.19.8.hex; verify_image sw102-full-0.19.8.hex; echo FLASHED; reset halt; resume; shutdown"
Open On-Chip Debugger 0.10.0 (2019-07-15) [https://github.com/sysprogs/openocd]
Licensed under GNU GPL v2
For bug reports, read
http://openocd.org/doc/doxygen/bugs.html
Info : auto-selecting first available session transport "hla_swd". To override use 'transport select <transport>'.
Info : The selected transport took over low-level target control. The results might differ compared to plain JTAG/SWD
Info : clock speed 1000 kHz
Info : STLINK V2J17S4 (API v2) VID
ID 0483:3748Info : Target voltage: 3.243973
Info : nrf51.cpu: hardware has 4 breakpoints, 2 watchpoints
Info : Listening on port 3333 for gdb connections
target halted due to debug-request, current mode: Thread
xPSR: 0xc1000000 pc: 0x000006d0 msp: 0x000007c0
Info : nRF51822-QFAC(build code: A1) 256kB Flash
Info : Flash write discontinued at 0x000007c0, next section at 0x00001000
Warn : using fast async flash loader. This is currently supported
Warn : only with ST-Link and CMSIS-DAP. If you have issues, add
Warn : "set WORKAREASIZE 0" before sourcing nrf51.cfg/nrf52.cfg to disable it
Error: flash write algorithm aborted by target
Error: timed out while waiting for target halted
Error: error waiting for target flash write algorithm
Error: Failed to write to nrf5 flash
Error: error writing to flash at address 0x00000000 at offset 0x00000000
I noticed on the screenshot it showed an earlier version of Open OCD 'openocd-20190210' so I downloaded that and tried again and it worked fine..
C:\TSDZ2\openocd-20190210\OpenOCD-20190210-0.10.0\bin>openocd -f ..\share\openocd\scripts\interface\stlink.cfg -f ..\share\openocd\scripts\target\nrf51.cfg
Open On-Chip Debugger 0.10.0 (2019-02-10) [https://github.com/sysprogs/openocd]
Licensed under GNU GPL v2
For bug reports, read
http://openocd.org/doc/doxygen/bugs.html
Info : auto-selecting first available session transport "hla_swd". To override use 'transport select <transport>'.
Info : The selected transport took over low-level target control. The results might differ compared to plain JTAG/SWD
adapter speed: 1000 kHz
Info : Listening on port 6666 for tcl connections
Info : Listening on port 4444 for telnet connections
Info : clock speed 1000 kHz
Info : STLINK V2J17S4 (API v2) VID
ID 0483:3748Info : Target voltage: 3.243973
Info : nrf51.cpu: hardware has 4 breakpoints, 2 watchpoints
Info : Listening on port 3333 for gdb connections
shutdown command invoked
C:\TSDZ2\openocd-20190210\OpenOCD-20190210-0.10.0\bin>openocd -f ..\share\openocd\scripts\interface\stlink.cfg -f ..\share\openocd\scripts\target\nrf51.cfg -c "init; reset init; nrf51 mass_erase; flash write_image sw102-full-0.19.8.hex; verify_image sw102-full-0.19.8.hex; echo FLASHED; reset halt; resume; shutdown"
Open On-Chip Debugger 0.10.0 (2019-02-10) [https://github.com/sysprogs/openocd]
Licensed under GNU GPL v2
For bug reports, read
http://openocd.org/doc/doxygen/bugs.html
Info : auto-selecting first available session transport "hla_swd". To override use 'transport select <transport>'.
Info : The selected transport took over low-level target control. The results might differ compared to plain JTAG/SWD
adapter speed: 1000 kHz
Info : clock speed 1000 kHz
Info : STLINK V2J17S4 (API v2) VID
ID 0483:3748Info : Target voltage: 3.242384
Info : nrf51.cpu: hardware has 4 breakpoints, 2 watchpoints
Info : Listening on port 3333 for gdb connections
target halted due to debug-request, current mode: Thread
xPSR: 0xc1000000 pc: 0xfffffffe msp: 0xfffffffc
Info : nRF51822-QFAC(build code: A1) 256kB Flash
Info : Flash write discontinued at 0x000007c0, next section at 0x00001000
Warn : using fast async flash loader. This is currently supported
Warn : only with ST-Link and CMSIS-DAP. If you have issues, add
Warn : "set WORKAREASIZE 0" before sourcing nrf51.cfg/nrf52.cfg to disable it
Info : Padding image section 1 at 0x0001afe0 with 32 bytes
Info : Flash write discontinued at 0x00038330, next section at 0x0003ac00
Warn : using fast async flash loader. This is currently supported
Warn : only with ST-Link and CMSIS-DAP. If you have issues, add
Warn : "set WORKAREASIZE 0" before sourcing nrf51.cfg/nrf52.cfg to disable it
Info : Padding image section 3 at 0x0003fa54 with 428 bytes
Warn : using fast async flash loader. This is currently supported
Warn : only with ST-Link and CMSIS-DAP. If you have issues, add
Warn : "set WORKAREASIZE 0" before sourcing nrf51.cfg/nrf52.cfg to disable it
Warn : using fast async flash loader. This is currently supported
Warn : only with ST-Link and CMSIS-DAP. If you have issues, add
Warn : "set WORKAREASIZE 0" before sourcing nrf51.cfg/nrf52.cfg to disable it
wrote 248656 bytes from file sw102-full-0.19.8.hex in 8.864602s (27.393 KiB/s)
verified 248196 bytes in 2.044464s (118.554 KiB/s)
FLASHED
target halted due to debug-request, current mode: Thread
xPSR: 0xc1000000 pc: 0x000006d0 msp: 0x000007c0
shutdown command invoked
C:\TSDZ2\openocd-20190210\OpenOCD-20190210-0.10.0\bin>
I hope that helps anyone with the same issue.
I also disconected the screen cable when flashing as it was easier to solder the programming cable and not put stress on the small screen ribbon cable that way.
geeksville
10 W
- Joined
- Aug 2, 2019
- Messages
- 89
Get it here! https://github.com/OpenSource-EBike-firmware/SW102_LCD_Bluetooth/releases/tag/0.19.9
Hi ya'll,
So this is our first 'end user' release of the OpenSource EBike firmware for SW102. We are looking for brave alpha-testers to try it and report back. We will eagerly fix any problems you encounter and intencipate doing frequent releases for the next few weeks. This alpha is unlikely to break anything on your bike, but it might have bugs or features missing compared to the KT-LCD3 display.
The initial install (mainly getting access to the programming pins) is a bit of a hassle but we've written instructions to make it easier. Every installation after that is very painless via our bluetooth bootloader software-update. Instructions here: https://github.com/OpenSource-EBike-firmware/Color_LCD/wiki/Initial-SW102-firmware-install
Future releases will include release notes, but for now here's a link to our TODO list. If you encounter bugs please open as issue here: https://github.com/OpenSource-EBike-firmware/SW102_LCD_Bluetooth/issues
We look forward to your reports of great success (or failure, ahem) in this thread.
Also: If the display ever encounters a serious bug it will print a special "fault" screen. If this happens to you, please take a picture of that screen and include it with your bug. You can then press the power button and the bike will resume.
geeksville
10 W
- Joined
- Aug 2, 2019
- Messages
- 89
perryscope said:Hi Guys, just wanted to give some feedback on flashing the SW102 under windows and a small issue i had.
Thanks for the feedback. I've added your comments here: https://github.com/OpenSource-EBike-firmware/Color_LCD/wiki/Initial-SW102-firmware-install
And since you got an early start, you probably want to update to the latest appload I just released (0.19.9). We haven't written instructions on how to use the Bluetooth updater yet. But in short:
* Install "nRF Toolbox" from your appstore of choice (Google Play or whatever)
* Download our sw102-otauptdate-xxx.zip file onto your phone (do not unzip)
* Press and hold the M key on the SW102, then press and hold the power button. Keep both buttons pressed down for at least eight seconds. You can then release the buttons. You will know you are in the bootloader if the screen stays dark.
* Run the "nRF Toolbox" app and click on "DFU" (for device firmware upgrade)
* Select our zip file. If it also prompts you to ask what sort of "scope" choose "application only"
* Click on "select device"
* Click on "start upload"
* After the upload completes turn your bike completely off
* Then start your new SW102 load as normal (a long press on the power button)
perryscope
100 W
- Joined
- Jan 6, 2019
- Messages
- 122
casainho said:Here is my way that I think is safe and most easy (yes, I already break 2 units of SW102 before having this idea). If this works for others, maybe we should put on wiki:
I just went to cut a lateral from SW102 so I could solder the 3 wires for STLinkV2. I am not using the 3V3 as I am powering the SW102 from battery -- I think this is better as it is one less wire to solder and it is a bit hard to solder them on SW102.
Did you issues with the buttons after opening via the knife method Casainho?
I found this method for less intrusive that what you are suggesting here? I used a strong knife from a Leatherman mulitool and this allowed me to cut each side with a single cut. Then gently prize the button panel up from the bottom splitting the glue that was only on the underside of the button panel. It came out with very little damage indeed.
I could then completely remove the bottom pcb using a small screwdriver to lift up one edge and disconnect the screen flex to remove it entirely.
I then soldered all four wires from the side which is much easier access.
Flashed and connected back up and unsoldered the wires once confirmed it worked.

did initialy have an issue with the down button having no feedback. It worked but no click but I noticed the rubber sheet on the underside of the button panel was not attached correctly.

I had to make sure the holes were pushed around the plastic holes so when you put it back on it seats correctly. Now it's like new again. No issues.
Also worth checking the plastic on the button panel is not deformed from prying it out...

Mine had a couple of bits or plastic that needed pushing back.
I have not yet glued it but it clicks in place with the plastic pins so other than not being water resistant works perfectly.
casainho
10 GW
- Joined
- Feb 14, 2011
- Messages
- 6,058
I tried to cut but after some time I was afraid to cut myself and ended destructing the keypad.
I think is good to have more than one option and users can choose what they think will work best for them. We can write a wiki page with pictures for each way.
I think is good to have more than one option and users can choose what they think will work best for them. We can write a wiki page with pictures for each way.
perryscope
100 W
- Joined
- Jan 6, 2019
- Messages
- 122
geeksville said:perryscope said:Hi Guys, just wanted to give some feedback on flashing the SW102 under windows and a small issue i had.
Thanks for the feedback. I've added your comments here: https://github.com/OpenSource-EBike-firmware/Color_LCD/wiki/Initial-SW102-firmware-install
And since you got an early start, you probably want to update to the latest appload I just released (0.19.9). We haven't written instructions on how to use the Bluetooth updater yet. But in short:
* Install "nRF Toolbox" from your appstore of choice (Google Play or whatever)
* Download our sw102-otauptdate-xxx.zip file onto your phone (do not unzip)
* Press and hold the M key on the SW102, then press and hold the power button. Keep both buttons pressed down for at least eight seconds. You can then release the buttons. You will know you are in the bootloader if the screen stays dark.
* Run the "nRF Toolbox" app and click on "DFU" (for device firmware upgrade)
* Select our zip file. If it also prompts you to ask what sort of "scope" choose "application only"
* Click on "select device"
* Click on "start upload"
* After the upload completes turn your bike completely off
* Then start your new SW102 load as normal (a long press on the power button)
Thanks Geeksville,
Yes updated to 0.19.9 via Bluetooth using those steps all worked great!
All I would say is it took a few attempts to get the screen into the DFU, would it be somehow possible to indicate on the screen when in DFU rather than being switched off? Not sure if you have any control over this?
It is in theory possible to show a fancy icon on the screen indicating we are in bootloader mode. But because bootloader and application are two independent pieces of software, we have to rewrite the LCD driver for the bootloader. This costs flash space and we want to save that. The bootloader is as dumb as possible to only do its main job.
I put my phone an the bench showing the bluetooth discovery. Then I press&hold the 1st: M 2nd: Power buttons until the SW102_DFU device appears. Now you are perfectly save to let the buttons go.
Greetings
Niklas
I put my phone an the bench showing the bluetooth discovery. Then I press&hold the 1st: M 2nd: Power buttons until the SW102_DFU device appears. Now you are perfectly save to let the buttons go.
Greetings
Niklas
geeksville
10 W
- Joined
- Aug 2, 2019
- Messages
- 89
Yay(?) we have our first bug . Also, this can hopefully serve as a template on how to file bug reports:
https://github.com/OpenSource-EBike-firmware/SW102_LCD_Bluetooth/issues/22
. Also, this can hopefully serve as a template on how to file bug reports:https://github.com/OpenSource-EBike-firmware/SW102_LCD_Bluetooth/issues/22
Updated wiki with new stand alone Windows programmer guide:
https://github.com/OpenSource-EBike-firmware/Color_LCD/wiki/Initial-SW102-firmware-install#stand-alone-programming-for-windows
This hopefully makes first install a bit easier!
Have a great day
Niklas
https://github.com/OpenSource-EBike-firmware/Color_LCD/wiki/Initial-SW102-firmware-install#stand-alone-programming-for-windows
This hopefully makes first install a bit easier!
Have a great day
Niklas
geeksville
10 W
- Joined
- Aug 2, 2019
- Messages
- 89
ooh! bravo!Nick said:Updated wiki with new stand alone Windows programmer guide:
This hopefully makes first install a bit easier!
casainho
10 GW
- Joined
- Feb 14, 2011
- Messages
- 6,058
I wish to take time to look at the full how to install the firmware and reorganize, mainly make sure there are no incorrect references or holes on the process.geeksville said:ooh! bravo!Nick said:Updated wiki with new stand alone Windows programmer guide:
This hopefully makes first install a bit easier!
Geeksville, I think we should get a working version with a nice design, at least on main screen. Why not focus a bit so we can get a version that users can use for next maybe 2 or 3 weeks?
I really don't like much the main screen and I think is a matter to select the write don't sizes and move the variables to correct places.
casainho
10 GW
- Joined
- Feb 14, 2011
- Messages
- 6,058
Isn't that clear on the wiki documentation?shaddi said:got my sw102 working today
is the current version compatible with the latest 0.20 alpha versions of the motor?
Similar threads
- Replies
- 2
- Views
- 622
- Replies
- 10
- Views
- 2,093
- Replies
- 0
- Views
- 633