Bubba’s Build 2 Morphing to Build 3

Joined
May 28, 2008
Messages
718
It is time to be a little safer. I added a 100A fuses to each of my 12S Lipo packs (two 6S zippy packs). The fuses are only rated for 32 volts, so I am pushing them at 48 volts. My thinking is any fuse is better then nothing. When I get the new motor mount constructed, I will be rewiring everything and adding fuses to each of the 6S packs for maximum protection.

I modified some 100 amp FLM/PAL fuses.

Bubba

Fuse1.JPG
Fuse2.JPG
 
Uh, oh. I detect some cool stuff about to happen!

So, how else is this build morphing?

C,mon, spill the beans. I want to know what you are building. :mrgreen:

Matt
 
HEHEHEHEH.

theres a few memebers keeping it under their hats Matt ;)
Miles,Y etc what are you all up to? :twisted:

D
 
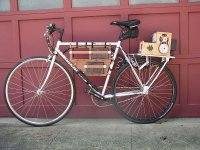
I have moved the batteries into the triangle and removed the shelves from the rack. The open bay is for the electronics that are now housed on the rear of the motor box. Wiring is messy and temporary. My knees will just lightly brush the side of the upper battery from time to time. To fix this I will make the battery narrower and use a thinner material for the horizontal brace. Replacing the colorplast on the sides of the battery with lexan will get me at least an extra 1/8" and facilitate inspecting the lipos for puffing.

Left.jpg
Right.jpg

The braces that connect the rack to the seat stays are not strong enough. Over time they slowly bend letting the front of rack to dip down. I thought that two 1/2" X 1/8" pieces of metal would be strong enough, but I was wrong. At first they were bolted to the rack, but it was slipping, so I left the bolts in place and welded it together. My other concern is that bosses on the seat stays will not hold up in the long run. They are just water bottle bosses set in thin tubing. If I was going to keep this configuration for much longer, I would add another brace going from the front of the rack to the wheel. This would relegate the seat stay bosses to just positioning the motor box.

brace.jpg

I picked up some 3/8" aluminum from a scrap yard for $24. It would nice to use it instead of the 1/2" steel tubing for the bracing to the wheel by cutting a truss like pattern. My problem is that I don't know how to engineer the aluminum brace to be as strong but lighter then a steel one. I can make it look pretty and strong enough, but if it is not lighter then I will stick to steel.

Metal.jpg

Bubba
 
That design defect should have been corrected before I went on another ride. I know I was not planning on doing any full throttle accelerations, but my controller got a mind of its own and went full throttle for me. As I was ridding, the controller would give the motor a little burp ever now and then. All of a sudden the controller gave a full throttle burp. It went from full throttle to dead stop is less then a second. One of the screws stripped out of the seat stay and the rack jammed into the wheel. I got thrown to the pavement and skinned both knees, an elbow, and a shoulder. On reviewing the damage, I saw that the controller was giving 5 flashes, which means bad throttle signal. The throttle signal runs in the same cat 5 cable as some of the display signals, so maybe there is some noise getting on the throttle signal.

Ouch!!!!!!!!!

Bubba

View attachment 2
a fast stop.jpg
a knee.jpg
 
Bubba,

So sorry to hear about your issue today. I hope you heal up quick.

Here is a post of mine from earlier today;


Hey Guys,

I found out an important piece of information regarding switching BECs and RC throttle assemblies;


Both of my bikes have had slight low RPM inconsistancy similar to minor surging. This is at maybe 10% throttle or so and low load if just very slowly putting around. The motor seemed to want to surge a touch (it never really sureged, but had a strange inconsistancy that felt like it wanted to surge forward). This is not an issue on my recumbent because of the slipper clutch and modest wattage. But, on the PK Ripper, it felt like a big block with a high lift cam. It sort of hesitated or slightly surged occasionally when at very low throttle settings. With so much power, it was noticeable. It was not unsafe, but noticeable. Scott (the owner of the PK), mentioned it and said on his other bike he moved the BEC aways from the ESC and servo tester board and it helped. So, I recommended wrapping the BEC in aluminum foil (electrically insulated first) to reduce the RF noise. He just called and said it is 99% cured.

So, a tip for you to obtain the smoothest low throttle response and performance is to wrap your BEC in foil to reduce the RF and any hesitation you may have otherwise encountered.

I will be untilizing this trick on my twist grip throttles I am building.

Matt
 
Definitely put some neosporin on those scrapes. They will heal faster, its worth it.

The flimsy braces that drooped are probably strong enough to handle the front and back rocking. I recommend an added brace on each side around where I drew this red line. I got an aluminum crutch at a thrift store for $2, good tubing.
 
recumpence - I think that I will run the throttle in a separate shielded cable. How close is too close for the BEC and ESC? My BEC is in the large black box and my controller is around the corner giving about 2" of separation as the crow flies.

spinningmagnets - That is exactly what I am going to do.
 
Good idea for the separate cable.

We tried moving the BEC away from the rest of the system and it took over 12 inch of distance to make a noticeable difference. It was very weird. Your setup may be different, though.

I am sorry to hear about your problem. :(

Matt
 
Thanks for the sympathy, but the crash was my own fault. I didn't have enough respect for what 6.5 KW of motor can do. Sure I got hurt and think I cracked a rib, but I am not giving up. The main point is that Bubba has been ridding and having fun. I was 25 miles into a 40 mile ride before I kissed the pavement. Worst case is it will be six weeks before the rib is healed, but I expect to be riding again next week after I make a few mods.

fyi. I get about 25 or so miles on my 12S2P 10AH battery pack with no pedaling. When I just run the motor on the hills, I use about 1AH per 10 miles. If I had the legs, that could be potentially an 80 mile ride assuming that I only discharge to 80%. Top speed is 40mph. This is pretty good for a single speed.

Bubba
 
That looks to be identical to my recumbent. Very cool! I am at 40mph top speed, 25miles maximum range motor only if I am very careful (20 miles if I do not focuss too hard on efficiency). If that is the case, your efficiency is a touch better than my recumbent because you are upright in the breeze and I am laying down. Very nice! :mrgreen:

Matt
 
Sorry to hear about your crash. From my RC experience and being in RC clubs, those RC speed controls would always glitch, surge or do weird things at times. I never trusted them and wouldn't even consider putting one on a bike with me on it. Watch out for kids, people, and lawsuits.
 
So can all electronics. Nothing electronic is immune to glitches.

I understand your concern. However, in over 1000 miles, I have never had a safety issue related to RC controllers except for a flamout I had. But, typical E-bike controllers can do that too. :D

Matt
 
If my rack had been strong enough, I would not have crashed. Murphy's law caused my crash. I knew my rack was not strong enough, but I went riding anyway. I don't blame the controller.

My rack has now been modified to handle anything the motor can throw at it. One of the screws on the seat stays was stripped, so I switched to hose clamp technology. I went from 1/2" X 1/8" flat bar to 1/2" tubing to connect the rack to the seat stays.

Bubba

View attachment 1
P1010872.JPG
 
A safety improvement. I need an emergency cut off so I used some rope with pink in it to draw attention to my rack. I know all the other girls are envious.

Bubba

P1010873.JPG
 
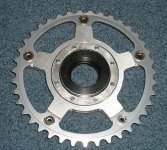
This is a foam prototype of a chainwheel adapter for my south paw freewheel. I will be using only one jack shaft for build 3 and need more reduction then what the 16 tooth south paw can give me. It will allow me to use any 130 mm chainwheel, that doesn't hit the chain stay, on the wheel. It will be cut out of 3/8" aluminum.

Bubba

P1010874.JPG
P1010876.JPG
 
Here is the finished adapter. The only change from the prototype is that I had to flatten the top of the spider arms by 1mm to clear the chain.


Bubba

P1010877.JPG
P1010878.JPG
 
Nice work Bubba!

Did you do that on the homebrew CNC?
 
12p3phPMDC said:
Nice work Bubba!

Did you do that on the homebrew CNC?

Thanks. I used my smaller CNC machine that was designed with cutting aluminum in mind. This piece is the largest that can be done on this machine.

Bubba
 
All joking aside Bubba, you could sell those adapters. If you also made an adapter that accepted the 6-hole disc brake hub to 5-hole BB-sprockets, you could become the Endless Sphere "one stop shop" for left side freewheel sprockets.

The bottom pic is how I used a $2 thrift-store aluminum skillet to put a 47T onto a 20" wheel for a power-trailer. Plus here's a thread about some sprocket adapters http://endless-sphere.com/forums/viewtopic.php?f=28&t=7468

Here's one current weak option for LSD from a chainsaw-bike website (Atomic Zombie):
 

Attachments

  • AtomicZombie_RearDiscAdapter.jpg
    AtomicZombie_RearDiscAdapter.jpg
    37.5 KB · Views: 2,517
  • 47T_skilletSprocket.jpg
    47T_skilletSprocket.jpg
    28 KB · Views: 2,520
Here's the $20 cheap Chinese Left-Side-Drive from "Boygofast". Its for a single-speed bike and its from a chainsaw-bike site. It just bolts through holes drilled through the wide spoke flanges. Its a 44T, but since it doesn't freewheel, it must use a freewheel on the small pinion gear of a jackshaft or motor. Tiny one-way roller-bearings (sometimes called a sprag-clutch, see: Grinhill-drive) can't handle as much torque as the bigger ones, like yours.

So, we must either adapt a freewheel onto the large gear, or use a much bigger pinion-gear (which leads us to use an even larger big sprocket). Its not hard to find a 47T BB sprocket. I imagine a lot of builders would find it useful to adapt an easy-to-find ~47T to an LSD.

Rear disc hubs are getting cheaper and easier to find. Hubs (no spokes or rim) with left-handed threads on the left side that would accept a freewheel like yours are available for $120 from Staton.

Niagra has a rear disc hub for $70, but If I already had a rear-disc bike, it would be worth $50 to adapt a freewheel onto the disc mount rather than pay $120 for a hub that it would just thread onto (plus dis-assembly and re-assembly of the spokes and wheel). A variety of places provide sprockets that bolt up to that freewheel without your adapter.

I don't know if the center hole on the freewheel is big enough to allow room for some type of adapter to connect freewheel-to-discmount,...but I'll bet you've looked at that?
 
spinningmagnets,

I want to keep this a hobby, so I not looking to get into the parts business. I have attached the cad file of the 16 tooth adapter for anyone that wants to have a go at it.

Hubs with right and left handed threads

1. Bicycle-Engines.com This is a steel hub that uses sealed bearings. It comes with a left hand freewheel and drilled for 13 gauge spokes. The good thing is that you could use it with an 8 speed and make an indestructible wheel. The bad thing is the freewheel threads is larger then normal.

2. evdeals.com The Currie USPD is a aluminum hub that uses 14 gauge spokes. This hub does not use sealed bearings. This means that the axle is smaller and I found that it was too weak for an 8 speed freewheel. It works great as a single speed and would most likely work well for 5 or 6. 7 speeds maybe.

3. Staton This look to be a very good hub. It uses sealed bearing, comes in several spoke hole patterns, and can handle an 8 speed freewheel.

4. There are some BMX hubs out there, but they tended to be pricey.

I don't see a way of making a freewheel adapter for a disk hub, because the bolt holes are on a 44 mm circle (~1 3/4") and the freewheel has 1 /3/8" threads.

Bubba
 
Thanks Bubba, you just saved me a lot of searching. They didn't look like it would work, but you never know. The Staton wheel is stout and has 4 sealed bearings, and has left-handed threads (LHT) on the left side. Does ENO have a freewheel with left-handed threads (or must I settle for a loud and cheap freewheel for a left-side-drive)?
 
Back
Top