spinningmagnets
100 TW
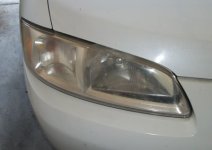
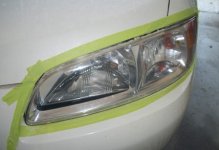
I've seen enough before/after advertisements to be skeptical, but I must say I am pleased with the results of the 3M kit my wife bugged me to get.
http://www.superiorcarcare.net/3m-headlight-kit.html

It requires a cordless drill, and the kit includes the foam-backed rotary sanding/polishing bit that attaches the various polishing discs with velcro. I got a radio, 6-pack of beer, hand sponge, and a 5-gallon bucket filled to the brim with water...and a short seat. I'd allow 15 minutes per lens.
Tape around the headlight to cover the body paint (enough tape is included to do two cars). No matter how hard you try, you will remove some paint if you don't do this.
Its a 4-stage process, and don't freak out on the first stage...its where you actually sand off the top layer of plastic, so it will look worse before it looks better. I angled the drill slightly and used the trailing edge to touch the lens as I went back and forth. It took me 4 passes to cover the whole lens once, and after every two passes, I dipped the disc in water to keep everything wet. Move slowly across the lens with very light pressure, but...always be moving, don't sand in one place too long.
After covering the entire lens about 3 times (your lens may be worse than mine, 3 did it for me) you can tell this stage is done when the yellowing is gone, and the fine scratches you are leaving on the lens are all evenly spread out in a easy-to-see pattern, it will look frosty. The plastic you are removing will form a white sludge, wipe it off occasionally with the sponge and water, so you can see the evolving results.
The next stage is a very fine sandpaper that is noticably finer than the first, and you can tell when that stage is done when the pattern of fine scratches looks like the newer and smaller scratches, and the bigger scratch pattern is gone.
Third stage, repeat with the finest sandpaper discs, keep everything wet throughout the entire process of every stage...
Final stage is a round sponge disc, and you apply the "rubbing compound" to it (provided in a foil packet), repeat pattern until it stops getting clearer. There are enough supplies included to do two cars (minus bucket, seat, beer, radio, cordless drill etc).
View attachment 2


http://www.superiorcarcare.net/3m-headlight-kit.html
It requires a cordless drill, and the kit includes the foam-backed rotary sanding/polishing bit that attaches the various polishing discs with velcro. I got a radio, 6-pack of beer, hand sponge, and a 5-gallon bucket filled to the brim with water...and a short seat. I'd allow 15 minutes per lens.
Tape around the headlight to cover the body paint (enough tape is included to do two cars). No matter how hard you try, you will remove some paint if you don't do this.
Its a 4-stage process, and don't freak out on the first stage...its where you actually sand off the top layer of plastic, so it will look worse before it looks better. I angled the drill slightly and used the trailing edge to touch the lens as I went back and forth. It took me 4 passes to cover the whole lens once, and after every two passes, I dipped the disc in water to keep everything wet. Move slowly across the lens with very light pressure, but...always be moving, don't sand in one place too long.
After covering the entire lens about 3 times (your lens may be worse than mine, 3 did it for me) you can tell this stage is done when the yellowing is gone, and the fine scratches you are leaving on the lens are all evenly spread out in a easy-to-see pattern, it will look frosty. The plastic you are removing will form a white sludge, wipe it off occasionally with the sponge and water, so you can see the evolving results.
The next stage is a very fine sandpaper that is noticably finer than the first, and you can tell when that stage is done when the pattern of fine scratches looks like the newer and smaller scratches, and the bigger scratch pattern is gone.
Third stage, repeat with the finest sandpaper discs, keep everything wet throughout the entire process of every stage...
Final stage is a round sponge disc, and you apply the "rubbing compound" to it (provided in a foil packet), repeat pattern until it stops getting clearer. There are enough supplies included to do two cars (minus bucket, seat, beer, radio, cordless drill etc).
View attachment 2


