
You are using an out of date browser. It may not display this or other websites correctly.
You should upgrade or use an alternative browser.
You should upgrade or use an alternative browser.
DH Fork Hub Motor Custom Adapter: Safe?
- Thread starter shenzhen_ex
- Start date

Drunkskunk
100 GW
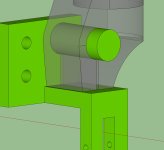
Those purple parts need something to to secure them better. Between acceleration and braking, they will be constantly going back and forth between tension and compression. Those straps can help under braking, when they are being pulled away, but won't help under compression, where the purple parts will try to slip around the tube.
I also see potential for all kinds of stress cracks in the forks if you ride this like a DH. Is there a reason you aren't going with a rear motor?
You should check out Justin's thread on his trip to makers fair. There is a section where he reveals a prototype motor they are working on for 20mm through axles. That would work far better
shenzhen_ex
100 W
WOW! My first reply. Thanks!
I am building a 2wd.
The clamps i am planning to use should be stronger than the ones in the model:
View attachment 1
I was hoping that the green bracket alone would prevent rotation, and purple arms would be for added measure.

I won't be doing any DH, but curbs will be jumped.
I am building a 2wd.
The clamps i am planning to use should be stronger than the ones in the model:
View attachment 1
I was hoping that the green bracket alone would prevent rotation, and purple arms would be for added measure.
I won't be doing any DH, but curbs will be jumped.
Attachments
Kingfish
100 MW
I think your design is over-engineered. Look at what you are doing:
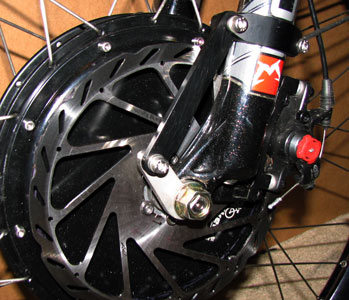
I designed my own custom TA using 4 unique parts - which upon reflection could have been simplified. Still, it has worked flawlessly. The fork can support either rim or disc brake, and is still pretty tall, especially with that 26" wheel. The DH fork that I originally wanted was yet another 3 inches taller; if that was mounted I'd need a ladder to jump onto the saddle
Unless you have daddy-longlegs, I'd try to find a suitable fork and use something a bit less complicated")
Best, KF
- The DH fork is already a very tall beast. You are adding even more height to it.
- The bottom registration at the hole is fine, but you only need the strap at the top; do not bother with the middle straps. In fact - I would not use straps at all, but instead a bolt-on clamp.
- In short: I would try to make all one piece, with a precision bolt for the 20mm hole, and a U-Bolt clamp of sorts at the top.
I designed my own custom TA using 4 unique parts - which upon reflection could have been simplified. Still, it has worked flawlessly. The fork can support either rim or disc brake, and is still pretty tall, especially with that 26" wheel. The DH fork that I originally wanted was yet another 3 inches taller; if that was mounted I'd need a ladder to jump onto the saddle
Unless you have daddy-longlegs, I'd try to find a suitable fork and use something a bit less complicated
Best, KF
iamsofunny
100 W
- Joined
- Apr 30, 2012
- Messages
- 178
Best to put the motor on the rear wheel
shenzhen_ex
100 W
iamsofunny said:Best to put the motor on the rear wheel
I will have a motor in the back as well. That will also require custom adapters. I am going to break the fabrication up into 4 steps.
(1) front hub adapters.
(2) rear hub adapters.
(3) controllers mounting
(4) battery mounting.
Below are my 2 motors: 48V 500W each

John in CR
100 TW
Instead of Frankenconnection why not make 2 threaded sleeve with ID to fit motor and outside to fit 20mm axle connection to fork? You'll need triple clamp forks obviously to put motor axle through fork axle holes and thread on these new "nuts" on the motor axle. Then your motor is well attached and only needs good torque arms to keep it from spinning....Lighter and far better.
shenzhen_ex
100 W
John in CR said:Instead of Frankenconnection why not make 2 threaded sleeve with ID to fit motor and outside to fit 20mm axle connection to fork? You'll need triple clamp forks obviously to put motor axle through fork axle holes and thread on these new "nuts" on the motor axle. Then your motor is well attached and only needs good torque arms to keep it from spinning....Lighter and far better.
I already have my forks. They have a cross brace so i can't separate the 2 fork stanchions.
In the image below you can see the cross brace.

Currently my dropouts only have a 2mm opening from the bottom (see image below).

To do what you recommend with the axle adapters i would need to widen the dropout opening on the fork just to get the 10mm hub axle in place.
I did not want to machine the magnesium fork dropouts and weaken them. I am also worried about the chatter the cutter will make while milling the dropout.
Below you can see the material i will need to remove from my dropouts just to get the motor axle into the 20mm hole.
Thanks for your help.
John in CR
100 TW
shenzhen_ex said:To do what you recommend with the axle adapters i would need to widen the dropout opening on the fork just to get the 10mm hub axle in place.
Think laterally. No need to modify the fork. Simply cut the axle only as short as necessary to get it into the holes in the fork. Then the interior threaded adapters screw onto the axle all the way to the hip. Both will provide sufficient support as axle extensions. The one on the right side can bear all of the twisting force, because that force will be to screw the "nut" tighter, but it's already at its limit. You wouldn't be able to use regen on the front is all, because that would act to unscrew that side. Then your torque arm connects to that right side adapter and can run up the inside of the fork on that side where there's space since the brake disc is on the other side....relatively simple and very clean. I can't believe no one has done it yet.
dogman dan
1 PW
Those aren't monster motors. Can't you find a "normal" fork that performs good enough for your needs? Then just use two good torque arms with them.
Or, just make the blue part in your drawing into a pinching dropout. You'd need to notch the forks to get them into the hole. Then they have a value of zero for resale though.
So sell them now, and get some regular dropout forks that don't suck.
Or, just make the blue part in your drawing into a pinching dropout. You'd need to notch the forks to get them into the hole. Then they have a value of zero for resale though.
So sell them now, and get some regular dropout forks that don't suck.
shenzhen_ex
100 W
I really need long travel forks to go with my 220mm travel frame, so "normal" forks were not considered.dogman said:Can't you find a "normal" fork that performs good enough for your needs?
Here in China, resale value for an e-bike does not enter into the build planning.dogman said:You'd need to notch the forks to get them into the hole. Then they have a value of zero for resale though.
dogman dan
1 PW
Notch em then. Fabricate a spacer washer to fill the hole, so the nut on the axle pinches in on the motor's axle shoulder, not flexing the forks inward.
Keep the axle located in the same spot as before for sure. relocating it below is not a good idea. That changes your fork rake too much.
220 mm travel should be available in other good forks though. I just meant normal dropouts, not cheap 100 mm travel forks.
Keep the axle located in the same spot as before for sure. relocating it below is not a good idea. That changes your fork rake too much.
220 mm travel should be available in other good forks though. I just meant normal dropouts, not cheap 100 mm travel forks.
shenzhen_ex
100 W
John in CR said:Simply cut the axle only as short as necessary to get it into the holes in the fork.
I like that idea. That will leave 10-12 mm on each side.
How can I cut the axle without damaging the wires? I already spent an hour in this forum looking for an answer, i'm sure it is in here somewhere.
shenzhen_ex
100 W
Kingfish said:I think your design is over-engineered.
Thanks for the constructive criticism, I probably over engineer everything i design.
With your help, and that from John in CR, here is what i have come up with:
- Cut the axles leaving 12mm per side (still working on how to keep from cutting the wires in the process).
- Fabricate 20mm O.D. extensions that thread on to the remaining 12mm length axles.
- Fabricate a one piece torque arm w/ clamp.
btw, 24"rims on this build!
John in CR
100 TW
There you go, but hide the green part parallel with the fork lowers and bring the tab to the front at the greatest distance from center of the axle instead of so close, so the forces are much lower and thinner lighter material is used. Use thick only in the area of torque arm's clamp to your adapter.
If the wiring harness is fairly loose in the axle, then the phase wires need replacing anyway with a thicker gauge. Just pop the cover off and snip the wires inside the motor leaving enough to make reconnection color on color easier. I'm sure I could cut one with the wiring in place without damage using a dremel with a cutting disc and cutting intermittently so it doesn't get hot and melt the insulation I'm trying not to cut. The problem with doing it in place is the sharp interior edge left behind. A re-harness job is relatively simple, many times easier than the contraption you were planning to build at first.
Hint: On your wire side 20mm axle adapter extend the piece somewhat beyond the fork, so you can make a channel for the wiring harness for both a clean look and to protect the wiring harness in case the bike gets laid down or knocked over.
Find out the different diameters and threads on common motors and make a bunch of them to sell once you work out the kinks on your own set. They are a needed item that will sell. Proper motor attachment to quality forks is non-existent and needed.
John
shenzhen_ex
100 W
John in CR said:Use thick only in the area of torque arm's clamp to your adapter.
The torque arm does not engage with the flats on the axle? Instead it clamps to the 20mm OD adapter? I did not get that at first.Since the adapter needs to slip in from the outside,the torque arm engagement features will have to remove steel. Since there is only 12 mm of axle length in the adapter i would not want to weaken it too much. Maybe the adapter on the torque arm side needs to be hardened.
Below are flats added to the adapter on to engage with a torque arm.
Man... this forum is helpful. Thanks a million John in CR
Attachments

John in CR
100 TW
shenzhen_ex said:John in CR said:Use thick only in the area of torque arm's clamp to your adapter.
I'd make the adapter screw all the way to the limit on the axle. The force of rotation is opposite the direction of tire rotation, so it will try to make it tighten. That way you get the most axle adapter sleeve on the axle. That allows flats on the adapter at a larger distance from center and can cut the force on the torque arm by probably a third.
Another option would be to give the adapter a large flat head, like a large bolt with thread for the axle on the inside. Tap some bolt holes in the "head", and you can then use a relatively thin flat steel as your arm that is secured a few inches up. Maybe bend a curve into it to fit the fork and paint to match and it would look like it is just part of the bike with easy access. Use the disc brake bolts to secure it, so a tool you already carry can remove it for tire repair.
shenzhen_ex
100 W
John in CR said:Another option would be to give the adapter a large flat head,
I don't understand the "large flat head" option. I believe the adapters needs to be installed from outboard of the dropout so anything larger than the 20mm dia will not fit. the adapter can't be installed from inside the fork because then the hub axles won't fit.
I like your initial suggestion (or at least as i understand it and modeled it below).
Will the hub motor cover come off without a gear puller tool?
will I be able to pull the wires out of the axle and push them back through after cutting the axle?
Attachments

John in CR
100 TW
That looks good on the wire side....great protection for the harness, though have it enter from below (cut the groove after you see where to put it with the adapter all the way screwed on. From below is so the wire forms a drip loop and doesn't act like a channel for water to follow directly into the motor.
On the other side I was thinking of a head outside of the fork, and the head is larger diameter than 20mm with some tapped bolt holes for the "arm", just flat steel to connect with bolts. The larger radius from center will allow much thinner material to be sufficiently strong.
Either way you'll have the best connection of a motor to a good fork around.
John
Kingfish
100 MW
I am not convinced the last CAD dwg with the TA on the inside will work out; not enough material for capture & keying, maybe 8 mm per side. But then you're not slotting the fork, so perhaps that's worth exploring.
As for fork slotting, I cannot fathom a practical way to mount a hub motor to a DH fork without compromising it. That's why I didn't do it. :|
But let's say we did; what would be the result? Putting my thinking cap on and using the Marzocchi RC3 EVO 888 Bomber with a 9C Front Hub as a guide, I evaluated the "what if's" and came up with a list of challenges.
I just hate to see the fork slotted out.
Empty cup, KF
As for fork slotting, I cannot fathom a practical way to mount a hub motor to a DH fork without compromising it. That's why I didn't do it. :|
But let's say we did; what would be the result? Putting my thinking cap on and using the Marzocchi RC3 EVO 888 Bomber with a 9C Front Hub as a guide, I evaluated the "what if's" and came up with a list of challenges.
- There is no obvious method of mounting the two together. The easiest route is to notch the Fork interface to have a 10mm slot. This would allow direct mating with the axle.
- However, the through hole on my DH fork is 20 mm, therefore we need an adapter, possibly slotted on one side. The adapter accepts the 14mm diameter x 10mm slotted axle and about 30 mm in length. These are inserted after the hub axle is slid into place.
- We still need washers on the inside take up play between the motor and fork.
- There could be a clearance problem with the disc brake standoffs and the hub cover on the brake side.
- On my fork, bolts used to clamp the axle are threaded into steel inserts that are press-fitted into the bottom side. If I slotted the fork ends as suggested, these inserts would be trashed. However there's enough material for an external threading system - maybe threaded bar stock to make up for material removed. Let's say I work this all out and continue...
- Rechecking the dimensions, the front hub axle is too short to extend out past the fork width; it's buried!
- An alternative is to key the adapter above so it sticks out, or perhaps it is designed to slide into the fork slot so that it is registered. It might be slotted in itself to allow clamping pressure to pass through to the hub axle. If the part that stuck out beyond the fork width could be knurled, or have a geometric shape that is captured by the actual Torque Arm, then we're in business and it's a matter of locking down the level end.
I just hate to see the fork slotted out.
Empty cup, KF
John in CR
100 TW
KF,
You should sue your school, because this is grade school simple for an ME. Shenzen_ex gets it even without any visual aides from me. There's no change needed in the fork itself whatsoever. The 20mm circular clamps will only hold the motor wheel on, not resist the motor torque. They probably could handle the torque with a small mod for a key, but not worth the risk. Even coaster brakes on kids bikes have torque arms, so this is definitely worthy of an arm. Due to the lack of extra material thickness I think it's best to mount the arm from the outside, thus my suggestion for the adapter to have a head, say 35-40mm in diameter, so they look like bolts with a smooth outside and threads to fit the axle on the inside, actually like a giant spoke nipple nipple with a smooth 20mm OD.
Screw the adapter all the way down to the shoulder/hip where the threads end, and the right side adapter will take the motor torque. You'd have to do the same on the wire side and add an arm there to handle regen torque for a DD. The fork's clamps hold the adapters and therefore the wheel on, and the arm(s) attached to the adapters handle the motor torque and divide that force many fold by moving it several inches from the axle center instead of at 5mm.
The reason I know it's simple and will work is because I did it 5 years ago with my first hubbie when the lack of proper torque arms stripped off most of my threading. My adapters went into steel dropouts that I modded to 17mm at the flats if I recall correctly. That motor still works just fine with the long set of threads on the right side adapter bearing all of the motor torque despite much of the axle thread being compromised.
John
Kingfish
100 MW
John, if you've done it before - show us the beef; I want to see it. Don't insult me. Just show us what you are talking about. Because from my perspective with a DH fork in front of me and a nice shiny 9C FH, I cannot see how you are going to mount it without cutting off the axles, and that doesn't leave a lot of room for clamping.
~KF
~KF
John in CR
100 TW
KF,
I insulted your school, not you. You insulted yourself by saying you can't figure it out. Last hint, nothing would clamp to the motor axle. Torque for forward motion would be borne by the longish set of threads on the right side, and regen torque by the threads on the left. That would then transfer to the forks via the torque arms which attach to the adapters.
I don't have the motor anymore, and the adapter sleeves went with it, so the idea is all the beef you get...or should need.
Kingfish
100 MW
Well with no proof and disparaging attitude - then I would discourage the OP from following that advice: Caveat emptor
There are better ways to solve the problem. I would have stopped at "using the DH fork" because you have to cut something to make it work (or do an add-on extension). A traditional suspension fork with plenty of travel can be found online. I did, it cost less money, I've been using it, and countless have seen it for real.
As long as we're talking about shock ideas...
An interesting alternative is to use light motorcycle shocks that have full bottom-clamping; one side comes off completely allowing the long axle to spoon into the opposite-side socket for capture. I like that kind of setup, plus - if you find the wholesaler then you could fab a custom bottom-end to suit. I would love to find a bicycle DH folk that had a setup like that. If it existed - we wouldn't be having this conversation.
~KF
shenzhen_ex
100 W
i will not be running regen, so i think 1 torque arm on the non-disk side is enough.
BLUE and GREEN=Aluminum
ORANGE= P20 Steel
Wire protection not yet modeled

BLUE and GREEN=Aluminum
ORANGE= P20 Steel
Wire protection not yet modeled
Similar threads
- Replies
- 21
- Views
- 273
- Replies
- 0
- Views
- 93
- Replies
- 0
- Views
- 530