Did I just smoke my controller?

hj2095

10 mW
Joined
Nov 4, 2014
Messages
33
Hi,
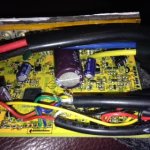
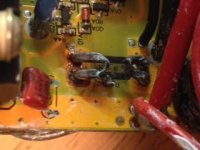
a bit bummed here. I've had my ebike (Pheonix 2 brute 72v moter kit) for about 5 months and have loved every minute of it. Yesterday I did something pretty stupid. While being inattentive, I accidentally very briefly hooked up my charger to one of the connectors going to the controller and got a big spark with smoke (fried the deans connector going to the controller). Now, when I connect the battery to the controller (ever so briefly), I get smoke appearing to come from inside the controller itself. No power to the console. Is it toast? If so, is there another controller (cheaper) that will work with this motor kit that anyone knows of? Or, is it worth trying to open up/repair? Let me know what you think.

Thanks,
HJ
 
Open her up! be mindful of any capacitors that can discharge giving you a big shock tho?
electonics people should be able to help with pictures and more info.

I recently fried a charger and upon examination believe it can be fixed with a little newb soldering of a new cheap little capacitor. If not, wth did I lose, $4?

I'm not familar with that bike or I'd offer info on replacement controllers too, but a little research should show a replacement for whatever it is, should you not be up to repairing it. brushed/brushless, ca/non ca, voltage, amperage, should be the main specs to look 4.
 
It will be good to open up, even if it ends up only a bit a of learning experience. To prevent shocks or capacitor discharges, I always use a resistor to drain any energy from the controller after disconnecting it and before opening. Just hold it across the controller's battery mains, and then connect the mains together until you put it back together.

A lesson I hope you take from this even if the controller is dead is to use battery charger connectors that don't fit anything else and can't be connected with incorrect polarity (another common and costly mistake).
 
Mosfets are one-way transistors and putting a current on the wrong side will fry 'em for sure, which it sounds like you did. Happens too with a spin-out that frays the phase wires and reverses the current momentarily. Often its only one or a couple of fets, which can be had from electronics part stores and replaced. There are threads here at ES dedicated to that. ES'ers sometimes take a good controller and make it better by replacing all the fets with higher capacity ones, so there are instructions available.
 
if you will open up your controller and take pictures of the insides then we can tell you where and what to test to determine what you did to damage it. if you are still around.
 
Thanks. I'll take it off the bike, open it up, and upload pics tonight. Thanks all for the help.

Hj
 
wasnt able to get the controller off tonight. I'll get it off after work tomorrow. Thanks again.

HJ
 
ok, here's the controller open the large capacitors seem to be buldging alot no char or burn that I can tell on the board

let me know what you think

thanks

HJ
 

Attachments

  • IMG_2267.JPG
    IMG_2267.JPG
    27.7 KB · Views: 2,533
  • IMG_2269 (2).JPG
    IMG_2269 (2).JPG
    33.6 KB · Views: 2,532
  • IMG_2270.JPG
    IMG_2270.JPG
    32.9 KB · Views: 2,533
  • IMG_2271.JPG
    IMG_2271.JPG
    20.6 KB · Views: 2,532
Those caps are toast and need to be replaced; it's easy.


There is info on how to test the FETs in various other controller repair threads. May also be in the wiki, and on the Grin Tech website.
 
looks like he reversed polarity on the input power. i suspect the shunt wire is burned open too like the others.

you will need to use a diode tester on your voltmeter to test the mosfets also in case they were damaged by the current surge through the body diodes.
 
John, thanks for your input. I have a question though, you mentioned using battery charger connections that wont fit anything else:

"A lesson I hope you take from this even if the controller is dead is to use battery charger connectors that don't fit anything else and can't be connected with incorrect polarity (another common and costly mistake)."

my question is, if the battery charger has to connect to the battery, and the battery has to connect to the controller through a harness, by definition dont they have to be the same? How can I make it so that the battery charger connector wont fit the controller harness connector. If there's another way, could you be more specific. I'll definitely look into it.

Thanks again,
HJ
 
hj2095 said:
my question is, if the battery charger has to connect to the battery, and the battery has to connect to the controller through a harness, by definition dont they have to be the same? How can I make it so that the battery charger connector wont fit the controller harness connector. If there's another way, could you be more specific. I'll definitely look into it.
Suppose you have one of those batteries where discharge and charge is done through the same leads and you have Deans connectors on it. You could put Andersons, for example, as the only connectors on the charger outputs and then add Andersons taps onto the battery leads along with the Deans that are already there.
 
Assuming the battery has only one connector for charge and discharge, simply add a parallel connector of a different kind or different keying on it for charger only, and change the charger connector to match that.

If the battery already has separate charge and discharge connectors just make sure you key them differently or use different connector types, or else don't disconnect the controller and just plug in to charge when you need to.
 
ok, I finally did get the capacitors changed out, and low and behold, the display unit does come on. However, when I hit the throttle there's no response of the motor. Made sure that the throttle cable is plugged in, and all the other cables are plugged in. The remainder of the controller board looks pretty good, no signs of char or blown capacitors. When this originally happened, the motor never smoked and the cables to the motor appear normal. So the display LCD works now, but no power to the motor. I feel I'm so close. Any suggestions?

Thanks,

HJ
 
I'm not sure how to do that. Any suggestions on where I can go to find out what they look like?
 
use the diode tester on your DVM. the mosfets are between the phase wires and the B+ and P- leads. test them by measuring the body diode in the mosfet between the source and drain legs of the mosfet. put the red probe on the B+ lead to the controller, and the black on each of the phase wires. they should be open circuit. then put the black probe on the P- lead of the controller and use the red probe and measure each of the phase wires. they should all be open circuit. then do just the opposite. put the black probe on B+ lead of the controller and use the red probe on each of the phase wires. you should see the forward bias of the body diode. then put the red probe on the P- lead and use the black probe on each of the phase wires and you should see the forward bias of the body diode of the loside mosfets then. all the forward bias voltages should be identical.

if any of the measurement show a short then the mosfet is dead.
 
I really appreciate that instruction. Real noob quesiton here, on these pics, can you tell me where the mosfets are?
 

Attachments

  • IMG_2768.JPG
    IMG_2768.JPG
    26.1 KB · Views: 2,366
  • IMG_2769.JPG
    IMG_2769.JPG
    24.6 KB · Views: 2,366
  • IMG_2771.JPG
    IMG_2771.JPG
    24 KB · Views: 2,366
  • IMG_2772.JPG
    IMG_2772.JPG
    22.8 KB · Views: 2,366
The black square things with the screws through them are mosfets. They have legs soldered to the board that are the places dnmun is telling you to test with the diode tester. Whoops, I just read his instructions and he is telling you to test the phase wires and power wires. This is new to me.
otherDoc
 
how interesting. so I can test them while they're soldered to the board?, or do I have to take them out?
 
I believe dnmun gave you a way to test them in place.
otherDoc
 
Hi again, he mystery continues. Upon closer inspection of my board, there is an area that looks burned out, but I'm not sure what this would be. Here is a pic of the area, you can see the burn near the left side. Almost looks like something was here and its not anymore. Any ideas?
Thanks,

H
 

Attachments

  • burned.jpg
    burned.jpg
    18.1 KB · Views: 2,305
Closer pics
 

Attachments

  • image.jpg
    image.jpg
    16.7 KB · Views: 2,300
  • image.jpg
    image.jpg
    16.6 KB · Views: 2,299
Back
Top