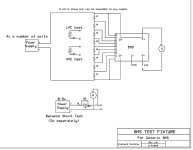
Here is a way to test a BMS board without using a pack. The circuit simulates the pack voltage for each cell channel to enable the output and allows testing each channel for various fault conditions. You need a power supply that can produce pack voltage or at least 4v times the number of series cells, a power supply that is variable from 0-5v, and a bunch of resistors, a terminal block and a digital voltmeter.

The drawing shows the setup for a 8 series pack, but can be made for any number of cells by extending the chain. In the basic condition, the power supply is adjusted to about 4v per series cell and applied to the resistor divider which will put about 4v to each cell channel, which should be in the healthy range for the voltage detectors and enable the P- output, which can be measured with your voltmeter.
First test is to use your voltmeter and measure across each cell channel to verify they are somewhere between 3v -4v. A channel that reads low indicates something on the channel is shorted (this is the most common failure mode).
To simulate a low battery condition, a 1.5v battery can be attached to each cell channel to verify this causes the output to drop. A variable power supply with a 1k resistor across the output can be used instead if you want to measure the exact trigger point. If using a 1.5v battery, be extra careful to observe proper polarity as reversing it may blow the channel. Placing a 100 ohm resistor in series with the battery (optional) will protect against most misconnections.
Likewise, applying 4.5v (3 of the 1.5v batteries in series) should trigger HVC and cause the charge control to turn off. Since we aren't using a charger, the voltage measured on the C- port will not change by much when it triggers. There will only be a slight drop of about 0.3v from the normal reading. Alternately, you can put the voltmeter across the two outer legs of the charge control FET on the board and get a much more noticeable reading. When it goes to zero, the charge port is off. Again, if you use a variable supply for this, you can measure the exact HVC setting.
Measuring the balance shunts is a little tricky, but using the circuit shown has been proven to work. This test is done with the other fixture disconnected and simply placed on each channel one at a time. Voltage is slowly increased until you see the LED blink. The blink will be pretty short and typically about once per second. If you adjust the voltage unit it just barely starts blinking, this will be the balance voltage.
Instead of a variable 5v supply, it may work to use a 5v fixed supply (phone charger) and 1k potentiometer set up as a voltage divider to vary the output.

