EV Hauler

TylerDurden

100 GW
Joined
Jan 4, 2007
Messages
7,176
Location
Wear the fox hat.
Well, until we can find opportunity-charging locations across the country, we may need to take our EVs further than they can travel on their own.

I have been towing my EVs on flatbed trailers behind my van, but the trailers have had some issues which I have tried to resolve:
They have been heavier than needed.
They have been single-axle.
The lightweight tandem-axle trailers on the market have been big & heavy and big-bucks (relatively speaking).

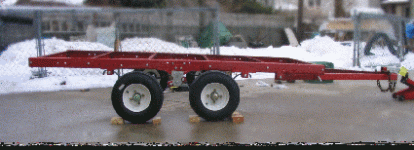
I modified a trailer... well, two trailers actually, to make an affordable lightweight tandem. It ain't perfect, but it's moving in the right direction.

I bought two of these 4'x8' weenies from Harbor Fright:
View attachment 9 http://www.harborfreight.com/cpi/ctaf/displayitem.taf?Itemnumber=42709

I had married two of these together before, with fixed axles... similar to trailers used to carry snowmobiles. That trailer gave it's life to protect my Commutacar and my sorry-butt in a recent highway crash. This time I wanted to try having the axles joined with an equalizer, to keep the weight distributed evenly regardless of the pitch of the trailer. To make it even more of a challenge, I intended to make the trailer using common tools and as little additional material as possible.

To add an axle, meant eliminating the folding feature of the trailer. No biggie. It would also mean come creative cutting and shaping of some pieces...

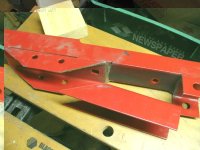
I cut the original spring-hanger/folding-brace to get the steel for the equalizers, leaving the center for the pivot mount:
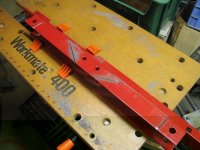
IMG_3250_sm.jpgCutting the sides first, then grinding the welds without chewing into the workpieces, then cutting across to free the channel.
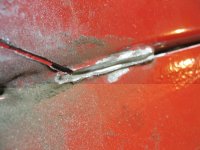
IMG_3252_sm.jpgView attachment 6IMG_3257_sm.jpg
Then I cut the angle into sections that can be bolted to the frame-rails. The channel will be the equalizers.
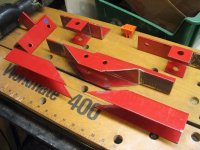
IMG_3258_sm.jpg
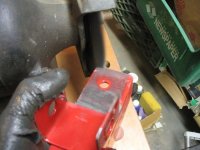
I drilled the pieces for 3/8" hardware (supplied in the kits). I figured it might also be good to smooth the pieces, to reduce sharp corners and edges:
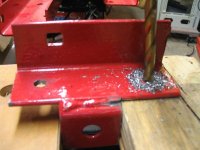
IMG_3260_sm.jpgView attachment 2IMG_3262_sm.jpg

I flattened the fender supports with a BFH. They are heavier steel.
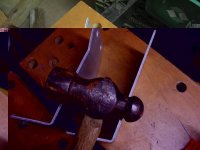
IMG_3263_sm.jpg

more on the way...
 
...continuing:

The original spring hangers have 5/8" area around the holes, I'll try to match that for the equalizer holes.
IMG_3265_sm.jpgIMG_3268_sm.jpgIMG_3267_sm.jpg
The pivot mounts get clamped tightly for drilling, as they help keep the frame-rails from flexing at the butt-joint (where the original design would fold for storage).
IMG_3269_sm.jpgIMG_3270_sm.jpg

The pivot plate gets cut to accommodate the 1/2" bolts:
 

Attachments

  • IMG_3272_sm.jpg
    IMG_3272_sm.jpg
    54.2 KB · Views: 3,124
The wreck... we won, sort of.

...Continuing...

A test to check the action before proceeding further:
equalizer1sm.gif

The action looks ok, so remaining plates are cut and smoothed.
IMG_3284_sm.jpg

The smaller angle-iron for the eliminated rolling-stand provides material to further re-inforce the middle of the frame-rail. I ground-down the outside corner for a snug fit:
IMG_3286_sm.jpg
IMG_3288_sm.jpg

A warm(ish) February day and the assembly continues:
IMG_3289_sm.jpg

The rails come out of the shop:
IMG_3290_sm.jpg

The back axle is bolted loosely in place, then the front. The crossrails are positioned for bolting. The frame is squared before tightening.
IMG_3292_sm.jpgIMG_3294_sm.jpgIMG_3295_sm.jpg

When I put the new tongue and latch on, I used my older, heavier safety chains. They kept the previous trailer connected in the wreck, preventing a runaway.

More coming...
 

Attachments

  • IMG_3296_sm.jpg
    IMG_3296_sm.jpg
    61 KB · Views: 3,089
...continuing...

Well, almost done... another action check:
IMG_3297sm.gif

I finished it with the included light-kit and a 3/4" pressure-treated plywood deck.

It seems pretty stable on the road. I towed it for a hundred miles with a stove and fridge on it... it seems fine. The best parts are: the fact it tracks on all four when the towing vehicle bounces, and the axles go over bumps like a walking-beam suspension... it doesn't pop the trailer like a single axle would when you hit a bump.

(More pix when weather permits.)

Cheers.

:mrgreen:
 
I never thought trailers could be this interesting. I'll have to go over this again in the morning when my brain's a little fresher, but it looks like a really nice job there, TD.
 
Well done! Nice work on the suspension :D.

Wish I had a workshop like you do...
 
Bravo, a well thought out project with what appear to be excellent results. Bear in mind that Harbor Freight (I am a fan of Harbor Freight) can sell these so inexpensively for several reasons and one of them is the wheel bearings. Good high speed bearings tend to be relatively expensive and most the manufacturers of most light weight trailers try to sell their product for as little as possible and still make a profit. Tires and bearings are two easy ways for them to save money.

We have all seen boats and other light weight trailers broken down on the side of the highway. It's not just the weight that causes bearing failure, it is lack of lubrication and it is amazing how much grease it takes to keep them lubricated. Fifty or sixty miles an hour behind a vehicle with these little tires generates a tremendous amount of heat which in turns melts the grease and manages to have it leak out of spots that seem impossible. Frequent shots of fresh grease with an inexpensive Harbor Freight grease gun can and will save a bunch of aggravation later.

Mike
 
Hi all, thank you for the comments!

Mike is quite right: the quality of the components is not exactly award-winning and regular inspection is always a good idea. As is regular maintenance & lube.

The critical area is the equalizer: the pivot is under constant load and action. The pivot bolt will wear, as will the holes. I'm pretty sure I'll not be able to find a "common-tool" solution and get out the torch to install bushings and wet-bolts.

The other issue is vibration. A bolted kit has additional space in the holes that vibration can easily make components shift around. The spring hangers/perches and other pieces could be easily brazed or tack-welded to eliminate the shifting in the shear-planes.

I feel a lot more secure having the redundancy of two axles if a tire blows. The max load I will carry is 1600lbs, and the trailer weighs about 300lbs with spare tire, swing jack and sway reducer.

Oh, yeah... it will get paint on the bare areas when temps permit.

The weight, size and the price are winners. But, they would be meaningless if the rig is unsafe, unstable or lasts only a year. Any suggestions to improve the project are greatly appreciated.


:D
 
Making a tendem this way does result in an extra frame's worth of steel to make other stuff with... If we could find a source for cheap axles/hubs/wheels/springs, we could avoid the extra material. So far, it's only 199 bucks to get all that stuff and re-purpose the extra frame.

I'm interested in making a set of ramps like the car-dealers have: you drive a car onto them and they rock forward to place the car level, about 3-4 feet above the ground... a poor-man's lift, so to speak. Maybe the steel goes into that; I have two extra frames now.
:idea:
 
TylerDurden said:
That trailer gave it's life to protect my Commutacar and my sorry-butt in a recent highway crash.
Sorry if this is a little off topic but, I have been wondering what is the status of that Commutacar?

Any plans for fixing it?

I for one, would love to see a Post on that restoration process. Oh, by the way I think you did a great job on that trailer and I'm glad you posted it (I just want to see the Commutacar as well).
 
Something like this may be workable for a bike trailer, the one I've seen with two wheels per side had them directly on the frame. Makes sense that giving the wheels some liberty would yield a nicer ride.
 
Drunkskunk said:
So when are you going to add the motors to the axles and turn this into an electric pusher trailor for your Van? :twisted:
:lol: :lol: :lol:


@iberkt: The Commuta will be restored over the summer... time permitting. It's so cold right now, the ABS body panels can crack as easily as an eggshell. It will give time for the Kelly controllers to progress and the battery-wars to escalate. :mrgreen:
 
TylerDurden said:
@iberkt: The Commuta will be restored over the summer... time permitting. It's so cold right now, the ABS body panels can crack as easily as an eggshell. It will give time for the Kelly controllers to progress and the battery-wars to escalate. :mrgreen:
Damn bad weather! :evil:

Guess I will just have to wait then.
(I hate waiting, low impulse control I guess).
 
TylerDurden said:
The Commuta will be restored over the summer... time permitting. It's so cold right now, the ABS body panels can crack as easily as an eggshell.
How are you planning to fix the ABS body? I've been looking for solutions for the ABS body on my project and have played with heat welding cracks with a soldering iron and heat gun. That worked ok but would probably be better with some practice. Next I'm going to try dissolving ABS chips in acetone and making a paste out of that, supposedly that works well.
 
Ja, it's problematic. I'll probably do the same type of thing.

These folks sell chips:
http://www.evperformance.com/pc-82-10-abs-plastic-chip-for-repairs.aspx
 
bah, it's ugly. Why not rebuild with with something like a hummbug kit or somesuch, +15 hipster points.

http://www.kitcarmag.com/featuredvehicles/5594_humvee_hummer_replica/index.html
 
Nice kit, but this is (was) the best shell I have come across. I might do something to another c-car, but more slippery in the aero dept.
 
You can bridge the crack on the backside (where it doesn't show) with some fiberglass cloth / epoxy to add strength. The melted chips will be good for cosmetic filling, but I don't think the strength will be great.
 
One thing I would like to do is diagram the frame, so other folks can build "replica" c-cars... these cars are 100% street legal (but not highway), so if people "found" a wrecked c-car, they could make/restore an EV without the low-speed restrictions. 8)
 
Back
Top