I picked up a 24v Lee Iacocca EVG Ebike

I put a larger 48 tooth front chain ring/crank on my EVG :mrgreen: I had to trim the plastic a little for it to clear. Stock chain ring on left for comparison. I even used the original chain, no problem. I got the chain ring off an old mountain bike that someone was throwing way. :D

chain_ring2.jpg
 
:D
 
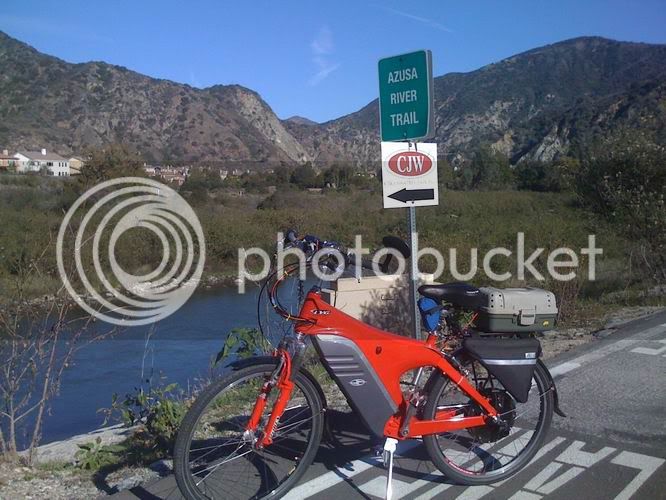
Here's my EVG Ebike on the San Gabriel Bike Trail (trail goes 38 miles, from Azusa to the Seal Beach). 36v 500w rear E-bikekit and 22A Infineon Controller, 48V 10AH LiFePO4 battery in tackle box, Watt's-Up Meter, Schwinn Speedo, Planet-Bike Fenders, Torque arm, Zefal Raider HD rack, Slime in tubes :)

Resizeofevg.jpg
 
Lucky you! I tried several different 42 tooth mtb cranks on mine and all rubbed the chainstay. Could be they made the frames a bit different at times? Or maybe I just was using too old school stuff that went back to MTB's being basicly a road bike frame with a diffferent gearing and 26" tires.

The frame battery space is the same size as two sla's, so a 36v ping wouldn't likely fit in there. A 12s 10 ah lipo would I think.
 
SamTexas said:
1000watt said:
... 48V 10AH LiFePO4 battery in tackle box, ...
So what's inside the nice frame? I thought that's the ideal place for the battery.

I put the controller in the frame with all the wiring tucked it.
 
SamTexas said:
I am guessing then that you're using less than half of the space available, right?

yep. just the controller and the wiring so there is a bit more room in there.
 
Hi 1000W. Cool! I see you have a 46 tooth chain ring instead of the original 33t. That will certainly take care of the fast pedaling! Even the middle ring is larger than the EVG front sprocket...
I am recharging the 12 year old (and hardly ever used) battery now with little hopes of recovery, but I have seen surprises before. I still own an almost 18 year pair of Hawker batteries that still put out over half their rated capacity...
Since these are gel cells, they may survive the abuse without too much damage (there is always hope).
I can easily upgrade to a higher capacity & voltage pack, I even have the electronics lying around to provide a constant 30V 30A to the controller, no matter what the input voltage does (isolated DC/DC converter) so ideal with a 48V pack of 12V 15Ah SLAs that would otherwise blow the controller - that is, if the controller can deal with 30V input continuous.
The cap in the battery box is 35V but that does not mean that the controller transistors can handle this voltage...
I did not yet remove the plastic covers around the controller to see what I am dealing with.
If I cannot revive the SLA batteries then I will start experimenting, for example with a NiMH pack.
There is a concern about charging NiMH cells in parallel, so I may need to cool them (add a fan) but from the size of the battery box
I suspect that I can fit 3 parallel strings of 21x 9.5Ah C cells in there (21s3p) which gives me a 25.2V 28.5Ah pack for about $160 and a lot of soldering.
Still a much better deal than Li-Ion which will easily run into the $400 range if you like to even have 20Ah.
I am not afraid to deliver a good deal of the motive power myself (my commute is 11 miles each way), but if I want to go longer distances then it is nice to have some assist, hence the requirement to have a better gearing with larger chain ring.
OK, enough ideas for now. First checking if the bike actually works once the battery holds some charge, or connect a 24V power supply to the contacts in the frame. Thanks for all the advice. I will take some pictures as soon as I have determined where I go from here and list the bike on the EValbum.
 
I just realized that I can even get 4 strings of 24 cells in the battery box, but then there is likely no more place for wires or fuses.
Would be cool though: 28.8V 38Ah pack. Might give me 40 mile range or so ;) Cells measure 25mm (1") dia and 49mm long, so you can stack 2 on top of each other, 4 side by side and 6 rows in a single battery slot in the battery box.
 
OK, I am very hesitant to go ahead with the Ebay sellers who promise fantastic energy, more than 2x compared to verified good quality batteries and I see too many responses that call them on not delivering the promised Ah ratings. So, I am considering to get verified good quality (A123) 20Ah cells to give the bike good power and energy, though I will need to decide if I buy a BMS, or hook something up myself and/or replace the stock 24V controller (I did not yet check if it is possible to upgrade the controller by replacing the FETs).
Also the battery box won't be able to hold the cells, I will need to fix them into the frame in the place of the battery box, or also put them in a tackle box on the back. I already bought a rack and moved the tail light from the seat to the back of the rack.
The BMS will need to cut back the charger to avoid over-charging if any cell has lower capacity (or higher SoC) as well as cutting back the throttle when any cell starts dropping below the cutout voltage (I think that is 2.5V).
I double-checked the clearance on my bike for adding a larger chain ring and found that stock it won't go any taller than 40, maybe 42 teeth.
Then I looked at 1000W's picture again where he put a 46 teeth chain ring from a discarded bike on and I noticed that "trimming" is the operative word.
Remove the chain stay so it is no longer in the way and remove the edges of the battery cover and the central frame cover, so both are out of the way - in fact,
they are sort of functioning as chain cover now...
Anybody have experience with the stock controller, how much voltage it can take (I know 48V will blow it, but taking 9 LiFePO4 cells and charging them to about 3.45V each means I need to trim the charger up to deliver 31V. Will the controller blow at that voltage or have people seen it work?
Anyone who has upgraded the stock controller to keep the features, but get more volts/amps out?
I have the knowledge to reverse engineer a controller, so if anyone has a stock controller (blown or still working) then I would be interested to look at it before tearing into my own controller.
I will start with a larger chain ring, so at least I can use the bike as usual, without assist.
Oh, BTW - the 12 year old neglected battery pack is really dead.
One battery initially came up to 13V charging at about 1A rate, the other has never shown a decent behavior, but after charging at low current (0.12A) over a weekend to try and reverse some of the sulphation, I found one battery charging at 11V and the other at 9V so each had at least one shorted cell. I will bring them to the recycling.
 
I hope you didn't hurt yourself when you "picked up" the dead SLA powered eBike :)P

Sorry - just couldn't resist :)

Regards,
Mike
 
Hi mwkeefer,
I was somewhat prepared for the pick up - since I did not know what I would find, I drove to the location (just a mile off my normal commute) and parked my car, looked at the bike and since I liked it, I walked to the ATM, payed the guy, pulled the dead battery pack from the bike and threw it into the trunk of my car, then rode to work on the EVG which was now pretty light ;)
That was also when I noticed that I was spinning out due to the chain ring being too small for normal flat roads, apparently the designer did not expect anyone to pedal the bike except to start going and on excessive steep inclines to help the motor. But I like to ride a bike and only occasionally use assist, so I will mount a larger chain ring tomorrow. I managed to get 3 bikes here: my EVG and two cheap mountain bikes. One will be a "sacrificial" bike, the other was my daily ride until now but is having issues: a holy rear tube, too much play on the bearings and a loud ticking sound in some of the rear gears. I already have a bag of bearing balls here, but the easiest solution is probably to swap the rear wheels and service or swap the crank.
Since I want a large chain ring on the EVG, I will probably do the same as 1000W, putting a complete set of front chain rings (with crank arm) from one of the mountain bikes on and either saving the original or putting it on the sacrificial bike so it is still rideable.
I still want to raise the handlebars and bring them closer to me, as I like the position of the "upright" bikes more than road or mountain bike's requirement to be bent over. I usually carry a laptop bag with a strap over my shoulder, so a better seating position makes that easier also.
If I get around to it, I will pull the controller so I can reverse engineer it to see if I can improve on it. Anybody having an old controller they don't use?
 
Mike,
I noticed in your tag line that you have a bike with a 11t-28t 7speed freewheel. Where did you pick that up?
That is exactly what I would like to get on my bike to allow easy spinning at high speed with assist.
I inspected my "sacrificial" bike closer and noticed that the chain rings were welded onto the crank, which is of cheap design (essentially one steel rod is the crank and the two crank arms, the pedals screw into holes in the ends of the rod). The 3 chain rings were held onto the crank with a "spider" meaning that two (the smaller) chain rings are actually only rings, clamped onto the large sprocket which carries everything, including chain guard.
Luckily the points where the 2 smaller chain rings clamped onto the large ring are almost the same positions as the 5 holes in the EVG chain ring. So, I drilled out the fasteners for the smaller rings and with a sawsall cut the 5 "spokes" of the large chain ring from the crank. Tomorrow I will file the holes to match up with the EVG chain ring and bolt the two together.
That will bring the front to 48 teeth and the EVG will be usable as bike, until I install a new battery pack and possibly upgrade the controller.
If I up the voltage, then it may be necessary to also change the freewheel from the standard 14-28t to 11-28t so that the high gear is increased (even with the 48t in front) from 3.4 to 4.4! (this is almost twice the stock 33/14 = 2.4)
 
OK, I did it. Just like 1000W, I took the right side cover off the bike and the battery pack door (pulled the two pins out the hinges) and cut off a semicircle of about 1/2 inch wide. Also removed the chain cover. The 48 tooth chain ring has a chain guard which sits just slightly higher than the battery pack cover and the chain just barely clears the new cutout, so I do not think that anything will get in between there. I cut after marking the covers with a scratch holding a tool alongside the chain guard and rotating the crank.
I ended up bolting *two* additional chain rings to the original EVG sprocket, using washers between the original and new as spacers, this allows the chain to run over either of the original or the two newly added chain rings.
This gives me gear ratios of (rear) 14-28t and front 33, 42 or 48.
I did not (yet) install a front derailleur as there is nothing to install it on, but I can slip the chain from one chain ring to the other with just a finger push and half reverse rotation of the crank. When the chain runs over the two largest sprockets front and rear then the rear deraileur is almost taut, but then the chain does not run well (too much sideways action) so I will try to avoid turning the gears back to 1. Amazing that the original chain can take such larger chain ring.
Good that I did not try to install a 52t.
The 48/14 combination will likely wear the fastest as that is my favorite gearing, so I still need to see if I can find a smaller freewheel (I'd love to keep the largest 28t but go for a small 11 or 12t sprocket)
Finally the EVG is usable as a bike!
I also found out how to loosen the crank from the crank shaft (after I had to work with everything attached to the bike because I do not have a crank release tool)
as I did not tighten the allen bolt back after mounting the new chain rings, when I went to take a spin suddenly the crank arm and chain rings became very wobbly after a hard (standing) acceleration...
Since I had the cover off anyway, I also removed the (triangular shaped) controller. Will look at it tomorrow - too many tiny Phillips head screws in there...
Another future project is the battery pack upgrade...
 
Hi cor

Reading your info with interest as I have a 24v model for six years, wanted to share my setup for a bit so here it is, basically after many upgrades all I have of original is the frame, ditched all electrics, fenders, bags etc, now its running on 11-30t freewheel for my ideal 20mph cruising speed. Latest incarnation is:
motor: 9c 6x10 - verdict: really good and strong motor needs 48v to do 20mph, better yet 60v for a lot of pep and hill climbing ability. run at 1700 watts peak, 1200 watt continuous is ok. long sweeping hills not a problem, very very steep hills ok for half to one mile before heating issues.
batteries: ping 48v 20ah (one half in battery bay, other on topeak rear rack) - verdict: excellent choice for use up to 1.5c, had mine a year and a half now.
plus 14.8v 20ah hk turnigy (in 4" x 3" x 3" case between rear seat post and mtx bag - a perfect fit - verdict - lipo is a bit tricky and not 100% reliable, but imo good for smaller 'booster' packs and flexible. Usually I run at 63v 20ah but also can easily configure the turnigy cells to a 48v10ah second pack for slower speeds and extra range around 60 miles - ie one 10ah pack plus the ping 20ah pack for 30ah total at 48v). weight with all this is still similar to original 24 sla!!
brakes: stock rear, new avid hydraulic front disc - verdict: a must have for hilly rides
controller: lyen 9fet - verdict: really good and allows for different voltages. Using twist grip throttle.
tires: specialized crossroads 1.95 - heavy and robust tire - verdict: perfect for ebikes, wish I'd gotten these years ago
seat: bontrager comfort - very wide with springs - verdict: must have somthing comfy for rides over 10 miles, stock seats that come with most bikes are a joke.
cycle analyst - plugs direct into the lyen - verdict: super useful, I will change sometimes change peak amp or max mph settings mid ride to make sure I get back home or to preserve battery if going to deep discharge.
handlebars: bought new higher ones, so I have a more upright seating position. verdict: experiment with positions to save yourself discomfort and injury.
lights: magicshine x 2 - good company, they sent me two replacement batteries after their recall last year. verdict: double up for easy night riding. once light battery goes in controller bay, other in that weird compartment below the battery bay.

overall the evg frame is a winner imo, very tough, take off the fenders and all the bags and it looks ok too!
 
Hi Ian,
Thanks for the reply - that shows how far this bike can go, good to know!
I understand that the weird storage compartment by the crank is originally used to store the AC cord for the original charger, so you can plug in wherever you go (opportunity charge or emergency if you can't make it home).
Where did you get the taller handlebars? That is exactly what I like to improve in seating position and I am used to it from the bikes I ride in The Netherlands, but I can't find it in California, or they call it "Oma" bike (oma is the dutch word for Grandmother).
I am still trying to determine how far the original controller can go, so I took it apart.
It looks a lot like an old IBM PC, with 4 plug-in slots in the triangular motherboard. In closer inspection, one slot is dedicated to a 25A 100V DC fuse (with an LED to light up when the fuse has blown because it is a ceramic fuse that can withstand interrupting 10kA (!).
The second slot is the power output, 5 FETS (STP60NE06) of 60V 60A each which are bolted down to a small triangular heatsink (the one with the mounting lug that connects to one of the motor leads) and 3 double Schottky diodes on the back: SBL2045CT which are rated for 45V 20A each so my suspicion is that the controller will blow not when going fast, but when lugging it uphill, when the diodes carry the motor current most of the time, as the diodes are not properly heatsinked: they have an insulation sheet between heatsink and diode (should have used the reverse units with the other contact to the tab) and some diodes are not flat on the heatsink, the leads are slightly short, so the tab sits in the rounded corner of the heatsink, not flush with the bottom. That will allow some diodes (and possibly also one or two FETs!) to overheat and blow when current is high.
The power board also has a 24VDC 40A (120VAC 20A) relay to switch the battery power to the FETs, an 8V linear regulator which powers the driver for the FETs, consisting of two transistors A1015 and C945 (PNP and NPN push-pull Emitter followers).
Interesting feature of the power board PCB layout is a cut in the power trace to the relay (and the FETs) which is used to generate a small voltage drop, the control board uses this to measure the current in the power board and throttle back the current. You can see a trace running back from the relay contact, parallel to the power trace, to report the voltage drop to the other board. Unfortunately this will also measure the voltage drop in the contacts to the mother board, but that is part of the design. I know the trick of measuring current through a trace from my BMW where the light control module also issues (annoying) warnings every time a light is not found to trigger the threshold of the comparator - that means that you can never upgrade to LED lights without triggering the warnings for all the replaced lights because the LEDs draw less current...)
The third and last board (position 4 is unused) is the control board. It has a large section reserved for a capacitor bank (2000uF 35V) and a linear 5V regulator.
The only other active parts are the microcontroller from Samsung: KS86P4004 in a 30-pin package (clearly overdesigned as more than half its I/O is unused even though the pins are connected to the card edge, but the motherboard does not connect them to anything on *this* bike) and there is also a transistor to drive the warning buzzer (plus a manually soldered diode to avoid blowing the transistor from transients) and a dual opamp BA10358 which is monitoring the voltage drop across the power trace in the power PCB and will flip its output to the controller when too much current is drawn by the FETs. That is also why the trimpot is there - you can calibrate how much current can be delivered maximum (also within the limit of the 25A fuse in the power supply, of course)
All in all, the theoretical supply voltage of the controller is 35V as this is the max that the Elcos and the linear regulators can take, but I am a little concerned with the 45V diodes and 60V FETs that the overshoots (ringing) on the output may destroy them at high input voltage. There is exactly ONE capacitor on the power board between the motor output and the + supply. It is a rectangular type that I think is a foil cap, 335K 63V so I think that is 3.3uF.
But I would expect many more small (distributed) caps around the FETs. If I get around to it, I need to measure the ringing (overshoot) voltages as that may kill the power stage as soon as running anywhere near the theoretical 35V max.
Other concerns are the lighting - I heard that the front lamp can be used at higher voltage, though I just see two wires going to it, no voltage regulation, so it depends on what the bulb can take, I guess. Tail light has two settings for normal light and brake and since it is a LED system, it can't take too high voltage or it will burn out the LEDs. It also seems to be sealed and I don't want to crack it open, so I will need to add a regulator if I want to use it at higher voltage.

BTW, my bike did not come with fenders, I was already wondering if that is normal since rain water will splash into the venting holes in the front of the battery compartment... For myself it is not a problem as the battery and the rack that I installed in the rear will shield myself from mud thrown by the wheels.
 
I saw a red EVG offered for $380, without battery pack, on the local Craigslist - see the tekst below:

http://sfbay.craigslist.org/eby/bik/2747779540.html
This is a EV Global e bike sn# f939584 Needs battery I have never had a battery and have not had time to work on this project call Phil if interested 702 807 3216 in Livermore
 
...and two more in Alameda (pictures show a red EVG):

http://sfbay.craigslist.org/eby/bik/2751295797.html
Great condition red color EV Global 24 volt 7 speed e-bikes with new battery packs. 17" frame with a 30" stand-over height. Excellent condition 26" X 1.95" tires, and linear-pull brakes. Headlight, taillight, and brake light. Horn, and cruise control. Batteries give about a 10 mile range on flat land. I have two bikes @ $300 per bike. Located in Alameda. Thanks. (510) 692-3866.
 
After reviewing the construction of the original controller, I have an idea of its weak points that need to be fixed before it can deliver more power (which it can do easily, especially rebuilding it for higher voltage so that top speed goes up even while maintaining the existing motor and control electronics. The upgrades are part mechanical and part electrical.
First mechanical upgrade will be to simply reposition the output FETs and Diodes so that they sit flat on the heat sink, instead of being wedged up. I already did this, simply loosening the 5 mounting bolts a few turns so that both diodes and FETs can shift up when you heat all 3 through-hole pins with a large enough soldering iron, do all 8 components (pull them as high as the bolts will allow them) and then bolt them down again, you will see that a lot more of the thermal goop will be squeezed from behind the parts, now that they sit flat on the heatsink. Then touch up all solder joints that there are no shorts between pins and all pins are soldered with a nice shiny solder drop.
The second mechanical upgrade is to avoid that one diode will see more current than the others. When you look at the power PCB you will notice that at the edge the +24V rail runs along all diodes, but the trace is not very wide. Where the -24V trace to the FETs is 1/2 inch, this trace is barely 1/8 inch wide.
The result is that when diodes conduct, the trace acts as resistor, the last diode will get little current, maybe only 1/6th, the middle one 1/3rd and the diode next to where the +24V power rail goes to the connector may carry half of all the current.
Guess what happens? That diode gets warmer than the others (especially because the diodes are on an insulator and (were) not flat on the heatsink, so thermal resistance to move heat away was poor.
What happens when a diode gets hot? Its forward voltage drops!
What happens when you have several parallel diodes and one has lower forward voltage? It gets even more current!
This can easily lead to "thermal runaway" which ends when the diode that gets almost all the current either dies (usually short circuit, so the fuse blows and the bike stops) or the thermal sensor in the heatsink detects an overheating condition and cuts power, or the user shuts off the power in time before something blows...
What I did to reduce the chance of the unbalance is that I added two solid copper wires, soldered on top of the 1/8 inch trace and touching each of the 3 diode's center pin and extend to the pint where the power rail moves towards the connector. That way all 3 diodes should get equal current from the start and it is less likely to unbalance and run-away. Also because the diodes are now better heatsinked, so their temps should stay closer together.
With these upgrades I feel confident to run the controller for longer periods of time and up the voltage to a max of about 31-32V (9 LiFePO4 cells), though I will at least need to modify the connection of the rear light to avoid blowing it, see the electrical upgrades in the next posting.
 
Electrical upgrades to run higher voltage on the original EVG bike and controller:
(after the mechanical upgrades that will allow existing electronics some more power without blowing, here are the electrical considerations)
- tail light has 5x10 LEDs. the red LED has typically 20mA consumption at about 1.6V voltage drop. The tail light seems to have 5 series strings of 10 LEDs
so its max consumption is likely 100mA (when braking, less for the normal light) and the LED voltage of 16V is likely achieved with a resistor that allows a full lead-acid battery level of 26V to result in at least 20mA per string, so probably a 470 Ohm resistor per string (for braking light, higher resistance for normal light). The modification to run higher voltage can be as simple as a resistor in each of the 2 wires for normal and braking light, to drop the excess voltage.
For example in the braking line, to drop a 48V battery pack to the normal 24V at 100mA, a 240 Ohm 3Watt resistor should be added. The normal light should have a larger and lower Wattage resistor, for example a 560 Ohm 2W.
- headlight: the bulb will likely need to be replaced with a version for the right voltage
- battery pack has a 35V cap and if the battery contacts are still used, this needs to be upgraded.
- controller: There are several Elcos on each plug in board that are rated for 35V and need to be upgraded.
The fuse board has only an Elco that needs to be replaced with a high voltage variant
At the microcontroller board there are two critical points: the voltage divider that feeds into the micro controller pin 9 to sense if the 24V is present and high enough (this divider can be adapted to shut down the controller when the battery voltage falls below threshold, or when battery is very "stiff" and has no clear point where to stop drawing current, as with LiFePO4, a little circuit can be added that is controlled by the BMS (Battery Management System) to pull this pin low and shut off the motor controller; the other point is the linear regulator to drop the 24V to 5V supply for the microprocessor. Since the max input voltage for this regulator is 35V, at least a series resistor is needed. I do not know how much current is drawn by the microcontroller - if you want to go fancy then you can add a little DC/DC converter before the linear regulator to avoid wasting power.
Note also the two Elcos on the input of the linear regulator - these need upgrading to higher voltage than 35V
The power control board needs all 3 diodes upgraded, because they are now max peak 45V and you should best stay at least 20V above the battery voltage with the diode breakdown. Note that there are 5 positions for diodes, so you can add more diodes to reduce the stress on each, but you will either need to get the "reverse" variant that has the other contact to the tab (then you can bolt all of them directly to the heatsink), or add 2 insulation plates and screw inserts and two longer bolts.
The FETs are spec'ed for 60V and you best keep this at least double the battery voltage, so if you want to go to 48V then you need at least 100 or 120V FETs.
If you want to reduce the spikes and stress the FETs less, then you can add snubbers next to the FETs. Note that there is very little clearance on most of the power control board, because the fuse board has its components sticking towards the power control board.
Two other concerns on the power control board: the 24V relay also has a coil for 24V. So for higher voltage, a series resistor should be added to avoid burning up the coil. The second concern is the same situation as on the microcontroller board: a linear regulator creates an 8V supply for the FET drive. This regulator can take no more than 35V, so either replace with a DC/DC that can take higher voltage, or add a voltage drop (another regulator or zener diode) in front. I did not measure how much current the FET driver is taking (and this will change when switching the FETs for a higher voltage type).
- indicators (on handlebar) and horn I did not check for 36/48V operation, so that still needs to be looked into.
This is as far as I know - I did not implement the changes nor test the results, so use this info as it is intended: for your entertainment and experimenting. You should verify everything and modify these suggestions to your findings when modifying the bike to higher voltage. Don't blame me if you or I forgot to modify a part and it blows up or causes damage.
 
cor said:
Ian,
Where did you buy your motor and freewheel?

Hi Cor

I got the freewheel from SF bikes a guy called patrick winston - he sells them on ebay or em on patrickwinston at coxnet

The motor, being the "slow wind" 6 x 10, was at the time a clearance by e-bike kit - only $100! - so I lucked out there. These days methods from this forum has them now and then, or I am sure someone on the ES forum knows how to get one. I think its a great winding esp as I am not into cruising speed over 20mph - but most vendors probably want to stick to 36v offerings and the motor does need 48v minimum, 60v ideal.

As for handlebars - just picked it up local as I just needed a couple more inches raise - I am 6' - but easy to find bars online or on amazon whatever height you want. I was going to get even higher ones as I was getting aching hands on long rides, thought of "chopper style" ones, but the bike shop said after a certain point its more about your overall position, so I searched online for info on riding positions, and then adjusted the seat different ways and moved the handlebars "back" a bit and that really worked - just transferred more of my weight I think to the seat and got the relationships of distance right for my frame.

I see the interest in tinkering with the controller. I didn't go that road - I ran my 24v on 36v pack for 6 months and then it gave up, so I just got a small brush controller and ditched the handlebar controls - a while after that, I upgraded the 24v heinzmann (burnt out) for a 36v heinzmann and that did nicely for a year or two. but then I moved to a hilly area and the 36v wasn't near strong enough for long distance. I have found after nearly a couple years with the 9c, that it is far superior in every respect to the heinzmann motors - it was a relief too to have something quiet! It will just slot in nicely in the dropouts, good tight fit and I don't use a torque arm and have had no problems. Just try and avoid punctures on the rear wheel - pita!

once I moved from oem electrics, I did dremel out the base of the battery bay also for a flat surface - gave another inch of usable height in there. Any non-stock controller will fit in the existing controller bay with room to spare.
 
Hi Ian,
From being in a Hilly Area and your purchase at SF Bikes, I take it you are in the City. That should make it easy to get a controller from Lyen, though for me in South Bay it should not be too difficult either...
OK good to know that the 9 Continents motor is on sale at times, because I only saw it online for about $500 in a kit without batteries (but including a 9C controller) and did not like the idea to pay more for the motor than for my entire bike (even though I read that that motor can take a beating and get you easily over 30 MPH). I like riding fast, today I rode my EVG for the first time to work with the 48t chain ring and I set a new personal record, riding the 11 miles in 45 minutes (on my mountain bike I usually did it in 55 mins) and *yes*, I stop for traffic lights and stop signs and this was with just me pedaling - there is no battery or controller in the bike at the moment! It just runs beautifully and the hybrid tires are good for asphalt riding. I estimate that I had to stop about 5 mins for the traffic lights/stop signs on the way (I try to follow the Expressway to have as little of them as possible, but still encounter 19 traffic lights, 2 stop signs and one railroad crossing) so I am riding at an average 17 MPH when not stopped (this is all flat terrain, following the Bay).
What I just want to say is that if I crank up my average a little with some electric assist, it will mean that it needs to be capable of doing over 20 MPH or else I can't make much use of it - I am pedaling faster than the stock bike goes. Even with the 48t chain ring I was spinning out a few times on a descent from an overpass. I expect that at 48V it should top out at 25 MPH, but I will have to figure out how much I want to trick out the existing controller and motor and when I better start putting on a new rear wheel with powerful motor and new controller; then sell my stock motor, controller and battery pack.
I already know that running a 36V battery pack on a stock controller will *NOT* work, because the batteries will be over 40V when charged and the controller has many parts that have a max 35V rating, so even if you want to up the voltage a little bit (which I am contemplating as my first installment - simply running a 30V pack of 9 LiFePO4 cells, which I later can re-use if I plan to double it to 60V) you should always try to stay well below 35V max, I recommend no more than 32V peak - see also the warnings in my modification posts. BTW, do you happen to have the stock (fried) controller still? I may want to have a go at redoing the power stage to see if it can work with higher voltage - what better place to start than a blown controller?
 
Hey Cor....nice to see you too opened your 24v controller. I own five 24V, & five 36V EVG ebikes (one mini folder).

I was curious if a 24v ebike could use the 36v battery box, as they are exactly the same size. Turns out you can, as the first 15 minute ride proved. Though it will "burn" out the 24v controller, but allows the lights & horn to still function, just NO more power to the hub.

When I took my controller apart I found 3 25v capacitors, with one that over heated & was coming apart. So, I figured I'd just go buy some higher voltage ones (60v) @ the local electronics store. I did, installed them, & it still didn't work.

My desire was to of course retain the front/rear lights, cruise control & horn. I lost these when I exchanged the controller on a couple of the 24v ebikes.

For two of the 24v ebikes I bought NOS Tres Terra (bought EVGlobal) Callisto 36v controller/throttle/& brake levers. I too upgraded the battery by using a 5lb 37v (42.5v)/8ah lithium poly battery that fits nicely in the side compartment. Yes, you can over volt the rear 24v/400watt hub up to 44v's (my max) without any issues. The 24v/400watt ebikes don't have the torque of the 36v/500watt hubs but they go right up to 21.5 mph for around 14.5mi range. One 24v ebike was upgraded to a 36v ebike by using the controller/front headlight/throttle/brake handles/500watt rear hub, off a "parts" 36v ebike that has a spun rear gear. Not sure how to repair or if the part is available to purchase. One 24v touring is 100% stock with new 12v/12ah batteries. What a slug @ 11mph. :)

Now having four (4) dead 24v controllers, it would be nice to know someone that can repair & update these to take 42.5v & then still be able to use the stock front/rear lights, horn & cruise control these ebikes came with.

I'm using the same lithium battery in the 36v ebikes, that too reduces the 22.5lb SLA pack to 5lbs & I'm now going from 17.5mph up to 21.5mph with the voltage increase with a range increase. And I'm still using the original 36v controller that leaves the lights/horn/cruise control intact.

My question, if anyone here on ES knows, is what is the max voltage I can use on an original EVG 36v controller? I desire more speed while retaining the stock goodies! :)

All the ebike's gearing has been updated to 42t, 44t, or 46t (some trimming) front chaingears, & 7spd 30t-11t rear freewheels for topend pedaling. The 24v ebikes need a complete front chaingear/pedal setup exchange, where as the 36v ebikes will take a 42/44/46t Origin 8 chaingears switch from the stock 38t.

Consider these older EVG ebikes can be bought from $50-$200 complete, it's in my view the best way to get into ebiking for cheap.

This is my $.02 cents input on these EV Global ebikes.

I also have four Tidalforce ebikes, one Tres Terra 36v Europa, & a Ultra Motor 26" 36v Velociti I ride.
 
Back
Top