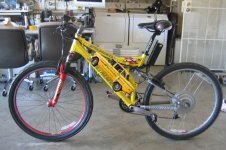
Jonathan's 44 lbs Specialized FSR S-Works

Jonathan

10 W
Joined
Apr 16, 2008
Messages
69
sworksgq0.jpg


motorqe9.jpg

This is my 2nd bike that I put together. The first one was a learner hardtail Rockhopper. Not quite my cup of tea.

So I'm out on a quest to make a sub 50 lbs bike that can do 35+ mph.

Here's what I got.
1. Donor Specialized S-Works
2. BMC Gear Hub (evtech)
3. Crystalyte 24-72V 35A Analog Controller (ebike.ca)
4. A123 M1 20S2P 66V/4.6Ah Battery (custom)
5. Crystalyte Half Twist Throttle (ebike.ca)
6. Cycle Analyst (ebike.ca)

After talking to Maytag, I've upgraded the motor phase wires inside the motor and kept it as short as possible.
he motor, controller, throttle, and cycle analyst mounted was a fairly quick and easy process. Couple tie wrap and wires shortening things were done in a jiffy.

The stock 20A controller is a PIC, it can barely do 20 at 36V lithium. I immediately went shopping for a better controller. Considering the BMC motor got plenty of torque, I didn't need the CL's 48A controller. IMHO it would just be a waste of torque and potentially ripping out my dropout. So I got the 35A controller with the main goal of bumping my voltage and therefore top speed.

I ran into a minor hickup with the drive system. The S-Works comes with Shimano Deore XT 9-speed shifter, which didn't work with my 7-speed flywheel on the motor. I had to downgrade to a 7-speed shifter which was significantly rougher. I might get that 9-speed flyweel and rehaul this.

There's still ALOT of work to be done for my baby to be on the road such as dual torque arm installation, battery pack & enclosure fabrication , lighting etc. But the basis is there.

I'll be updating this with the progress made.

Status Update:
05/25 - A123 M1 20S2P 66V/4.6Ah Battery Pack completed.
06/01 - dual torque bar installed.
06/04 - Enclosure mold produce. Kevlar/Carbon Fiber laydown started
 
Let me know where you find a 9 speed freewheel or what type of 7 speed derailur you pick.

I am using a 5 speed freewheel on 9 speed derailer and works OK just need to click 2x to go from 3rd to4th sproket
I would like to make it all perfect. Works for now but looking to improve.
 
Going Vertical
motorqe9.jpg


That's the first time (that I can recall) that I've seen somone have the presence of mind to go vertical with the battery mounting rather than the usual horizontal. Seems that most people try to imitate the bike rack and when you combine it with suspension you always end up with a rack that wants to break due to stress.

By going vertical you reduce the stress and have a better mounting location. You could double the battery with this configuration because the seat tube gives added strength.

Very nice... :)
 
safe said:
That's the first time (that I can recall) that I've seen somone have the presence of mind to go vertical with the battery mounting rather than the usual horizontal. Seems that most people try to imitate the bike rack and when you combine it with suspension you always end up with a rack that wants to break due to stress.

By going vertical you reduce the stress and have a better mounting location. You could double the battery with this configuration because the seat tube gives added strength.

Very nice... :) [/color]
That would be the controller...
 
TylerDurden said:
That would be the controller...
I don't know... he says he has:

"4. A123 M1 20S2P 66V/4.6Ah Battery (custom)"

...and that would be about the right size for it. I guess we will have to wait for a response.
 
safe said:
TylerDurden said:
That would be the controller...
I don't know... he says he has:

"4. A123 M1 20S2P 66V/4.6Ah Battery (custom)"

...and that would be about the right size for it. I guess we will have to wait for a response.
If you are familiar with ebiking, you will recognize that box as a Clyte controller. :roll:

You might notice the cable with the Anderson connectors hanging on the top-tube for the pack.
 
LOL... i was trying to figure out what was safe talking about.

but i belive in a couple of years a decent battery pack will be as small as a the controller...
 
Holy crap safe.. you really should know this by now !! :cry:

Jonathan !! excellent build !! looks nice and clean ! 8)

If you ride in the wet, seal the wires with silicone as they enter the axle, and you might want to loop the wires down so that water drips to the ground instead of funelling into the motor !! :wink:

Otherwise good job man !!
 
I don't use a hub motor so I'm not familiar with their controller boxes.

The Unite (appropriate matching) controllers are brushed aluminum... so I just figured he had built his own box for the batteries.

It doesn't look like a controller because there are no fins and it's not aluminum. (what you would normally expect)

Unless are they aluminum with black paint?
 
Safe, you are way overestimating the energy density of lithium batteries...

Most heatsinks are anodised black....you've never seen a heatsink? A controller box is a heatsink, and about half are black (I have one black and one straight ally).


I like your bike Jonathan. The one change I would make is upgrading the front end to disc brakes.


And let me know if you find a 9 speed freewheel. I did find an 8 speed on the internet, but AFAIF there's no such thing as a nine speed. On a normal bike you bend your axle with more than 7. http://www.sheldonbrown.com/speeds.html

It really sucks as all decent shifters are 9 speed...one reason I ended up with a front hub. The best 7 speed shifter are Shimano Rapid Fire 7's I think. Depending on brand the spacings between sprockets changes from 7 to 8 to 9 speed, but I think you can get away with a 7 speed cluster and an 8 speed changer...at least I hope so as that's what my brother's half built e-bike will have!
 
Yes that's a Crystalyte controller behind the seat and he says he hasn't made the battery pack yet. 20s2p is four DeWalt 36V packs, and that's not tiny.
 
batterypack01xq1.jpg

Solidworks modeling ... 20S2P Battery pack assemble and insulated with tap to prevent shorting.

batterypack02hu8.jpg

My mold for the carbon fiber battery enclosure.

I had some progress with the battery pack. Couple minutes of 3D modeling and several hours of shoe-goo & soldering.
The A123 M1 are not quite 26mm it's more like 27mm. NP it still fit within my frame.
During the assembly process I accidentally dropped the my screwdriver across the battery and ZAPP! a 2mm weld occur. Luckily the batteries are still fine.


Microbatman, I had the link for the 9-speed freewheel somewhere but I can't seems to find it now. I believe they are for the Bionx. Not quite sure if they fit the BMC or not but well worth a try.
Ypedal, thanks for the wiring recommendation. Will do.
Mark, Front disc brake is part of the plan but first I need to get this thing on the road.
 
Hi

Nice bike! and a nice build as well, this is going to be a copy of maytags bike in many ways! you will love the Puma at 66V its a nice safe voltage to run one at as well, any higher and the stock controllers have problems, this is an analogue controller you have there? you will need your torque arms bolted down well as it will throw a huge amount of torque at you, great place for batteries in there wont affect the handling too much, hope there is enough capacity in there for you? you can always back off on the throttle and peddle more for greater range.

Make sure you fit a kill switch to this rig, it will accelerate hard you dont want the throttle jamming, just get one of those little pit bike bar switches and wire it in to the brake line, I dont think you need a disc brake on the front IMHO, the bike is nice and light and it will have a good spec v-brake on it, get some decent pads and you should be fine, none of my e-bikes other than my KMX have them and I run quality pads and good cables, keep the well adjusted they stop me just fine, disc brake pads wear out just as quickly as well and they are normally more expensive to buy.

Good luck with the pack building, where did you get the batteries from? I may do something similar in the future, however I would need more AH for longer rides, maybe put a booster pack on a rack on the back, you could do that with your rig, keep it nice and light and simple for local stuff then pop a seatpost rack on the back with another pack in should you wish to go touring at range.

Once its on the bike its a good idea to use some self amalgamating tape around the exposed axle hole to keep the water out and also like the other poster said loop the cable up, check with maytag to get the correct phase connections as this is important.

Keep the pics coming I love seeing new bikes being born

Knoxie
 
Umm, when I clicked that I found a freewheel adapter, not a 9 speed freewheel.

I did find an 8 speed when I poked around.

Thanks for looking though.
 
Thanks.

Yep, it's 9 speed (well, the description is). But it would be nicer is the smallest sprocket was 11 tooth instead of 13.

To find out if it is compatible with shifters you need to know the sprocket spacing.
 
I've had a little more progress on the bike since the last posting. I finally finished my ride. Woo Hoo!

batterypack03uq4.jpg

The batteries pack fit within the triangle frame with about a 1/4 slop. I then machined couple little spacers to hug the circumference of the downtube for a little better traction. The fit now is pretty darn tight with only one way of coming apart.
1. slide the top spacer up & out.
2. tilt, pivot battery pack 25* then slide upward.
I don't think this one is going anywhere soon.

The batteries are wired as two separate 2P10S configuration, which allow me individually balance each cells. I can also go from 33V / 8.6A configuration to 66V / 4.5A configuration in an instance.


torquearmfo7.jpg

I also got a chance to installed the two stainless steel torque arm from EVTech (they're $12.50/each, what a deal!). I preferred two over one torque arm to keep the torque force parallel to the frame. From what I've seen or dropout with torque arm fatique/failure is that the arm horizontally tilt and cause the dropout to expand and break. Again all I have to do is machine couple spacer blocks out of AA6061-T6 to the frame. I didn't need any for the brake torque since I have freewheel.

Here's the final results.
sworkssv1.jpg

Sorry for the messy garage pic.

I'm very satisfied with the current results. It weight a total of 47 lbs, 3 lbs more than original spec, due to CA, wirings, spacers and duct tape.
The handling is almost stock with most of the weight at the lower 2'. Slalom was quite a bit of fun on this full suspension.
Top speed for me was 35 mph on flat no wind. fitek reported something like 37 mph but I think it's down the small gradient.

What's next?
Well I need to get disc brakes. At least for the front, because stopping from 30+ mph is pretty darn scary with v-brakes.
The other thing is to connect the cruise control. Now I know why joystix, maytag, & jondoh luv theirs so much.
But this will be another day and another project.
 
Epic build! Congrats! I do think you need to add a little paint job to the batt pack though before it's complete. :p :wink: :mrgreen:

sworkssv1_cab.jpg
 
"Please excuse the crudity of this model. I didn't have time to build it to scale or to paint it."

Its always those guys who say "I apologize in advance for the messy xxx" that have the neatest xxx.
 
Jonathan let me ride this bike the past weekend and it is amazingly fast. 32mph uphill! And it out accelerated cars quite easily.

Additionally, when I got home I felt shameful and spent the rest of the day cleaning my garage.
 
Jonathan said:
What's next?

Impressive looking ride there Jonathon :) Are we still going to see the carbon/kevlar enclosure sometime down the track or has this been scrapped completely (apologies if i missed anything regarding it)... Very interested in seeing how it comes out as i plan on something similar myself ...
 
Hi Jonathan,

yes very very nice build - clean and stealth just how we like it!!!
looks like Maytags GT - nice and light too :) excellent work!!


Cheers

D
 
Back
Top