Juiced 52v 19ah Battery BMS Dead/Sleeping?

gobi

10 kW
Joined
Jan 9, 2021
Messages
546
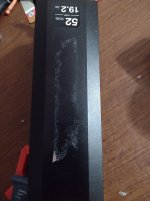
I bought a non-working Juiced 52v 19ah ebike battery.

When I got it:

Discharge port measured - 0.1v?

Charge Port measured - 5v

I charged the battery via the charge port at 0.5 a first and at around 40v I charged it at 1 a.

Problem 1 - The battery won't charge beyond 54v. So I stopped,

Problem 2 - LED push on/off switch dead

Problem 3 - Discharge port measures 0.9v (FYI the charge port measured 52.6v)

I confirmed that the push button is working by taking Ohm when off and on.

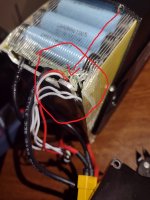
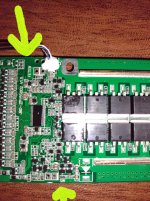
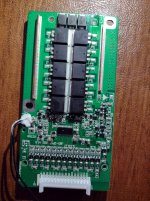
Opened the battery and it was VERY hard to push it out, I felt like I was giving birth via the battery. I pushed it out enough to expose the BMS,

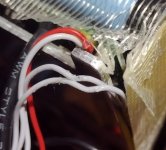
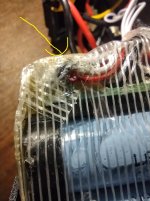
Holi mother of tight battery enclosures, I found that the RED and WHITE wire going to the on/off switch had rubbed on the high spot in the enclosure and probably touched the Alu enclosure.

BMS - #1 - toast or $2 - in sleep mode

How to attempt to wake up the BMS?

I will post some pics over lunch.
 

Attachments

  • juiced2.jpg
    juiced2.jpg
    124.3 KB · Views: 703
  • juiced2_a.jpg
    juiced2_a.jpg
    63.7 KB · Views: 703
  • juiced1.jpg
    juiced1.jpg
    103.1 KB · Views: 702
  • juiced3.jpg
    juiced3.jpg
    188.3 KB · Views: 701
You could try briefly charging through the discharge port. This will usually wake up one that's turned off. If this doesn't work, I'd try unplugging the BMS from all the cells and plug it back in. If those both don't work, you may need a new BMS.
 
I would find the state of charge by measuring each cell group you got to write it down on paper for the next time you measure. Like
1. 3.95v
2. 4.15v
3. 4.10v


14. Xxx volt
Voltage of your charger Xxx volt
Voltage of your battery Xxx volt
The reason you write it down on a piece of paper is because there's so many numbers and it'll save you time.
 
fechter said:
You could try briefly charging through the discharge port. This will usually wake up one that's turned off. If this doesn't work, I'd try unplugging the BMS from all the cells and plug it back in. If those both don't work, you may need a new BMS.

Charging Via Discharge Port -
It charges fine, I charged it all the way to 53.x volts

I disconnected the balance cables (is this what you mentioned in your 2nd thing to try?)

With Balance cables disconnected:
B- = 51.4v
C- = 51v
P- = 50v

Then I connected the balance cables back and I get:
B- = 51.4v
C- = 51.4v
P-= 0.9v
 
999zip999 said:
I would find the state of charge by measuring each cell group you got to write it down on paper for the next time you measure. Like
1. 3.95v
2. 4.15v
3. 4.10v


14. Xxx volt
Voltage of your charger Xxx volt
Voltage of your battery Xxx volt
The reason you write it down on a piece of paper is because there's so many numbers and it'll save you time.

Here are the volts:

Min - 3.66
Max = 3.7

Cell Total V Ind V
1 3.66 3.66
2 7.32 3.66
3 10.98 3.66
4 14.64 3.66
5 18.3 3.66
6 22 3.7
7 25.7 3.7
8 29.3 3.6
9 33 3.7
10 36.6 3.6
11 40.3 3.7
12 44 3.7
13 47.7 3.7
14 51.4 3.7
 
Thanks looks good static. Under load if one drops that's the bad parelle set. You can bypass the bms and charge it if you seat and watch it and don't let one cell group go over 4.15v. Not one Must monitor and watch. Can be used for testing without bms to see if one parallel cel group dips faster than the rest. If you do these Don't walk away when plugged in. Must supervise. As the numbers climb faster by the end of charge as opposed to the middle of charge.Did you get the variable voltage juice charger for 80% charge
 
999zip999 said:
Thanks looks good static. Under load if one drops that's the bad parelle set. You can bypass the bms and charge it if you seat and watch it and don't let one cell group go over 4.15v. Not one Must monitor and watch. Can be used for testing without bms to see if one parallel cel group dips faster than the rest. If you do these Don't walk away when plugged in. Must supervise. As the numbers climb faster by the end of charge as opposed to the middle of charge.Did you get the variable voltage juice charger for 80% charge

I use my Riden 6018 to charge all my batteries, except for my 80v Kobalts, I use a boost power supply.
For on the road I plan on using a meanwell PS and set the volts for 80% ish.

I was able to charge it to full using the charge port, I did know that Juiced control the max charge.
Ok charge and and see if one group rises faster at the end, gotcha, I will do that once I charge/discharge cycle the battery a few times at low amps.
 
Can you discharge thru the bms ? Also if you put a hairdyer or a load and see if a cell drops much quicker than the rest.
how's that 6018 work do you use it on 110 how many ps you get out of it at what input and highest output ?
 
999zip999 said:
Can you discharge thru the bms ? Also if you put a hairdyer or a load and see if a cell drops much quicker than the rest.
how's that 6018 work do you use it on 110 how many ps you get out of it at what input and highest output ?

nope, 0.9v at discharge port, so I am not able to discharge through BMS,
 
fechter said:
Seems like the BMS is toast. All the cell voltages are in the healthy range.

I measured the Ohms across

B- and P-
and it is 0 ohms

some daly bms's need

b- and p- to be shorted to be woken up,

Is this something I could try, with a resistor inline (to avoid a large spark)?

Here is a pic of the BMS on the batteryjuiced_bms_52v.jpg
 
gobi said:
I measured the Ohms across

B- and P-
and it is 0 ohms

some daly bms's need

b- and p- to be shorted to be woken up,

Is this something I could try, with a resistor inline (to avoid a large spark)?

If you are seeing zero ohms across B- and P-, then you should be getting full output. All of the positive side wires are just connected to each other. Make sure those connections are good. If you get full pack voltage from B+ to B-, then you should also see it from B+ to P-.

I have a BMS that needs B- and P- shorted to wake up. I used a push button switch and a 100 ohm resistor.
 
fechter said:
gobi said:
I measured the Ohms across

B- and P-
and it is 0 ohms

some daly bms's need

b- and p- to be shorted to be woken up,

Is this something I could try, with a resistor inline (to avoid a large spark)?

If you are seeing zero ohms across B- and P-, then you should be getting full output. All of the positive side wires are just connected to each other. Make sure those connections are good. If you get full pack voltage from B+ to B-, then you should also see it from B+ to P-.

I have a BMS that needs B- and P- shorted to wake up. I used a push button switch and a 100 ohm resistor.

Ok, I just got back home from a short vacation (took little one to Indianapolis to visit a buddy of ours)

I have a momentary switch I recovered off an old string trimmer (agm battery based) plus a 100 Ohms resister in line.
I will try it tonight.
 
999zip999 said:
They claim to use a decent LG cell like a 10 amp cell

Yeah they are LG MH 10a cells, not sure how much capacity is left after being so low for gawd knows how long.


Drum Roll.....

I connected the on/off switch, turn it on and shorted B- to P-

Nothing, no change!

I taking off the bms this weekend.

There is one soldered nickel strip from the battery - connected to the bms.

I found a BMS with the B- close the same position as the current one, but it might now match up, more pics later,

I am also considering putting a JBD BT BMS and using a 6 awg silicone wire to extend the battery negative.

I am not sure if I have room for all this doctoring.

Merry Christmas!
 
BMS

The factory BMS came with an on/off switch,

I had a JBD in my stash but it did not have an on/off wire coming out of it.

So, I took a deep breath and opened it up.

To my surprise it has 2 connections for what looks like on/off switch.

SW
FETSW

Any idea what these are?
 

Attachments

  • bms_connections_1.jpg
    bms_connections_1.jpg
    261.3 KB · Views: 455
  • bms_full.jpg
    bms_full.jpg
    196.4 KB · Views: 454
I can't tell for sure, but that does look like a switch connection spot. The temp sensor goes in next to it and those usually turn everything off when it overheats. It would be easy enough to test once you get things hooked up. With some of these, you may need a resistor from B- to P- to make it turn on with the controller connected.
 
Back
Top