Konion Makita LiMn battery care and feeding by Doctorbass

Doctorbass

100 GW
Joined
Apr 8, 2007
Messages
7,496
Location
Quebec, Canada East
A bit of History:

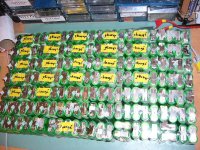
Back in the begining of 2007 I introduced these cells from Makita battery pack to the E-bike world.

I am not the very first person who used them other than for powertools. The RC crowd.. mainly from Germany already used them as great powerfull cells ( the 186650V). That's from one of their link that i finally found the specs in 2008. Also, The Bionx Lithium battery are using them too. finally Bosh are also using them but they use the lower capacity model ( 18650VT)

Since it happened. The popularity of them grow up alot and became a great solution for simple, cheap and low maintenance lithium battery.

How they came to the E-S ?
After my uncle that work from Makita gaved me few used and deffective battery i tested them alot and finally made my firsts ebike battery pack.

I still get some from him that i share with the E-S and to thanks him about that generosity, i built him an ebike with some of these cells.

The qty i can get from him is really interesting and i can supply and share my overstock to the E-S when i can.

I am one of the big supplier of these used or deffective packs.

As i said, these packs i get are all returned from custommers because they are deffective.

Some have just few cycles on them and some have over 400 cycles... But i asked my uncle to only give me the one that have 100 cycles of less. He have the special computerized makita tool to test them. By that way that ensure all cells had their burn-in and have more chance to work for their entire life compared to brand new cells.

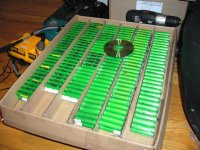
These cells are called : KONION i have to say.. i really dont know why they call them like that but i know it come from the german wensite.

They are made by SONY since around 2005-2006 and still exist today

They are lithium manganese and exist in two models:

18650V and 18650VT.. some rare 26650VT model exist but they are difficult to find)

18 is for 18mm diameter and 650 for 65.0mm lengh


They come in different pack on the market:

The 18650V are used in:
-The BL1830 makita pack of 18V 3.0Ah
-The BionX electric bike battery of 24V and 37V 9.6Ah

The 18650VT are used in:
-The BL1815 makita pack of 18V 1.5Ah ( but they have 1.3Ah real)
-The Bosh 36V slim and fatpack


Here are their specs:

18650V: ( the most popular for ebikes)
( same as the Sanyo’s UR18650W)

-Voltage range: 3.0 to 4.2V
-Nominal voltage 3.7V
-Capacity: 1500mAh(10C) to 1600mAh(1C)
-Max Discharge C rate: 10C ( 15-16A)
-Max Charge C-rate: 1.5 to 2C depending on the cooling
-Cycle life: 700 cycles to 75% initial capacity ( from BMZ manufacture)
-Cycle life claimed by Makita: 1200 cycles
-Internal resistance 30miliohm per cells
-Released in 2005... still existing in 2011
-Weight: 44g
-Dimensions: 18mm dia and 65mm long


18650VT:

-Voltage range: 3.0 to 4.1 or 4.2V
-Nominal voltage 3.76V
-Capacity: 1030mAh(10C), 1080mAh, ( 1C) to 1300mAh(0.1C)
-Max Discharge C rate: 15C ( 17-20A)... and 30A for 30 sec
-Max Charge C-rate: 3C depending on the cooling
-Cycle life: 500 cycles to 90% of initial capacity, at 2A discharge ( from BMZ manufacture)
-Cycle life claimed by Makita: 1200 cycles
-Internal resistance :initial is 25 miliohm ( 26-28 miliohm of used cells)
-Gravimetric energy94 Wh/kg
-Released in 2005... still existing in 2011

Here is the specs from BMS compagny: ( see the attached file) ( please note that the Wh of the 18650V at 1C is not 3.61Wh but is 5.61Wh.. this is an typing error in the specsheet


BMS ??

These cells are well appreciated because they do not require balancing wich normally cost time and money to acheive on diy battery.

The 2010 and older Makita packs and the Bionx pack dont have any balance circuit in them.

it's not magic but it's still something we dont really understand.

While they do not require balancing, they must have something that will cut the current like a LVC to protect overdiacharge.. and also to be protected against overcharge.

When assembling them into a DIY battery they MUST all be at the same voltage before to parallel them and to charge the pack.

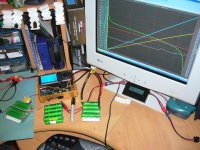
Info: Here is a document from the NASA Aerospace Flight Battery Program that tested some of the VT cells:
http://ntrs.nasa.gov/archive/nasa/casi.ntrs.nasa.gov/20100028067_2010030204.pdf

Why the Konion?

- Because they are cheap when bought as used packs, ( around 30 cent per Wh)
- Because they can give high power
- Because they dont NEED balancing
- Because THEY ARE SAFE chemistry
- Because you have a great source :wink:

They dont like: heat above 50 celsius.. it damage permanently them
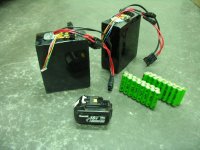
that's why i recommand to keep the nickel strip already spotwelded on them and to solder on these nickel parts... dont solder directly on the cell tab! that will produce damaging gas inside that will act as an insulator between the layers and will oxidize them.


Getting some:
From now it probably exist over 200 persons that made battery using them on the E-S and as far as i know, you all appreciate them.

Some that got some from me in 2008 are still asking to get more to build more pack.


My Konion packs

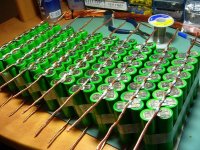
In 2008 i decided to build the biggest ebike pack ever built.

It have 432 of the 18650V cells and is divided in 4 independent packs of 6s 16P ( i updated it to 18P few month later

Today in 2011 i still use it and still never need to balance it.

UPDATE 2017!!

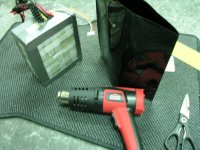
HOW TO DISASSEMBLE MORE RECENT MAKITA PACKS
[youtube]Oz6Uis05ewA[/youtube]


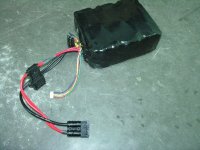
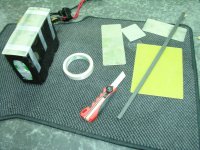
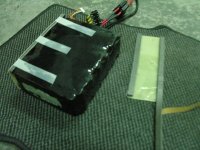
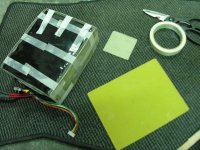
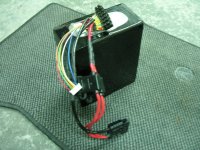
To give you a teaste of what look like one of my diy pack made with makita:
 

Attachments

  • BMZ1600[1].pdf
    154.5 KB · Views: 563
  • P1030504_800x600.jpg
    P1030504_800x600.jpg
    111.4 KB · Views: 19,710
  • P1030493_800x600.jpg
    P1030493_800x600.jpg
    170 KB · Views: 19,773
  • P1030501_800x600.jpg
    P1030501_800x600.jpg
    119.5 KB · Views: 19,773
  • C and Ri comparaison graph of all cells.JPG
    C and Ri comparaison graph of all cells.JPG
    42.3 KB · Views: 19,773
Making your pack:

Let say you want to build 10s 6p pack ( just like for the Bionx 37V 9.6Ah Battery)

You will need to make 10 packs of 1s6p, then you bundle them and connect them as 10s6p. THAT'S THE WAY TO GO.

I dont recommand to make multiple 10s1p string and than to parallel these string.
This is uncommon and not the best arrangment.

GIVING EQUILIBRIUM TO ALL YOUR CELLS
To give the final balance of the pack YOU MUSTcharge each of the 1s6p, Then individualy charge the remaining 9 packs, etc. After everything is all charged up, I suggest to let them settle for a day, then check the voltage and if the voltages are all close can assemble the final 10s6p. a bad pack will have lower voltage reading compare to teh average of teh rest of the 1s6p pack

PAY ATTENTION TO THIS:
Paralleling cells together when they dont have the same voltage will damage the cells. Because the highest cell will discharge with non controlled current to the lowest. that could be alot of amp! That's why each cell you plan on parallelling must be with in +/- 100mV difference before connecting them in parallel. Than you can treat the new multiple 1s Xp pack as if it would be a single cell but witgh more capacity.

SAVING TIME:
I suggest keeping the cell in pair since they are already paired and matched and that it cut your job of charging ans assembling in half. Disasembling paired cell in multiple 1s is not recommanded. That's why generally the konioni made battery have a p number by 2, 4, 6, 8 etc...

SOLDERING TIPS:
Also dont solder directly on the tab... you must keep cell paired and solder on the nickel link that connect each cell of the pair. best is solderring on the middle of that link between both cells. and also try to not OVERHEAT to not melt the fragile green plastic under it..


CHARGING TIPS:

Best voltage to charge them is 4.20V. (But some use 4.10V to increase life of the cells)
I usually charge each cell pair at a current of 5A
I stop charging when the current reach C/20 wich mean this cell pair have 3Ah so i cut the charge current once it reach 1/20 of that current = 150mA = full charged

Doc
 

Attachments

  • P1040235_800x600.jpg
    P1040235_800x600.jpg
    143.1 KB · Views: 19,677
  • DSCN4727_800x600.jpg
    DSCN4727_800x600.jpg
    83.2 KB · Views: 19,677
  • DSCN4728_800x600.jpg
    DSCN4728_800x600.jpg
    99.8 KB · Views: 19,740
  • DSCN4733_800x600.jpg
    DSCN4733_800x600.jpg
    87.6 KB · Views: 19,677
  • DSCN4734_800x600.jpg
    DSCN4734_800x600.jpg
    95.5 KB · Views: 19,740
  • DSCN4744_800x600.jpg
    DSCN4744_800x600.jpg
    76.7 KB · Views: 19,740
  • DSCN4746_800x600.jpg
    DSCN4746_800x600.jpg
    84.8 KB · Views: 19,677
  • DSCN4754_800x600.jpg
    DSCN4754_800x600.jpg
    71.3 KB · Views: 19,677
reserved
 
Reserved
 
One thing I would like to add is that in longer strings paralleling only at the ends of 2p strings works well if you capacity match the cells in that string, charge conservatively, and you run large capacity packs so discharge rates and DOD are low. On my bikes and those I've built for others, I have over 30 strings of 17s and 20s by 2p that have been in daily service since late '08 and early '09 without a single failure of even a cell.

Once a parallel pair does fail, a long string enables the other cells in the string to pick up the slack as long as you're charging to a conservative cutoff voltage. That way all that is lost is 2 cells and it doesn't kill the entire string, which would take down the entire pack. As my only protection, with some regularity I feel my packs for hot spots after demanding use and late in the charge cycle. Extra heat would indicate a problem.

Going the theoretically more correct route with full parallel structure at each series level, you lose the entire parallel group, but are limited to that loss, not the entire pack, which is possible building like I do. I believe the risk is small, at least until quite late in pack life (I'm at over 1000 cycles on many of my strings), but the 2 big reasons I prefer it are:
1. Simplicity and build ease- I can build a 2p20s string (over 200wh), almost any shape I want, with generally only 4 tab-on-tab solder connections, plus the 2 leads. In addition to fast and simple, making no new solder connections near the end of the cells must reduce risk of heat damage during assembly. The more you solder on these cells, the more likely you are to damage them.
2. Pack shape and failure points- With only 2p strings, it's much easier to create a pack shape to fit your bike, a major obstacle to large capacity packs on our ebikes. All the extra connections of the "right" way introduces more possible points of failure. On the pack of my daily rider that alone would be an extra 171 new solder joints, each a new point of failure with a new length of wire that could somehow short.

I concede that Doc's method is theoretically better, but I cherish my free time and the time savings alone is worth more than the cost of a new pack. Plus there are some new risks introduced that help balance the equation.
 
What we really need to do is track down Bionx source. 6p6s or 7s blocks of factory matched and tab welded Konion V cells for under $.50/wh, which I'm sure is high for factory direct, would be a boon for the DIY ebike community. I''d guess that in quantity they must be less than $1.50/cell, $.25/wh for a fairly low capacity 18650 cell in mass production for so long.
 
John in CR said:
One thing I would like to add is that in longer strings paralleling only at the ends of 2p strings works well if you capacity match the cells in that string, charge conservatively, and you run large capacity packs so discharge rates and DOD are low. On my bikes and those I've built for others, I have over 30 strings of 17s and 20s by 2p that have been in daily service since late '08 and early '09 without a single failure of even a cell.

Once a parallel pair does fail, a long string enables the other cells in the string to pick up the slack as long as you're charging to a conservative cutoff voltage. That way all that is lost is 2 cells and it doesn't kill the entire string, which would take down the entire pack. As my only protection, with some regularity I feel my packs for hot spots after demanding use and late in the charge cycle. Extra heat would indicate a problem.

Going the theoretically more correct route with full parallel structure at each series level, you lose the entire parallel group, but are limited to that loss, not the entire pack, which is possible building like I do. I believe the risk is small, at least until quite late in pack life (I'm at over 1000 cycles on many of my strings), but the 2 big reasons I prefer it are:
1. Simplicity and build ease- I can build a 2p20s string (over 200wh), almost any shape I want, with generally only 4 tab-on-tab solder connections, plus the 2 leads. In addition to fast and simple, making no new solder connections near the end of the cells must reduce risk of heat damage during assembly. The more you solder on these cells, the more likely you are to damage them.
2. Pack shape and failure points- With only 2p strings, it's much easier to create a pack shape to fit your bike, a major obstacle to large capacity packs on our ebikes. All the extra connections of the "right" way introduces more possible points of failure. On the pack of my daily rider that alone would be an extra 171 new solder joints, each a new point of failure with a new length of wire that could somehow short.

I concede that Doc's method is theoretically better, but I cherish my free time and the time savings alone is worth more than the cost of a new pack. Plus there are some new risks introduced that help balance the equation.


John, I see we have all our own opinions and this is ok :)

My method work well.. your method work well... Both possible method work well .....Whatta wonderfull world 8)

Doc
 
John in CR said:
What we really need to do is track down Bionx source. 6p6s or 7s blocks of factory matched and tab welded Konion V cells for under $.50/wh, which I'm sure is high for factory direct, would be a boon for the DIY ebike community. I''d guess that in quantity they must be less than $1.50/cell, $.25/wh for a fairly low capacity 18650 cell in mass production for so long.


I might have a solution for that...

i have a contact at our big Bionx distributor here (Cycle Lambert) and they already offered me a job last year to become their bionX specialist tech.

I have to contact the guy i spoke with...
 
marty said:
Please explain Internal Resistance and how it relates to the health of each cell. Do you measure the internal resistance after the cell is fully charged?

The more a cell have cycle of use, the more the internal resistance will increase.
( lower is better)

Yes.. it is always better to measure the internal resistance of each cell or cell pair and to match them in paralle group than in serie.

ALOT of thread talking about internal resistance!!! do a search :wink:

Doc
 
I gotta say, I love how you do this, and I can't wait to build a pack up for my next build.

I have some concerns regarding the packaging of the cells. It looks like a lot of work to do it your way, but it seems like it offers a lot of protection. Where did you get the shrink wrap, plastic siding, and foam?
Are you at all concerned about how much work it would take to dissemble the pack if something goes bad? Or do you just make damn sure the cells are good before you build the pack up?

Since these are "technically" recycled cells, I'd be worried about a cell failing and taking down a whole parallel string. And then having to take apart all the time I spent building the battery pack!
Is monitoring the pack with a cell log enough to catch a bad cell? What about monitoring the Ri of each parallel group? What about capacity testing of each parallel group every 100 cycles or so? That's my only worry with these cells; if I take the time to build a pack, I wouldn't want to worry about it going bad.
 
auraslip said:
I gotta say, I love how you do this, and I can't wait to build a pack up for my next build.

I have some concerns regarding the packaging of the cells. It looks like a lot of work to do it your way, but it seems like it offers a lot of protection. Where did you get the shrink wrap, plastic siding, and foam?

shrink wrap availlable from ebikes.ca and ebay. mine come from a local battery repair service shop.

The plastic siding is some PCB with removed copper.. this is fiberglass and insulate very good.. i followed the killacycle pack construction tips using the pictures of the killacycle website. foam can be found in your locak home hardware store.

Are you at all concerned about how much work it would take to dissemble the pack if something goes bad? Or do you just make damn sure the cells are good before you build the pack up?

On my very first konion pack ( the biggest one i ever made) of 432 cells total divided on 4 suback of 6s, i carefully measured EACH cell pair i RI and capacity wich mean i recharged all them and tested them with my RC charger two by two !.. that'S 216 measurements :lol:

Hard work right!.. but that's a 2.3kWh pack.. dont forget :wink:

I have than take all data and matched all 1s18p cells to get less than 1% diff between all 1s18p subgroup.

That's the most complicated pack i ever made!!.. it work well today after 300 cycle on it but lost like 20% capacity after i accidently overcharged it to 4.5V per cell :roll:

After that i made more pack without all these complication of cell matching and got very good result anyway.

I had to dissassemble the subpack no 2 because i overdischarged it one time and had to replace one 1s18p group. it took me 3 hours but the pack recovered very well

Since these are "technically" recycled cells, I'd be worried about a cell failing and taking down a whole parallel string. And then having to take apart all the time I spent building the battery pack!
Is monitoring the pack with a cell log enough to catch a bad cell? What about monitoring the Ri of each parallel group? What about capacity testing of each parallel group every 100 cycles or so? That's my only worry with these cells; if I take the time to build a pack, I wouldn't want to worry about it going bad.

I make subpack test every year to ensure everything is ok. no cell are falling because they are all parallel cells x 18 and all RI was good so no reason for one cell to fall if it is connected to teh rest of the other 17 cells in parallel. it never happened.

The capacity lost i had because of the overchrging to 4.5V per cell had not really droped teh capacity.. it only have increased the RI so the LVC of the controller trip sonner.. and this translate in less capacity delivered from the cell into teh controller.

Konion are performig really well for pack builder and are far less dangerous than lipo .. ex.. try forgeting lipo in overcharge at 4.5V per cell.. :shock: .. in teh same condition, Konion will not burn your hous down to the ground.. lipo can...

Also they self balance really well.. you just need to balance the pack st least when you construct it.. than check it every 10 cycles

Also the more cell in parallel you have the less chance of unbalance in capacity and Ri can occur.

the average do the job...

Doc
 
Sounds good. I'm busy pricing a 12s10ah pack, and with goodrums new 12s10ah lipo bms "lite" I can't decide between the Doc option and the Lipo option. The raw cells come out about the same, but we'll have to see how the pricing comes out for the new BMS. I do like having SOME form of bms in case I want to sell the bike. On the other hand, these cells are much safer and only need a conservative pack level LVC. Much less complicated! Choices Choices eh?

BTW, this isn't ready for mainstream use but I've added your cells to my battery pack builder calculator/spreadsheet. here: https://spreadsheets.google.com/spreadsheet/ccc?key=0AuLYJj0UJIOndHVqSE0wUkNxaHpXVXZZd0R6NnpNTWc&hl=en_US&authkey=CIurk5wI

I wasn't sure about the cell weight or Ri though.
 
i just got my "doc option" working .. i went 12s 14p ... so 21 ah instead of 10
ttl cost to build was under 400 and i ended up w/ 20 extra cells

just did a range test and after 16ah i was tired and at home .. i went 30km at 45 amp draw (uphill both ways :p)
pack still isn't 100% balanced (had to try it out) and i still had my old lead pack on board just encase (extra 70-75 lbs)

considering i had one 4s sub-pack slightly out of balance (.1v and i was watching voltages) 4v sag under a 2c load isn't horrible and i am anticipating it to improve over a couple of cycles

i ordered 21 makita packs for this battery at 15$ per pack so $315 plus shipping so 210 cells ttl b4 losses
i anticipated 80% of cells would be fine to use (i got more like 90%) so i counted on having 168 cells

labour was about 20hrs and extra matts included
duck tape 1 roll to wrap pack (like a ping or vpower)
1 8os silver bearing rosin core solder
1 4.5" "zipdisk" (metal cutting angle grinder disk)
would recommend something smaller to cut apart the cells like a dremmal
i used the box they came in to isolate sub-packs and wrap the final battery
(4s sub-packs are insulated inside w/ the separators that came in the makita packs)
4' 10 gauge 4 strand silicone wire (welder needed a new cord at work)
and about 20hrs of my time

end result (F$&*ING WIN)

BTW DOC how many cycles can i expect from my new 932.4 wh (or should i just call it a 1 kwh) pack?

pack breakdown cutting tip... i fount it best for me to start at the most positive en of the pack and fold that tab over itself b4 i cut the negative apart so it pushed that cell pair up away from the positive of the next cell
(was scared to melt the plastic on the positive side wile cutting)

ps my new pack only weighs 20 lbs
 
Thanks nebriancent for that great review :wink:

It seem you get really similar result than me with these cells
I think you can call it a 1kWh pack :mrgreen:

I did 450cycles from now with my monghoose with 432 cells in it and it still have more than 80% of the capacity.

most of these cycles was at 2C average and 10C burst

btw... for the winter i suggest charging them at ambiant temp and at at least 5 or 10 celsius or above.

if you use them for this winter cut the max current of your controller by 50% or lower ... that will preserver the cells :wink:

Doc
 
so you recommend discharging the batteries at 1c during the winter months to preserve their lifespan?
i did notice a bit of heating during the 2c discharge would this not compensate for the temperature difference?
i just wanted to get it wright and in print on the forum for others to read and not have to make the same mistakes that many of us end up making

btw the unbalanced 4s sub pack i had took a extra 2 ah average between each 14p1s on top of the 16ish the others num num numed on :wink:
current status ... all 12 of the 14p1s charged seperatley for ballancing and voltage diferance between each 1s14p ranges from 10-20mv (20mv max spread lowest cell string to highest)
 
Yes the internal resistance of the cell that is higher at low temp is generating heat and increase the temp of these cells so it help... but the problem is during the moment that the cells are cold before they begin to rise... at this moment the sag is higher and the cells stress a bit more during the temp transition. This fact have been discussed alot on the forum and also this is a good sing that you learn fast about lithium cells technology :wink:


It remain that is is better to have the cells already warmed before to use them when temp are lower than 5 - 10 degree celsius.. otherwise i recommand to go easy on the current limit.

What is the most important is not the discharege.. it's the charger... with lithium cells it is preferable to charge at ambiant temp ( 15 - 25 celsius) otherwise the charging process at low temp will damage them over the time.. that's why powertools lithium charger have a temp monitoring for hot and COLD temperature for the charging process. if temp is too low they will lower the charging current

Doc
 
some pics of my bat build....unfinished but functioning
Photo0022.jpg
and balance leads hooked up
ballance leads.jpg
and the balancing charger
Photo0024.jpg

just thought i would share...
 
nebriancent said:
some pics of my bat build....unfinished but functioning
View attachment 2
and balance leads hooked up
View attachment 1
and the balancing charger


just thought i would share...
Great job!

You will get alot of power out of these :mrgreen:

Doc
 
Found some of the rare 26650VT cells for sale on ebay:

http://www.ebay.com.au/itm/Lot-200-Sony-26650VT-2-5-Ah-Lithium-Ion-Batteries-/150606747127

lot of 200. Bit expensive. I wouldnt mind some more to add to my 60 cells I already have. But not at this price
 
i would love to hop on those 26650VT cells like a fat kid on a smarty but i am raising 3 kids, broke allot of the time, and most of all i am really cheap
 
not to mention that the doc here is offering a unbeatable value in a safe liXX chemistry and all his packs come pre tested for charge cycles on a ligit makita tester
(the main reason i decided to buy his instead of some others being offered at a slightly lower cost.. at least some knowledge of history instead of just resting voltage per pack when acquired)
 
Are the cells in these drill packs the same as the loose 18650 cells you can buy like these ?

http://www.ebay.co.uk/itm/4x-18650-3000mAh-RECHARGEABLE-BATTERY-CELL-3-7v-Li-ion-/270694461158?pt=UK_ConsumerElectronics_Batteries_SM&hash=item3f06a5aee6

Regards

Jerry
 
Absolutly NOT.

These cells in teh link you posted are LiCo cells ( lithium cobalt) they have more energy per gram but they are dangerous.

The 18650 cells the drill pack have MUST be made for tough environment and be safe and they are.

The 18650 the drill pack i sale aere Lithium Manganese ( LiMn) and are safe anc have higher power density but a bit less energy density)

Doc
 
Back
Top