Liquid Cooling MXUS 3000 using a Kit from Linukas

madin88 said:
thanks for sharing some pics^^ whats the size of the bearings you will use?
I will install 42/30/7 2pcs for longer lifesspan. They leave enough thread left for brake rotor srews after machining the sidecover. Ceramic would be awesome, but from what i have seen they are very expensive so i ordered FAG / SKF "RS" bearings.

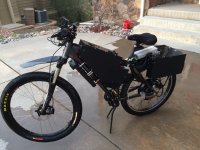
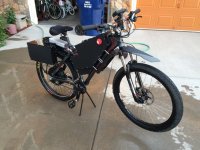
No problem on the pics, I feel I owe it to the community with all the great information I have acquired over the past two years. It has made my building much easier.

I am planning on installing only 1 40/30/7 bearing for three reasons. Whether these are good reasons I don't know.
1: Cost of the two bearings. I could have probably purchased two ABEC 1 bearings for the price of my 1 supposed ABEC5 bearing, so not the best excuse.

2: After looking at the measurements of the motor cover I thought it would be better to leave more support material on the cover, plus if you machine an opening to fit two bearings the backs of the disk brake mount screw holes will be open to the bearing surface. I wish they made a 42/30/10, that would have been my first choice. If this bearing fails too early I can always machine the cover to fit a second bearing.

3: I thought for reassembly and disassembly removing with a single bearing will be much easier.

So are you installing a heavier axle? Will you be incorporating any type of active cooling? Also be curious to see how your two 7mm wide bearing setup works.

Ed
 
That Axle is nice!
I got the V1 also and was surprised on how small the flat part of the axle was.
I'm McLovin this thread keep up the great work!
I'm going to let mine buck as is at first, but will prob be doing this also.

Advantages of V1:
A little bit lighter and this cool kit for cooling! punny
 
edventure said:
So are you installing a heavier axle? Will you be incorporating any type of active cooling? Also be curious to see how your two 7mm wide bearing setup works.

Ed

yep you have right the brake rotor bolts will be open to the bearings. if i can find a thin washer with bearing size i will put it between. than hopefully adding silicone between washer and sidecover or loctite screwlock in the thread will make them watertight again..

the axle will be same like yours from linas. only small changes for V2 motor with Al stator. i will not install a watercooling kit, however the axle also will have two nuts so i have the option for it.
to improve heat shedding i will install a 140mm fan to the chain side sidecover and little heatsinks which soak heat and also work like a radial fan (the heatsinks will have very small gap between sidecover and AL stator). if the motor spins they will create air flow over end turn windings, through the stator teeth and air gap. it will never be as good as watercooling but better than nothing. For example if i push my cromotor hard, stop riding and touch the sidecovers, they are always near outside temp. after few minutes standstill they become hot, so moving air inside the motor will definitely improve cooling. the question is how much..

EDIT: are you sure you meant 40-30-7 bearing? I could only find 42-30-7 types like i'll use..
 
Definately gonna try that!
Thanks for posting and sharing the struggle points, I'm sending you good vibes for the effort. :D
 
Whoa, what a project! Having one of these motors, loved the pictures on its disassembly. Not that I'll likely undertake doing so myself - I'd just end up muxing up the MXUS and be left with nothing but scrap metal. There has to be an easier way to keep the motor cool. Just to confirm - is this a 4T? Need to first get my motor operational, then get a CAv3, monitor temperatures for a while and see just what my situation might be with high temps on a 5T running in NE.
 
Run it all day long at 3,200watts. I guess 5,000 will make it sing and at a point for the Johncr hand temperature checks above 5,000 monitor with temp sensor. Now this is my quess. So what controller do you have, Paul's 12fet no worries.
This cooling system is for the 6,000 plus x people when they boog down up a steep hill ect.
I just want hear what wattage they will be using ?
 
999zip999 said:
Run it all day long at 3,200watts. I guess 5,000 will make it sing and at a point for the Johncr hand temperature checks above 5,000 monitor with temp sensor. Now this is my quess. So what controller do you have, Paul's 12fet no worries.
This cooling system is for the 6,000 plus x people when they boog down up a steep hill ect.
I just want hear what wattage they will be using ?
Ha, gottcha. Not my crowd. These are the real speed demons, pressing the limits of whats possible, John in CR's clan. But yea, what's the motor turn count, watts and battery juicing this? :?:
 
About the axel big slot to insert the watercooling tube and phase wires.. just pay attention to not make it too wide for nothing!! on my liquidcooled 5403, the bearing/axel mechanical contact got loose after few hundred miles. I suspect that this is due to the bearing I.D. to not be supported inside for large portion of circumference form the axel, making the 2 edges of the slot to take all the load and radius at this place prematurely is reduced.... the bearing is made to be supported for 360 degree circumference when the rei sa larger portion of it that is not supported this force the axel at this area and create a gap under the bearing near the edges...

Doc
 
good point Doc, as the bearings are very thin this could really result in a problem or much shorter bearing life. i believe how big or small the problem will be depends on if the axle flat part is vertically mounted or horizontal. i mean the point with highest / longest lasting load should have support.
filling up this gap with some very hard glue (i think of JB weld or some kind of epoxy to glue steel) should give 360° support if it does not crumble up :)
 
madin88 said:
good point Doc, as the bearings are very thin this could really result in a problem or much shorter bearing life. i believe how big or small the problem will be depends on if the axle flat part is vertically mounted or horizontal. i mean the point with highest / longest lasting load should have support.
filling up this gap with some very hard glue (i think of JB weld or some kind of epoxy to glue steel) should give 360° support if it does not crumble up :)

Use a bearing with a larger ID and a bushing with an ID of the original and an OD of the new bearing to eliminate the problem issue.
 
the bearings are already so thin a bushing would not fit. they are 42/30/7 (2 pcs on mine). however for future axle makings this would be a good improvement. Or let some land in the middle of the milling groove so the bearing has at least one support point in the middle. there is anyway so much space in the groove..
i will use strong metal epoxy.
 
999zip999 said:
Run it all day long at 3,200watts. I guess 5,000 will make it sing and at a point for the Johncr hand temperature checks above 5,000 monitor with temp sensor. Now this is my quess. So what controller do you have, Paul's 12fet no worries.
This cooling system is for the 6,000 plus x people when they boog down up a steep hill ect.
I just want hear what wattage they will be using ?

I have some Linas 4503 WC and AC options motors. Without cooling are 40 - 60A good but the motor get warm and hot. With WC, only for first testing a very simple style WC are 100A - 120A ok. The battery is 24S16P Sony VTC4. The Linas option motors are best ever seen. I have no more temperature problems.
 
UPDATE: Well I did finally finish this project early last June, but then had too many other things going on to finish my post about all the trials and tribulations of getting this back together and operational. I drove it all summer and put another 1000 miles on it until about the middle of September when about half the way to work, "about 10 miles" the motor stopped working again. :evil: I hit the throttle coming around a turn and it just started vibrating, but no forward motion. My wife was able to bring me my backup controller, but to no avail, so there was something wrong with the motor again. I had connected the water pump to my headlight switch so I could cycle the pump on and off if needed. This may have been a mistake, because I had noticed I did not turn it on the morning it stopped working. I do know the phases have not shorted, so I am thinking it must be a blown hall sensor, but I have not had the time or motivation to disassemble it again. I am planning on doing this soon, since a friend of mine at work, "fritzebike" is now building up his Flux Frame he has just ordered from Hyena and is giving me the itch again. I would still like to finish this thread since I still have a lot of good photos and info to go with it. I placed a couple here of after I had completed it. You can see the water pump just forward the rear wheel on the left side. When I ran the pump, I could drive the 20 miles to work and the motor would only be a tad warmer than ambient temp, so it did seem to work and was effective. I am curious to open it up to see what has failed and will post once I do. I will try to finish the build thread I started here too. Time & money never enough of either.

The radiator was one used to cool computer CPUs and has a built in reservoir at the top, it fit the bike perfectly. The only thing I did not like was the spacers that held the radiator were silver color. I should have painted them, but never got around to doing it.

Ed
 

Attachments

  • thumb_IMG_7197_1024.jpg
    thumb_IMG_7197_1024.jpg
    133.3 KB · Views: 2,401
  • thumb_IMG_7198_1024.jpg
    thumb_IMG_7198_1024.jpg
    128.1 KB · Views: 2,401
Dont give up !!

That's a very nice project, motor cut out is popular but once you solve it once for all fun is back! :wink:

Doc
 
are these water cooling kits still available?....i have an MXUS 4T motor build being built right now
 
For future reference, going with two ABEC1 bearings stacked vs. one ABEC5, you may still get better results from more bearings; there's been a few whitepapers where people have built high accuracy spindles by stacking deep groove bearings 3-4 high rather than use super expensive tapered roller bearings, and they get higher load capabilities/accuracy to boot.
 
edventure said:
I do know the phases have not shorted, so I am thinking it must be a blown hall sensor, but I have not had the time or motivation to disassemble it again.

No need to disassemble to check for working halls. You can check with the motor on the bike and wheel in the air using a multimeter. I had a failed JST plug that threw me for a loop. The divider between two of the pins on the female side of the plug was malformed internally and after 100 miles of riding began allowing intermittent continuity between two of the hall sensor pins. That was a fun one and has made me take a much a closer look at every little plastic piece before I use it in a wiring harness.
 
edventure said:
UPDATE: Well I did finally finish this project early last June, but then had too many other things going on to finish my post about all the trials and tribulations of getting this back together and operational. I drove it all summer and put another 1000 miles on it until about the middle of September when about half the way to work, "about 10 miles" the motor stopped working again. :evil: I hit the throttle coming around a turn and it just started vibrating, but no forward motion. My wife was able to bring me my backup controller, but to no avail, so there was something wrong with the motor again. I had connected the water pump to my headlight switch so I could cycle the pump on and off if needed. This may have been a mistake, because I had noticed I did not turn it on the morning it stopped working. I do know the phases have not shorted, so I am thinking it must be a blown hall sensor, but I have not had the time or motivation to disassemble it again. I am planning on doing this soon, since a friend of mine at work, "fritzebike" is now building up his Flux Frame he has just ordered from Hyena and is giving me the itch again. I would still like to finish this thread since I still have a lot of good photos and info to go with it. I placed a couple here of after I had completed it. You can see the water pump just forward the rear wheel on the left side. When I ran the pump, I could drive the 20 miles to work and the motor would only be a tad warmer than ambient temp, so it did seem to work and was effective. I am curious to open it up to see what has failed and will post once I do. I will try to finish the build thread I started here too. Time & money never enough of either.

The radiator was one used to cool computer CPUs and has a built in reservoir at the top, it fit the bike perfectly. The only thing I did not like was the spacers that held the radiator were silver color. I should have painted them, but never got around to doing it.

Ed

I'm really interested in your work, it would be very helpful to let us all know how you have got on? hoping to see you back soon! :)
 
Back
Top